There’s something undeniably comforting about the aroma of fresh bread wafting through your home, and that’s precisely what you can expect when making No Knead Whole Wheat Dutch Oven Bread. My journey with bread baking began a few years ago, and I quickly realized that the no-knead method was a game changer. I remember the first time I pulled a perfect loaf out of the oven; it was both beautiful and fragrant, a true testament to the magic of simple ingredients coming together. This method allows you to achieve that artisanal crust and chewy interior without the usual hassle of kneading, making it perfect for anyone, from novice bakers to seasoned pros.
Recipe Snapshot
60 mins
10 mins
50 mins
Medium
150 kcal
5 g
Vegan
1 g
Dutch Oven, Parchment Paper, Kitchen Scale
What We Adore About This No Knead Whole Wheat Dutch Oven Bread
1. Simple Ingredients with Maximum Flavor
One of the things I love most about No Knead Whole Wheat Dutch Oven Bread is its simplicity. The ingredients are straightforward: just whole wheat flour, kosher salt, dry active yeast, and warm water. Each component plays a crucial role, with the whole wheat flour giving the bread its hearty flavor and nutritional benefits. You won’t find any preservatives or artificial additives here, just nature’s best.
2. Effortless Preparation
You might think that making bread takes hours of work, but this recipe proves that wrong. With minimal active time, you can mix the ingredients and let them do their thing for up to 18 hours! I often prepare the dough in the evening, allowing it to rise overnight, then bake it fresh the next day. The anticipation builds as I wait for it to bake, and the delightful smell fills my kitchen.
3. Perfect Crust and Texture
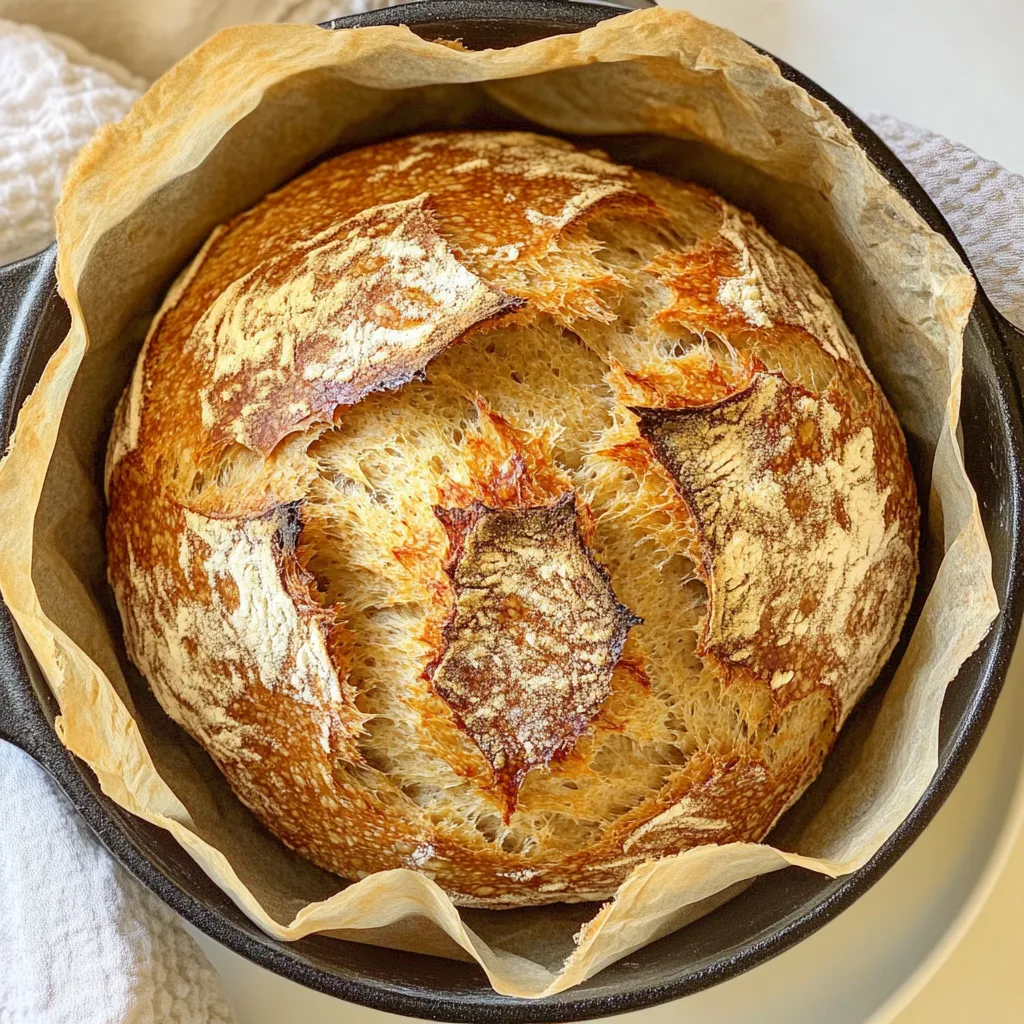
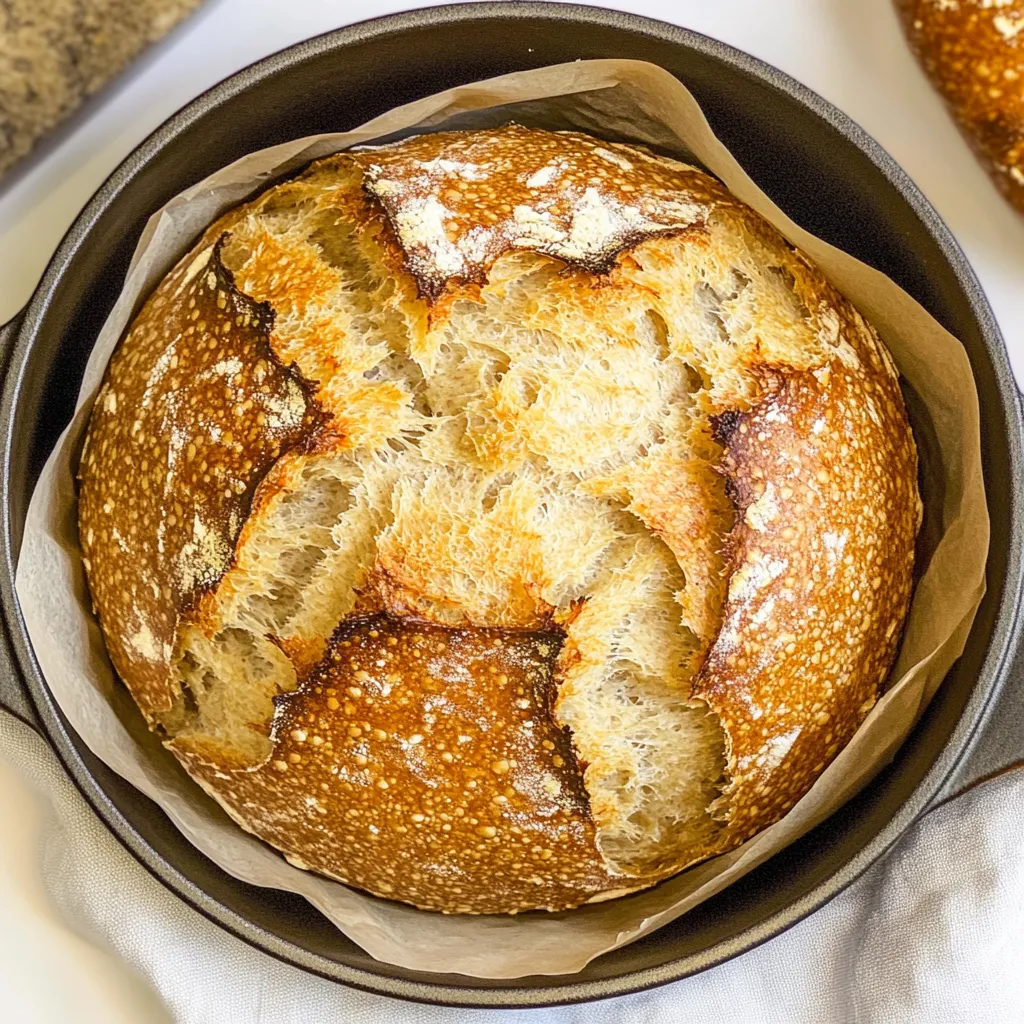
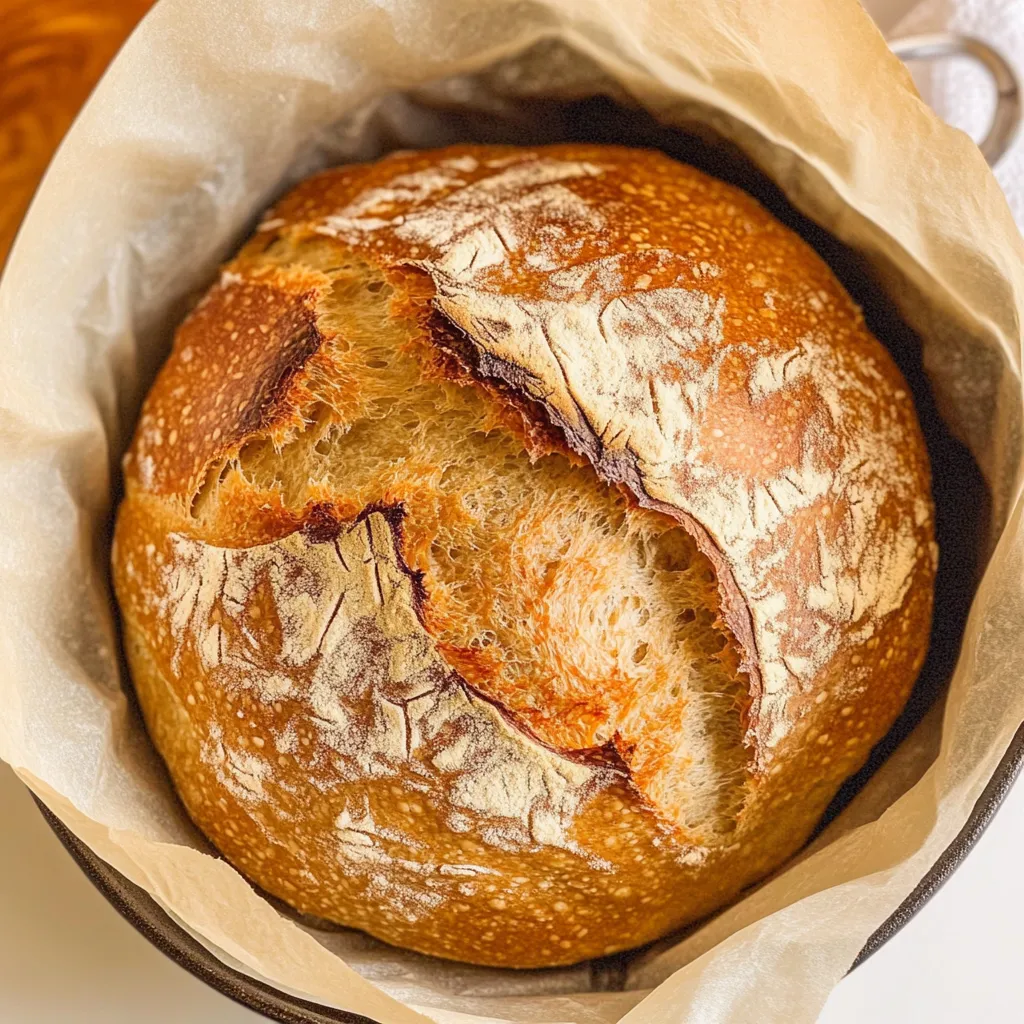
The use of a Dutch oven is crucial in this recipe. The lid traps steam, creating that perfect crust that’s crispy on the outside and soft and chewy on the inside. When I hear that satisfying crackle as I slice into the loaf, I know I’ve nailed it. There’s something so satisfying about achieving that professional bakery-quality bread right in your own home.
4. Versatile and Adaptable
Another great aspect of No Knead Whole Wheat Dutch Oven Bread is its versatility. You can easily customize it with herbs, seeds, or even a mix of flours to suit your taste. Want a hint of rosemary or a sprinkle of sesame seeds on top? Go for it! This bread is your canvas, and you can create your own masterpiece.
5. Healthier Choice
For those of us looking to incorporate more whole grains into our diet, this bread is a fantastic option. Whole wheat flour offers more fiber and nutrients compared to all-purpose flour, making each slice a nourishing choice. I love serving it with soups or toasting it for breakfast; it’s a great way to start the day on a healthy note.
6. Great for Sharing
There’s nothing better than sharing a loaf of homemade bread with friends and family. Every time I bake this bread, I’m reminded of the joy of gathering around the table, breaking bread, and sharing stories. Whether it’s a family meal or a cozy gathering, No Knead Whole Wheat Dutch Oven Bread is sure to impress.
Ingredient List for No Knead Whole Wheat Dutch Oven Bread
Each ingredient in this recipe plays a pivotal role in achieving the ideal loaf. The combination of whole wheat flour, kosher salt, yeast, and warm water not only brings flavor but also structure, ensuring a delightful texture that you can’t resist. These humble ingredients work together in harmony, making the No Knead Whole Wheat Dutch Oven Bread a wholesome and satisfying choice.
- 500 grams whole wheat flour (~3¾ cups): This is the backbone of your bread, providing a rich flavor and a delightful nuttiness. Whole wheat flour is packed with nutrients, making your loaf not just tasty but also healthier.
- 2 teaspoons kosher salt: Salt is essential for flavor and also strengthens gluten in the dough, helping to achieve a better structure.
- 1 teaspoon dry active yeast: This small but mighty ingredient is what brings your bread to life, allowing it to rise and become fluffy.
- 2 cups warm water (between 100-115℉): The warm water activates the yeast, helping your dough to rise efficiently. Ensuring the right temperature is key to a successful rise.
Putting Together No Knead Whole Wheat Dutch Oven Bread

Making No Knead Whole Wheat Dutch Oven Bread is a straightforward process that yields amazing results. You’ll find that once you master this method, bread baking will become a regular part of your routine. Let me guide you through the steps.
Start by placing a large mixing bowl on a kitchen scale. Change the unit to grams and zero it out. Measure out 500 grams of whole wheat flour into the bowl. If you don’t have a scale, don’t worry. You can fluff the flour in its container, spoon it into a measuring cup, and level it off until it amounts to roughly 3¾ cups.
Next, add 2 teaspoons of kosher salt and 1 teaspoon of dry active yeast to the flour. Mix well to incorporate all the dry ingredients together.
Now, it’s time to add 2 cups of warm water. Use a wooden spoon or spatula to mix until all the flour is fully moistened. Be careful not to overmix; you just want to combine everything until there are no dry pockets of flour left.
Cover the mixing bowl with plastic wrap or a clean kitchen towel. Let the dough rest at room temperature for at least 8 hours, or if you have the time, up to 18 hours. This long resting period is crucial for developing flavor and structure.
After the dough has risen nicely, turn it out onto a lightly floured piece of parchment paper or a floured surface. Lightly flour your hands and roughly shape the dough into a circle. Keep in mind that the dough will be sticky, so don’t be alarmed!
While you’re shaping the dough, preheat your oven to 450℉ (230℃) with your Dutch oven (with the lid) placed inside. This step is essential for creating that perfect crust.
Once the oven is preheated, carefully remove the Dutch oven and gently drop the shaped dough into it. It’s okay if it’s not perfect; rustic is part of the charm!
Place the lid on the Dutch oven and bake for 30 minutes. After this first phase, carefully remove the lid and continue baking for an additional 20 minutes, or until the bread is golden brown and the internal temperature reaches between 207-209°F (97-98℃).
Once baked, carefully remove the bread from the Dutch oven and let it cool on a wire rack for 30 to 45 minutes before slicing. This cooling period allows the texture to develop fully, making for a better slice.
Things Worth Knowing
- High Hydration Dough: The no-knead method relies on a high hydration dough, which helps create a more open crumb and chewy texture. Don’t be afraid of the stickiness!
- Patience is Key: Allowing the dough to rest for a long period is essential for flavor development. Don’t rush this step!
- Watch Your Oven Temperature: Every oven behaves differently. It’s a good idea to use an oven thermometer to ensure accurate baking temperatures for the best results.
- Cycle Between Cooling and Heating: When working with the Dutch oven, avoid drastic temperature changes. Cooling it slowly helps maintain its integrity.
Pro Tips and Tweaks
If you’re looking to perfect your loaf or customize your No Knead Whole Wheat Dutch Oven Bread, here are some pro tips to consider.
- Storage: To store your bread, let it cool completely, then wrap it in plastic wrap or foil and place it in an airtight container. It should stay fresh for up to 3 days.
- Freezing: You can freeze the bread for longer storage. Wrap it tightly in foil and place it in a freezer-safe bag. It can be frozen for up to 1 month. Just defrost at room temperature when you’re ready to enjoy it again.
- Pairing: This bread goes well with a variety of dishes. Serve it alongside soups, salads, or as a base for sandwiches. It’s versatile enough to complement many meals!
- Experiment with Flavors: Don’t hesitate to add ingredients such as herbs or seeds to the dough for added flavor. Think rosemary, thyme, or even sunflower seeds for a twist!
- Dutch Oven Choice: Use a Dutch oven that suits your needs; the size can affect the shape and height of your loaf. A 4-quart Dutch oven works beautifully for a tall bread.
- Keep the Dough Covered: During the rising time, ensure the dough is well covered to prevent it from drying out. A clean kitchen towel works wonderfully.
Side Dish Ideas for No Knead Whole Wheat Dutch Oven Bread
When it comes to serving No Knead Whole Wheat Dutch Oven Bread, the possibilities are endless. Here are some delightful ideas to enhance your meals:
- Soup Pairing: This bread is fantastic with hearty soups like lentil, tomato basil, or vegetable chowder. The crusty exterior is perfect for dipping!
- Salads: Serve slices alongside fresh salads. A classic Caesar or a vibrant quinoa salad will complement the bread beautifully.
- Breakfast Toast: Try toasting the bread for a delicious breakfast. Add smashed avocado, a sprinkle of salt, and a drizzle of olive oil for a nutritious start to your day.
- Cheese Platter: A cheese board with your favorite cheeses and some olives makes for a delightful appetizer or a light dinner, with your homemade bread as the star.
- Grilled Dishes: Serve with grilled meats or vegetables during BBQ season. The bread acts as a perfect accompaniment to soak up delicious juices.
- Bruschetta: Slice and toast the bread, then top with fresh tomatoes, basil, and balsamic glaze for an easy and impressive appetizer.
FAQ
Conclusion
The No Knead Whole Wheat Dutch Oven Bread is truly a game changer for home bakers. Its simple ingredients and hands-off method allow anyone to achieve bakery-quality bread right in their kitchen. I encourage you to give it a try; you’ll be amazed at how easy and rewarding it is to create your own bread. Trust me, once you experience that first warm slice right out of the oven, you’ll understand why baking bread becomes a beloved ritual.
No Knead Whole Wheat Dutch Oven Bread
Ingredients
Equipment
Method
- Start by placing a large mixing bowl on a kitchen scale. Change the unit to grams and zero it out. Measure out 500 grams of whole wheat flour into the bowl. If you don’t have a scale, don’t worry. You can fluff the flour in its container, spoon it into a measuring cup, and level it off until it amounts to roughly 3¾ cups.
- Next, add 2 teaspoons of kosher salt and 1 teaspoon of dry active yeast to the flour. Mix well to incorporate all the dry ingredients together.
- Now, it’s time to add 2 cups of warm water. Use a wooden spoon or spatula to mix until all the flour is fully moistened. Be careful not to overmix; you just want to combine everything until there are no dry pockets of flour left.
- Cover the mixing bowl with plastic wrap or a clean kitchen towel. Let the dough rest at room temperature for at least 8 hours, or if you have the time, up to 18 hours. This long resting period is crucial for developing flavor and structure.
- After the dough has risen nicely, turn it out onto a lightly floured piece of parchment paper or a floured surface. Lightly flour your hands and roughly shape the dough into a circle. Keep in mind that the dough will be sticky, so don’t be alarmed!
- While you’re shaping the dough, preheat your oven to 450℉ (230℃) with your Dutch oven (with the lid) placed inside. This step is essential for creating that perfect crust.
- Once the oven is preheated, carefully remove the Dutch oven and gently drop the shaped dough into it. It’s okay if it’s not perfect; rustic is part of the charm!
- Place the lid on the Dutch oven and bake for 30 minutes. After this first phase, carefully remove the lid and continue baking for an additional 20 minutes, or until the bread is golden brown and the internal temperature reaches between 207-209°F (97-98℃).
- Once baked, carefully remove the bread from the Dutch oven and let it cool on a wire rack for 30 to 45 minutes before slicing. This cooling period allows the texture to develop fully, making for a better slice.
Notes
- Enameled Dutch Oven: If your manufacturer's brand recommends NOT preheating the pan empty, skip the preheat and bake for 40 minutes covered, then remove the lid and continue to bake for 20 minutes.
- Dutch Oven Pan: Anywhere from a 3.5 to a 6-quart dutch oven with a lid will work to bake this bread. A smaller Dutch oven yields a higher, rounder loaf, while a larger Dutch causes the dough to spread more. While still delicious, the bread will be flatter. I prefer a 4-quart Dutch oven for a beautiful tall loaf.
- Flour: You can swap the whole wheat flour out for whole white wheat flour, whole wheat pastry flour, bread flour, all-purpose flour, or a combination of flours. Whatever flour used, it must measure 500 grams. And because different varieties of flour have different weights, a scale is critical here. Gluten-free flour blends and self-rising flour are not recommended.
- Yeast: Be sure your yeast is NOT expired and use dry active yeast (NOT quick-rise or instant yeast).
- Storage: To store, let the bread cool to room temperature and then wrap it in plastic wrap and foil or place it in an airtight container. Use within 3 days. Alternatively, wrap well in foil, place in freezer-safe bag, and freeze for up to 1 month. Defrost at room temperature.
- Prevent Sticking: If your pan is high-quality, you should have no issues with the dough sticking to the pan. However, some people have reported this issue. To prevent this from happening, use parchment paper that is suited for 450℉. I don't recommend greasing the pan, as the oil can burn at the high temperature the bread is baked at.