There’s something so comforting about Garlic Chicken Bites that takes me back to simpler times. Picture this: a cozy evening at home, the scent of garlic wafting through the air, making my mouth water in anticipation. I remember the first time I prepared these little gems for my family; they devoured them within minutes! The combination of tender chicken and fragrant garlic creates a delightful experience that feels special yet is so simple to whip up. Honestly, it has become a staple in our household, perfect for any occasion.
Every time I serve Garlic Chicken Bites, I can count on smiles all around the table. It’s not just about the flavors; it’s about the memories we create over shared meals. Whether it’s a weeknight dinner or a gathering with friends, these bites always impress. So let’s dive into this recipe and recreate that homey feeling together, shall we?
Recipe Snapshot
30 mins
5 mins
25 mins
Medium
350 kcal
30 g
Keto, Paleo, Whole30
24 g
Wooden Spoon, Chef’s Knife, Frying Pan, Skillet
The Charm of This Garlic Chicken Bites
Unforgettable Flavor
One of the main reasons I adore these Garlic Chicken Bites is the unforgettable flavor they offer. The garlic, sautéed to perfection, infuses the chicken with a rich, aromatic essence, making each bite a burst of deliciousness. You truly can’t go wrong with such a classic combination!
Quick and Easy Prep
If you’re pressed for time, you’ll love how quickly this recipe comes together. With just a handful of ingredients, you can have a mouthwatering dish ready in no time. Plus, there’s something incredibly satisfying about cooking with simplicity without sacrificing flavor.
Perfect for Any Occasion
From family dinners to casual gatherings, these Garlic Chicken Bites are versatile enough to fit any scenario. They can serve as an appetizer or a main dish, allowing you to cater to your guests’ preferences effortlessly.
Healthy Indulgence
What’s great about this recipe is that it’s naturally gluten-free and low in carbs. It tickles my taste buds without leaving me feeling heavy. It’s a testament to how delicious food can also be nutritious, making it a guilt-free indulgence!
Cooking Techniques that Shine
Utilizing low heat to cook the garlic ensures it becomes soft and flavorsome without burning. This technique enhances the dish significantly, allowing the chicken to soak up all the garlicky goodness. Trust me, the careful, loving approach to each step makes a difference!
Family-Friendly Fun
These bites are a hit with kids too! Their delightful flavor and bite-sized pieces make them approachable for even the pickiest eaters. Cooking together as a family can create lasting memories, and this recipe is perfect for some hands-on fun in the kitchen.
Everything You Need for Garlic Chicken Bites
Creating the perfect Garlic Chicken Bites starts with the right ingredients, each playing its unique role in crafting this delectable dish. The combination of fresh garlic, tender chicken, and aromatic olive oil works harmoniously to deliver a memorable flavor experience. Let’s take a closer look at these key players:
- 2 lbs of chicken breast, boneless, skinless: The star of the dish, this tender meat serves as the canvas for our flavors. It cooks quickly and absorbs the aromas beautifully.
- 1/4 cup extra virgin olive oil: This healthy fat not only helps to cook the chicken but also adds depth and richness to the overall flavor.
- 20 cloves of garlic, divided: Garlic is the true hero here! The first batch becomes deliciously sweet and roasted, while the pressed garlic adds a sharp, aromatic punch at the end.
- 1/2 tsp salt: Essential for enhancing all the flavors in the dish.
- 1/2 tsp pepper: Adds that little kick that balances the sweetness of the garlic.
- 2 tbsp parsley, chopped: A fresh herb that brings color and a light zest, finishing off the dish beautifully.
How to Assemble Garlic Chicken Bites
As we dive into making Garlic Chicken Bites, it’s all about the love and attention you give to each step. Cooking is an art, and this dish allows you to express that creativity while providing delicious results. Let’s break it down step by step:
Start by pouring the olive oil into a medium skillet. Add around 15 cloves of garlic (don’t worry, we have more to use later!). Set the heat to low and let them cook for about 20 minutes. This slow cooking will transform the garlic into a golden-brown delight. Stir it every 5 minutes, keeping a close eye to avoid burning.
While the garlic is cooking, take the chicken breasts and cut them into 1 inch pieces. Remove any excess fat for a cleaner bite. Once cut, season the pieces evenly with salt and pepper to ensure every piece is flavorful.
After 20 minutes, your garlic should be soft and golden brown. Carefully remove it from the pan and set aside. Don’t throw away that delicious oil; drain and reserve it for the next step.
Now, add one tablespoon of the reserved garlic oil back into the skillet over high heat. Allow it to heat up, ensuring your cooking surface is hot for the chicken.
Once the oil is hot, add the seasoned chicken pieces to the pan in a single layer. If your skillet isn’t large enough, you may need to work in two batches. Let the chicken cook undisturbed for about 3 to 4 minutes. This allows it to develop a nice golden crust.
After the first side is cooked, flip the chicken over and let it cook for an additional minute. Then, stir in the pressed garlic (the remaining 5 cloves) and continue cooking for another 1 to 2 minutes. You’ll notice the aromatic smell filling your kitchen!
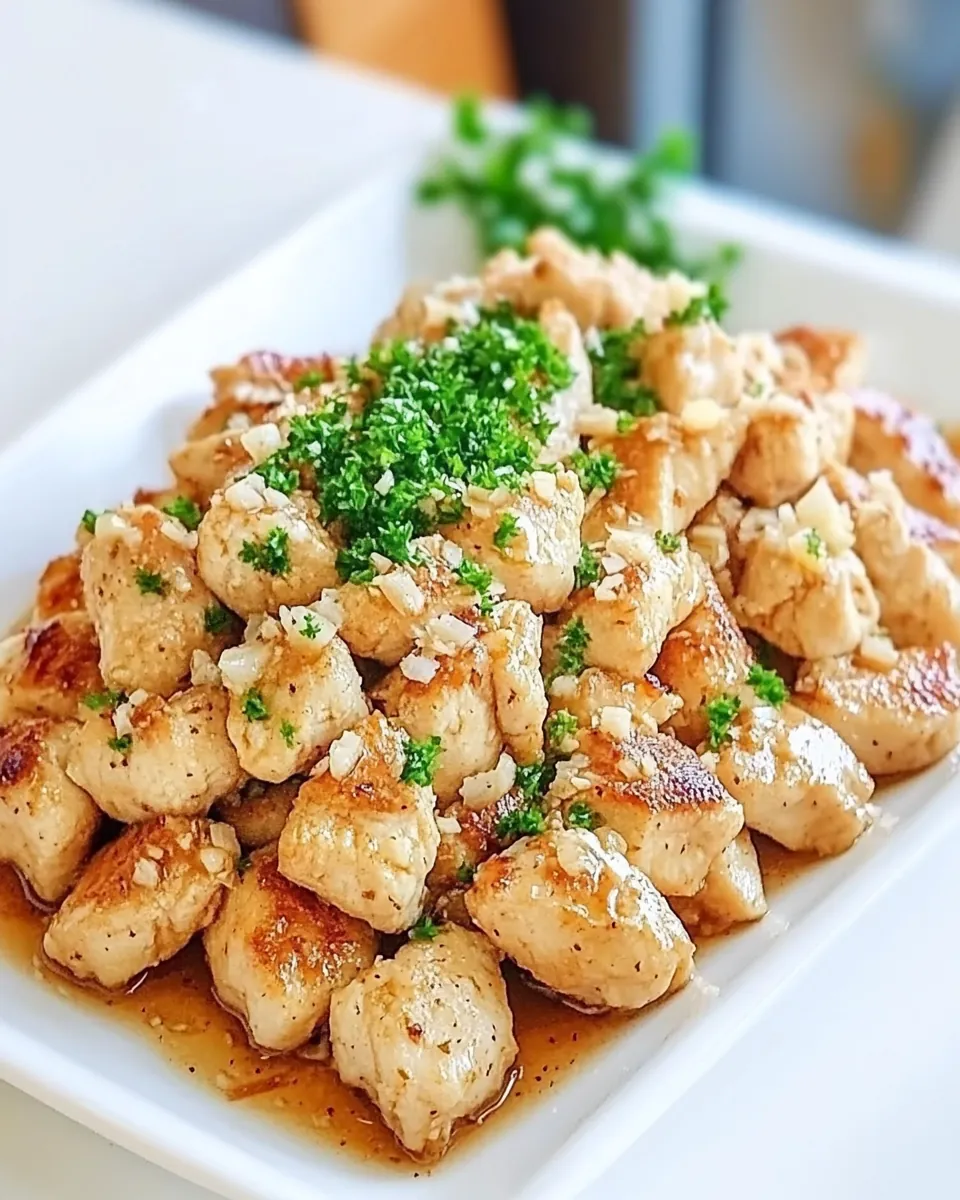
Once the chicken is thoroughly cooked and golden brown, remove it from the pan. Add the reserved garlic back into the skillet and toss it with the chicken pieces and chopped parsley.
Serve the Garlic Chicken Bites immediately while they’re hot and aromatic. They’re perfect on their own or with a side of your favorite dipping sauce!
Things Worth Knowing
- Use Fresh Garlic: Using fresh garlic instead of pre-minced enhances the flavor immensely.
- Temperature Matters: Ensure the oil is hot enough when adding the chicken for that perfectly crispy exterior.
- Batch Cooking: If cooking in batches, keep the first batch warm in the oven while you finish the second.
- Resting Time: Letting the chicken rest for a few minutes after cooking helps retain juiciness.
Ways to Adapt This Recipe
There are so many ways to make Garlic Chicken Bites your own! Here are a few tips to consider:
- Storage: Leftover Garlic Chicken Bites can be stored in an airtight container in the fridge for up to three days.
- Freezing: You can freeze the cooked chicken bites for up to three months. Just reheat when you’re ready to eat!
- Pairing: These bites go wonderfully with a side salad or roasted vegetables for a complete meal.
- Spicy Kick: Add a pinch of red pepper flakes when cooking for a spicy variation.
- Herb Variations: Experiment with different herbs like thyme or rosemary for unique flavors.
What to Pair With Garlic Chicken Bites
Serving your Garlic Chicken Bites is just as important as making them. Here’s how to create the perfect dining experience:
- Side Salads: A fresh garden salad with crisp greens and a light vinaigrette complements the rich flavors perfectly.
- Roasted Vegetables: Seasonal veggies like carrots, zucchini, or bell peppers add color and nutrition on the side.
- Pasta Dishes: Consider serving these bites alongside a light pasta, perhaps with a garlic and olive oil sauce.
- Rice Options: Fluffy jasmine or basmati rice can soak up the delicious garlicky oil beautifully.
- Special Occasions: Whether it’s a family dinner or a casual get-together, these bites are sure to impress your guests and make the meal memorable.
- Perfect for Game Days: Serve them as finger food during sports gatherings for a hit that everyone will love!
FAQ
Conclusion
The beauty of **Garlic Chicken Bites** lies in their delightful simplicity and delicious flavors. They bring a comforting warmth to any meal and are sure to become a favorite for your family as they have for mine. I encourage you to try this recipe and experience the joy it brings. Happy cooking!
Garlic Chicken Bites
Ingredients
Equipment
Method
- Start by pouring the olive oil into a medium skillet. Add around 15 cloves of garlic (don’t worry, we have more to use later!). Set the heat to low and let them cook for about 20 minutes. This slow cooking will transform the garlic into a golden-brown delight. Stir it every 5 minutes, keeping a close eye to avoid burning.
- While the garlic is cooking, take the chicken breasts and cut them into 1 inch pieces. Remove any excess fat for a cleaner bite. Once cut, season the pieces evenly with salt and pepper to ensure every piece is flavorful.
- After 20 minutes, your garlic should be soft and golden brown. Carefully remove it from the pan and set aside. Don’t throw away that delicious oil; drain and reserve it for the next step.
- Now, add one tablespoon of the reserved garlic oil back into the skillet over high heat. Allow it to heat up, ensuring your cooking surface is hot for the chicken.
- Once the oil is hot, add the seasoned chicken pieces to the pan in a single layer. If your skillet isn’t large enough, you may need to work in two batches. Let the chicken cook undisturbed for about 3 to 4 minutes. This allows it to develop a nice golden crust.
- After the first side is cooked, flip the chicken over and let it cook for an additional minute. Then, stir in the pressed garlic (the remaining 5 cloves) and continue cooking for another 1 to 2 minutes. You'll notice the aromatic smell filling your kitchen!
- Once the chicken is thoroughly cooked and golden brown, remove it from the pan. Add the reserved garlic back into the skillet and toss it with the chicken pieces and chopped parsley.
- Serve the Garlic Chicken Bites immediately while they’re hot and aromatic. They’re perfect on their own or with a side of your favorite dipping sauce!
Notes
- Tip 1: This recipe is naturally gluten free, low carb, and friendly for low carb and keto diets. Please check all packages of products bought to ensure compliance.
- Tip 2: Nutrition facts provided based on my best estimation for the recipe and may not be accurate depending on what brands you use or modifications you make to the recipe.
- Tip 3: I recommend using a nutrition calculator with the exact brands and measurements you use for the most accurate calculation.