Every time I think of Fried Chicken, I can’t help but remember those warm, sunny Sundays at my grandmother’s house. The aroma of crispy chicken frying in the kitchen would fill the air, drawing everyone into the dining room, eager for a feast. I can still picture her turning each piece with care, ensuring they reached that golden-brown perfection. It wasn’t just a meal; it was a family tradition, a reason to gather, and a moment to appreciate the love that went into each batch. Making Fried Chicken has since become a cherished ritual in my own home, where I can pass down those same flavors and memories to my family. There’s something magical about the crunch of the skin and the juicy tenderness of the meat that makes this dish a favorite, not just for special occasions but for any day that calls for a little comfort food.
Recipe Snapshot
60 mins
40 mins
20 mins
Medium
450 kcal
40 g
Whole30, Vegan, Gluten-Free
25 g
Wooden Spoon, Mixing Bowl, Frying Pan, Skillet
The Magic of This Fried Chicken
Comfort Food at Its Best
When you think of comfort food, Fried Chicken instantly comes to mind. There’s something about it that wraps you in a warm embrace. It’s not just about the taste; it’s the entire experience of enjoying a beloved dish that’s been passed down through generations.
A Versatile Dish
Fried Chicken can be enjoyed in so many ways. Whether you like it spicy or mild, served with a side of mashed potatoes or in a sandwich, this dish adapts to your preferences effortlessly. You can customize the seasoning and even the cooking method, making it endless in possibilities.
Perfect for Gatherings
Gathering around a table filled with Fried Chicken creates memories. It’s perfect for picnics, family reunions, or a cozy dinner at home. The joy it brings when shared with loved ones is unmatched.
Great for Meal Prep
Another reason I adore Fried Chicken is its suitability for meal prep. You can fry a big batch and enjoy it throughout the week, whether on its own or incorporated into salads, wraps, or sandwiches.
A Dish Full of Flavor
From the juicy chicken to the crispy coating, every bite of Fried Chicken is packed with flavor. The combination of spices and the frying process creates a symphony of taste that’s hard to resist.
Childhood Memories
Each time I make this recipe, I’m transported back to those Sunday dinners at my grandmother’s. The love she poured into her cooking is something I strive to replicate with each batch of Fried Chicken. It connects me to my roots and keeps those cherished memories alive.
Ingredients Required for Fried Chicken

When it comes to making Fried Chicken, the ingredients are simple yet essential. Each component plays a crucial role in achieving that perfect balance of flavors and textures. The key players here are the chicken, which is the star, and the buttermilk that tenderizes, while the flour and seasonings give that iconic crispy coating. Together, they create a delicious dish that’s hard to resist.
- 4 lbs whole chicken cut into pieces – The heart of the dish, providing juiciness and flavor.
- Vegetable oil for frying – Essential for achieving that crispy texture.
- 2 cups buttermilk – Adds moisture and tenderizes the chicken beautifully.
- 2 cups pickle juice – A secret weapon for flavor and tenderness.
- 1/4 cup hot sauce (optional) – For those who love a spicy kick!
- 2 cups all-purpose flour – Creates the crispy crust we all crave.
- 1 tablespoon salt – Enhances the overall flavor.
- 1 teaspoon ground black pepper – Adds a hint of spice.
- 1 tablespoon smoked paprika – Brings warmth and depth to the flavor.
- 1 tablespoon garlic powder – A flavorful addition that complements the chicken perfectly.
Putting Together Fried Chicken
Making Fried Chicken can feel like a labor of love, but trust me, the results are well worth it! Let me guide you through the steps to create this mouthwatering dish that’s bound to impress. Follow along, and you’ll have crispy, flavorful chicken in no time!
- Begin by cutting the chicken into 8 to 10 smaller pieces. It’s important to discard the backbone, but don’t throw it away! You can save it for making rich and flavorful chicken stock.
- In a large bowl, combine the pickle juice and buttermilk. Stir well to blend the flavors. If you enjoy a bit of heat, add some hot sauce to the mix.
- Carefully immerse the chicken pieces into the mixture, ensuring they are fully coated. This step is crucial for achieving maximum flavor and tenderness. Cover and let it sit aside for 30 minutes, or refrigerate for up to 24 hours for a deeper flavor.
- While the chicken is marinating, prepare a flour mixture in a medium, shallow bowl. Combine the flour, salt, pepper, garlic powder, and smoked paprika. This blend will create that irresistible crust.
- Set up a wire rack on a baking sheet nearby; this will be essential for draining the chicken after frying.
- After the marination period, take one piece of chicken out of the buttermilk mixture. Dredge it in the flour mixture, ensuring an even coat, then place it onto the prepared cooling rack. Let it rest for 20 to 30 minutes to allow the coating to adhere better.
- If you’re short on time, you can add the flour mixture to a large baking dish, then toss in the chicken, ensuring each piece is thoroughly coated before transferring them to the rack.
- In a large deep frying pan, fill it halfway with vegetable oil. Heat the oil to 365 degrees Fahrenheit. It’s crucial that the oil is hot enough to achieve that perfect crispiness.
- Carefully place a few pieces of chicken into the hot oil, being cautious not to overcrowd the pan. Fry in batches for around 10 to 15 minutes, or until each piece is golden brown and cooked through.
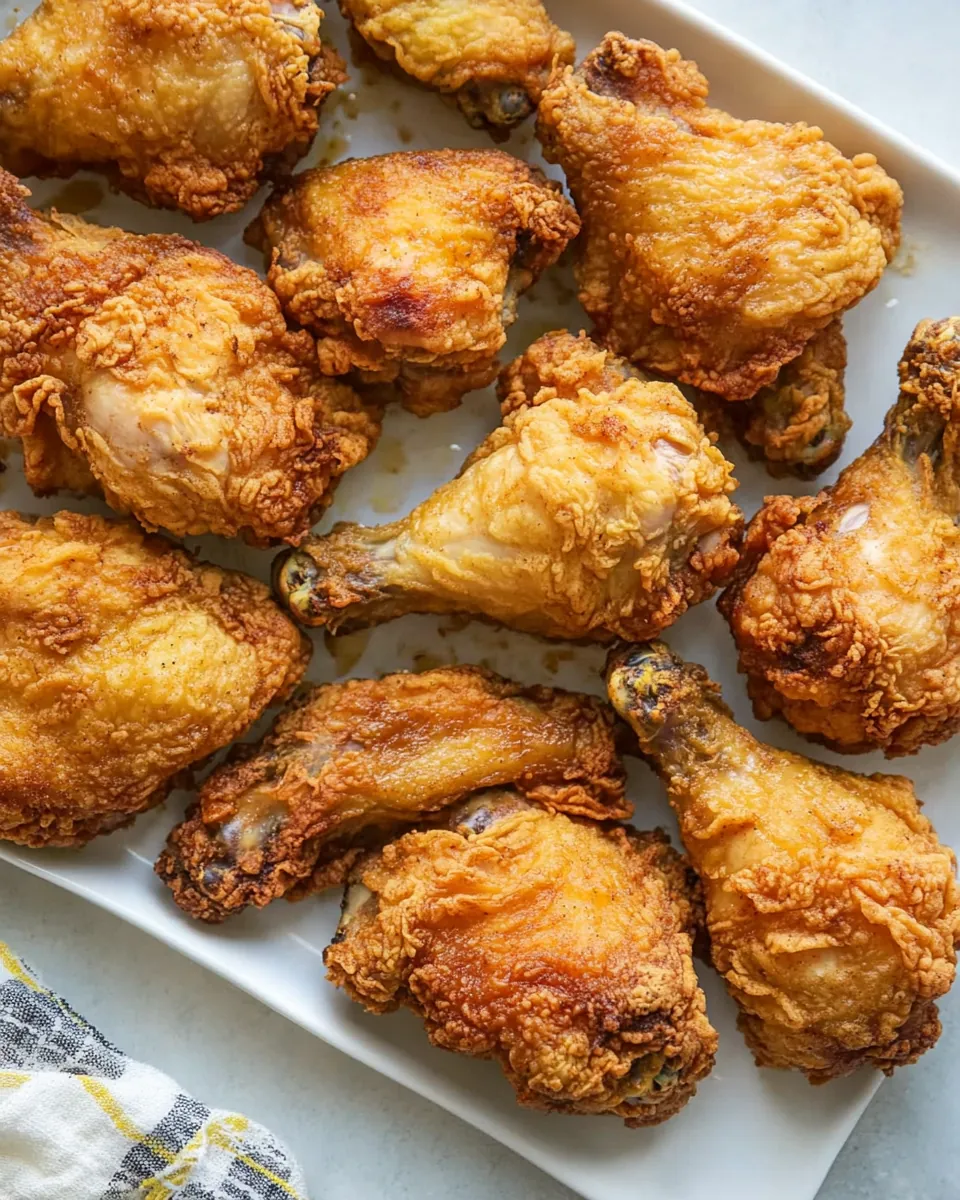
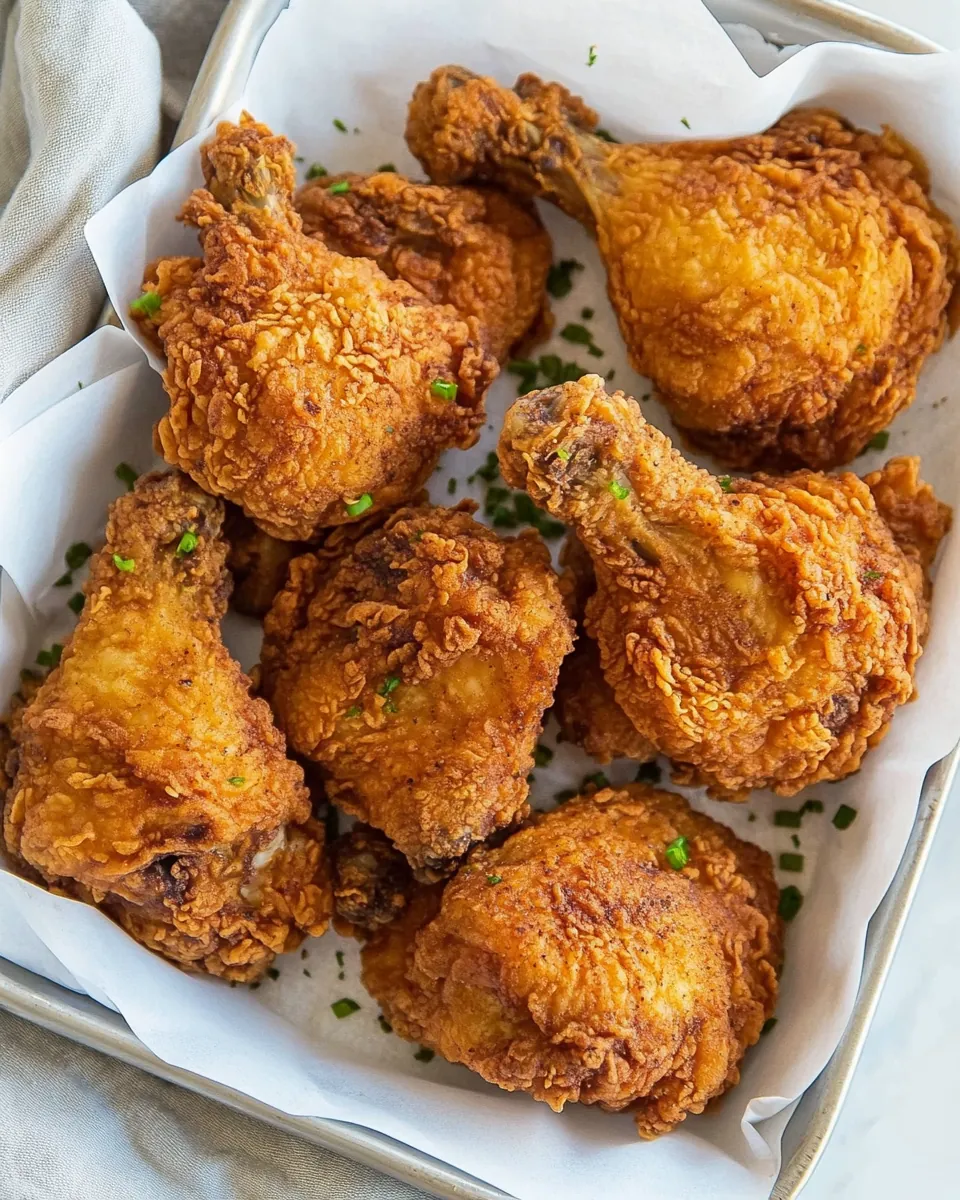
- Once fried, remove the chicken from the oil and place it on the cooling rack lined with paper towels. This will help drain any excess oil and keep the coating crispy.
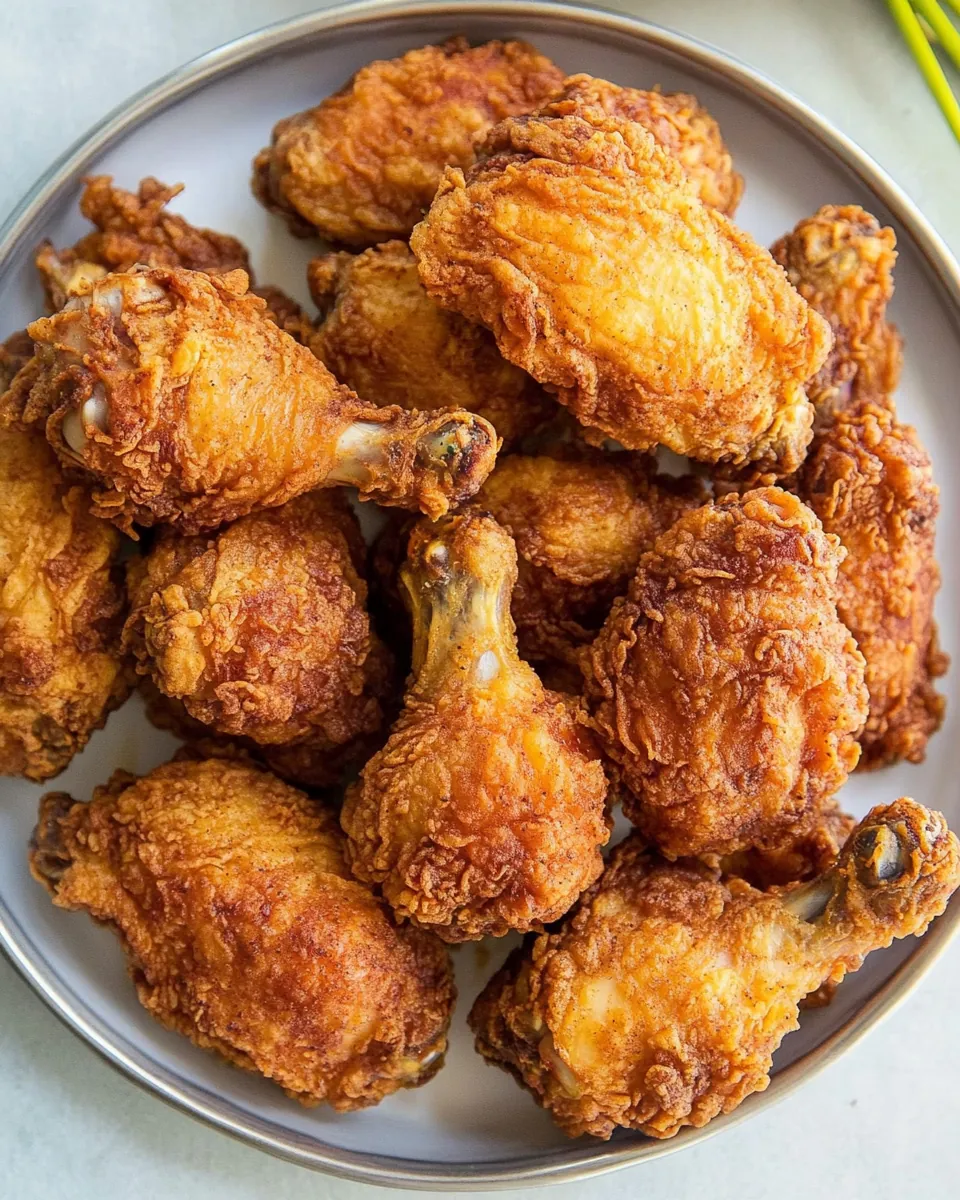
- Finally, serve your delicious Fried Chicken with your favorite dipping sauce, and enjoy every juicy, crispy bite!
Things Worth Knowing
- Ensure Proper Temperature: Before frying, it’s essential to let the chicken reach room temperature. This helps it cook evenly and prevents the coating from peeling off.
- Don’t Skip the Resting Time: Allowing the dredged chicken to rest for at least 10 minutes before frying helps achieve a superior crispy coating.
- Monitor Oil Temperature: Always check the oil temperature with a thermometer or the wooden spoon method. If bubbles form around the spoon, the oil is ready.
- Use High Smoke Point Oil: Opt for oils with a high smoke point, such as vegetable oil or canola oil, to prevent burning during frying.
Variations to Try
If you’re looking to shake things up a bit or simply want to explore new flavors, here are some variations for you to try with your Fried Chicken recipe:
- Different Marinades: Explore various marinades, like yogurt or lemon juice, for a tangy twist on the traditional buttermilk.
- Spicy Fried Chicken: Increase the amount of hot sauce in your marinade or add cayenne pepper to the flour mixture for an extra kick.
- Herb-Infused Flour: Mix in some dried herbs like thyme, oregano, or basil to your flour for added flavor.
- Gluten-Free Option: Substitute regular flour with a gluten-free blend or cornmeal for those avoiding gluten.
- Oven-Baked Version: If you prefer a healthier option, try baking the chicken in the oven instead of frying. It may not be as crispy, but it’s a great alternative!
- Chicken Sandwich: Use the fried pieces to create a delicious sandwich. Add pickles, slaw, and your favorite sauce for a delightful meal.
Serve This Fried Chicken With
When it comes to serving Fried Chicken, there are countless delicious combinations that enhance your meal. Consider pairing it with:
- Mashed Potatoes: Creamy mashed potatoes are a classic side that complements the crispy texture of the chicken beautifully.
- Coleslaw: A refreshing coleslaw adds a crunchy, tangy element that balances the richness of the fried chicken.
- Cornbread: Serve warm cornbread alongside your fried chicken for a comforting Southern touch.
- Biscuits: Soft, flaky biscuits are perfect for sopping up any leftover gravy or dipping in honey.
- Seasonal Vegetables: Pairing your fried chicken with roasted or sautéed seasonal vegetables adds a nutritious touch to your meal.
- Pickles: A side of pickles adds a nice tang that cuts through the richness of the fried chicken.
- Hot Sauce: Don’t forget to serve with your favorite hot sauce for an extra kick!
FAQ
Conclusion
The Fried Chicken recipe is truly special due to its perfect blend of flavors, crunchy texture, and the warmth of nostalgia it brings. I encourage you to try making it yourself and share those delightful moments with loved ones. There’s nothing quite like gathering around a table filled with crispy chicken and happy faces, so don’t hesitate to whip up this classic dish tonight!
Fried Chicken
Ingredients
Equipment
Method
- Begin by cutting the chicken into 8 to 10 smaller pieces. It’s important to discard the backbone, but don’t throw it away! You can save it for making rich and flavorful chicken stock.
- In a large bowl, combine the pickle juice and buttermilk. Stir well to blend the flavors. If you enjoy a bit of heat, add some hot sauce to the mix.
- Carefully immerse the chicken pieces into the mixture, ensuring they are fully coated. This step is crucial for achieving maximum flavor and tenderness. Cover and let it sit aside for 30 minutes, or refrigerate for up to 24 hours for a deeper flavor.
- While the chicken is marinating, prepare a flour mixture in a medium, shallow bowl. Combine the flour, salt, pepper, garlic powder, and smoked paprika. This blend will create that irresistible crust.
- Set up a wire rack on a baking sheet nearby; this will be essential for draining the chicken after frying.
- After the marination period, take one piece of chicken out of the buttermilk mixture. Dredge it in the flour mixture, ensuring an even coat, then place it onto the prepared cooling rack. Let it rest for 20 to 30 minutes to allow the coating to adhere better.
- If you’re short on time, you can add the flour mixture to a large baking dish, then toss in the chicken, ensuring each piece is thoroughly coated before transferring them to the rack.
- In a large deep frying pan, fill it halfway with vegetable oil. Heat the oil to 365 degrees Fahrenheit. It’s crucial that the oil is hot enough to achieve that perfect crispiness.
- Carefully place a few pieces of chicken into the hot oil, being cautious not to overcrowd the pan. Fry in batches for around 10 to 15 minutes, or until each piece is golden brown and cooked through.
- Once fried, remove the chicken from the oil and place it on the cooling rack lined with paper towels. This will help drain any excess oil and keep the coating crispy.
- Finally, serve your delicious Fried Chicken with your favorite dipping sauce, and enjoy every juicy, crispy bite!
Notes
- Tip 1: Do not throw away the backbone and neck. They can be used for chicken stock. Freeze them and they can be saved for up to six months.
- Tip 2: Before frying, it’s essential to bring the meat to room temperature for even cooking.
- Tip 3: Another way to check if the oil is hot enough is by using the tip of a wooden spoon. If little bubbles form around it, the oil is ready.
- Tip 4: Use another thermometer for the chicken. Take it out when it reaches 155 degrees F. It will continue to heat up as it rests until it reaches 165 degrees F when it is served.
- Tip 5: Drain the chicken on a wire rack OVER paper towels. Laying it on top of paper towels will make it soggy.
- Tip 6: Be sure to add plenty of salt and pepper. These are the main seasonings in your chicken, so don’t forget them.
- Tip 7: Avoid frying immediately after dredging, as this can cause the coating to peel off. It’s best to let it rest for at least 10 minutes on a wire cooling rack while the oil heats. Proper resting helps the coating stick, resulting in a crispy skin.