There’s something magical about baking a Cherry Pie on a warm summer day. I still remember the first time I made it; the sun was shining, and the smell of freshly baked pie filled my kitchen. Cherries were in season, and my local market was bursting with them. The vibrant red cherries, paired with a flaky crust, seemed like a perfect way to celebrate summer. I gathered my ingredients, excited to create a dessert that felt both nostalgic and timeless. Each step, from rolling out the dough to arranging the lattice top, felt like a joyful dance in the kitchen. When I finally pulled that pie out of the oven, its golden crust and bubbling cherry filling made my heart leap. I couldn’t wait to slice it and share it with friends and family, knowing it would bring smiles to their faces.
Recipe Snapshot
1 hr 20 mins
20 mins
60 mins
Medium
290 kcal
2 g
Gluten-Free, Low FODMAP
12 g
9-inch pie dish
Why This Cherry Pie Works
A Slice of Nostalgia
Every time I bake a Cherry Pie, it takes me back to my childhood. There’s something about the combination of sweet and tart cherries that resonates with so many of us. This pie isn’t just a dessert; it’s a slice of nostalgia that brings back memories of family gatherings and summertime picnics.
Perfectly Versatile
This recipe is incredibly versatile. Whether you’re using fresh, frozen, or even canned cherries, the Cherry Pie adapts beautifully. You can adjust the sweetness to your liking, making it perfect for any palate. Plus, it pairs wonderfully with various toppings like whipped cream or vanilla ice cream.
Easy to Make
Another reason I love this Cherry Pie is how simple it is to make. Even if you’re a beginner, you can whip this up with minimal effort. The ingredients are easy to find, and the steps are straightforward, allowing you to create a delicious dessert without feeling overwhelmed.
Impressive Yet Simple
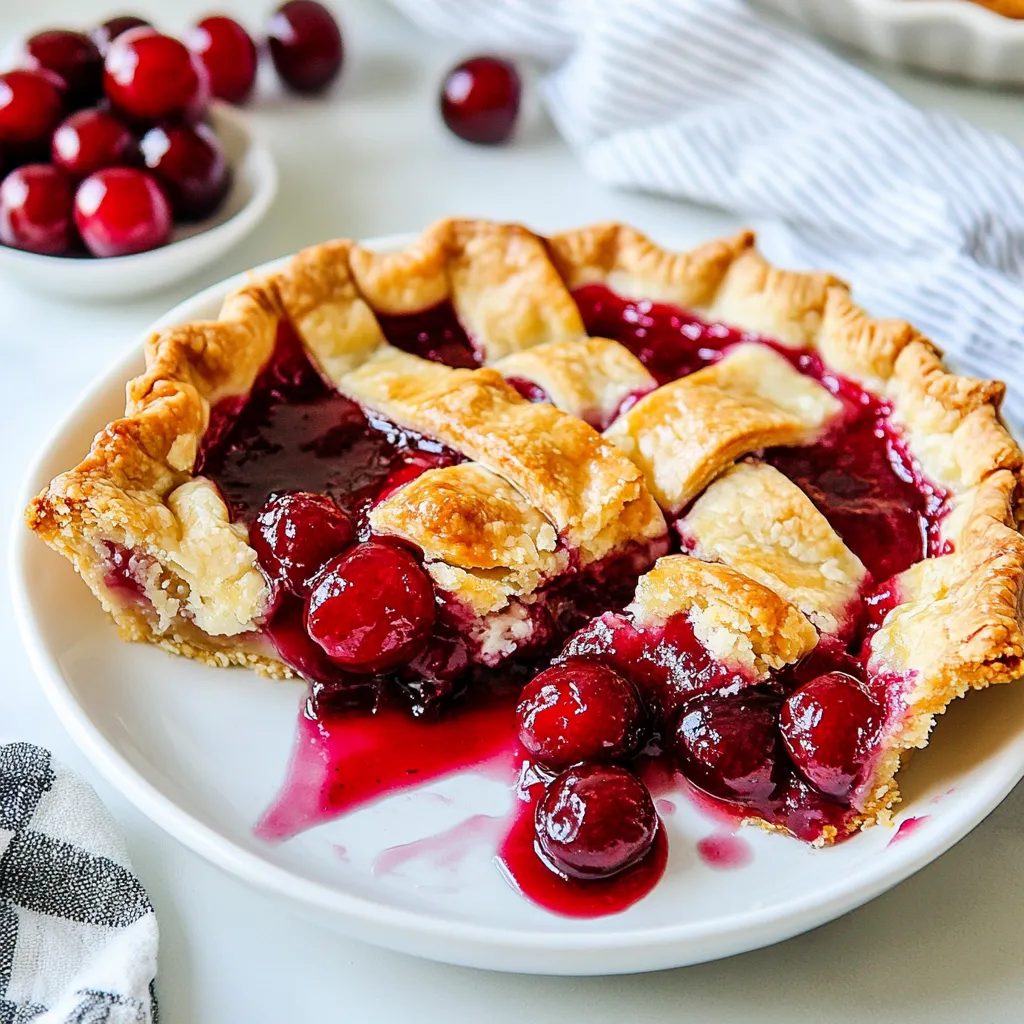
Despite its ease of preparation, a freshly baked Cherry Pie looks and tastes impressive. The golden lattice crust and vibrant filling make it look beautiful on any table. It’s a showstopper that will leave your guests raving about your baking skills.
Seasonal Delight
With cherries being a summer delicacy, this pie is a must-have for your seasonal dessert repertoire. It’s a refreshing way to enjoy the warm weather, showcasing the best of what summer has to offer.
Great for Gatherings
Finally, the Cherry Pie is a fantastic dessert for gatherings. Whether it’s a family reunion, a picnic, or a simple dinner party, it’s sure to be a crowd-pleaser. Everyone loves a good slice of pie, and this one is bound to become a favorite among your friends and family.
Recipe Ingredients for Cherry Pie
When it comes to the ingredients for this Cherry Pie, each one plays a crucial role in creating that perfect balance of flavor and texture. The combination of sweet cherries, sugar, and a hint of lemon makes the filling both vibrant and delicious, while the double pie crust ensures a flaky, buttery base that holds it all together.
- Double Pie Crust: The foundation of your pie, a good crust is essential for providing a flaky and buttery texture. Making your own or using a store-bought option will set the stage for the delicious filling to shine.
- Cherries: Fresh, pitted, and whole cherries are the stars of this recipe. They provide the sweet and tart flavor that makes Cherry Pie so beloved.
- Granulated Sugar: Sugar enhances the natural sweetness of the cherries and balances their tartness, creating a delightful filling.
- Cornstarch: This ingredient thickens the cherry juices as they cook, ensuring your filling is just the right consistency when baked.
- Vanilla Extract & Almond Extract: Both extracts add a depth of flavor, making the filling more aromatic and complex. They complement the cherries beautifully.
- Lemon Juice: A touch of lemon juice brightens up the flavors, cutting through the sweetness and adding a refreshing zing.
- Egg: This is used for an egg wash, giving the top crust a beautiful golden color when baked.
Cherry Pie Instructions
Now that you have all your ingredients ready, let’s dive into making this delightful Cherry Pie. The steps are straightforward and allow you to enjoy the process of baking while filling your home with the wonderful aroma of pie.
- Preheat your oven to 425°F (220°C). This is an important step to ensure your pie bakes evenly and achieves a beautiful golden crust.
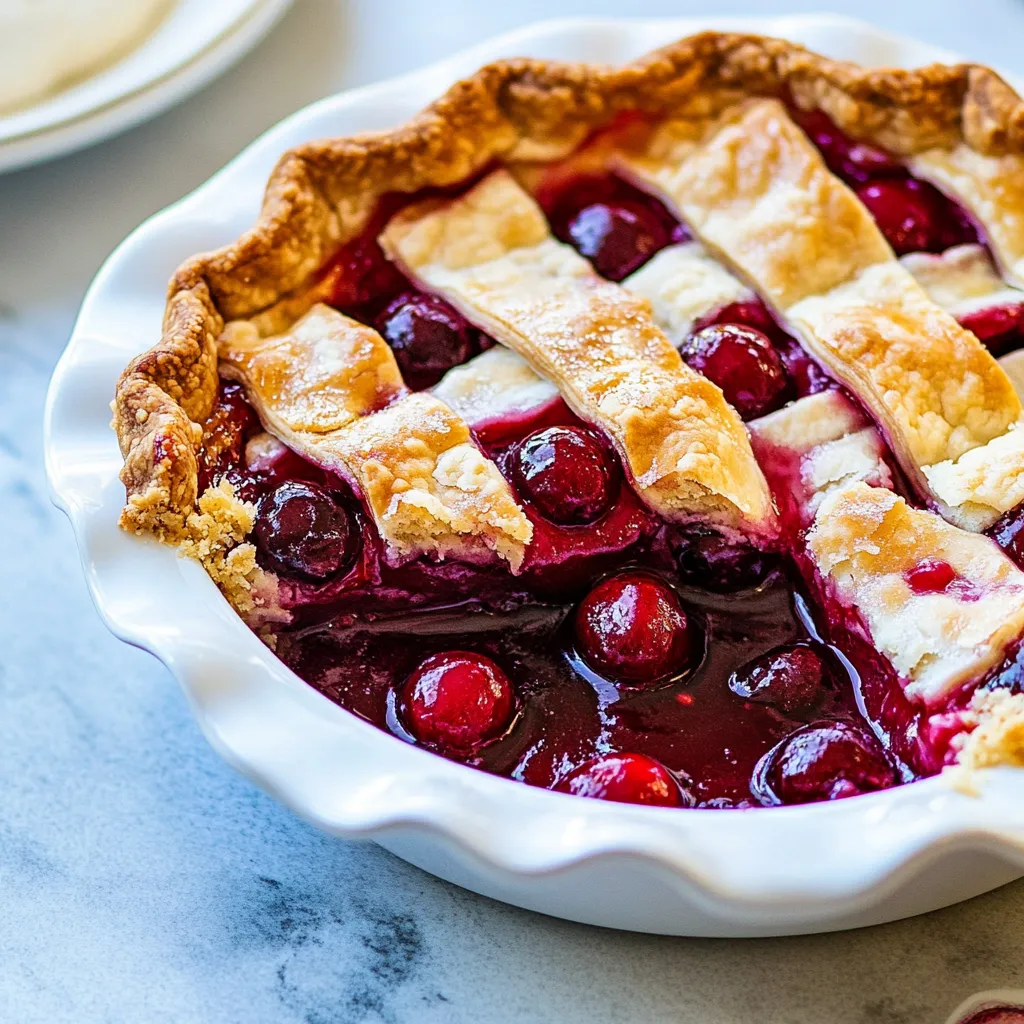
- Roll out half of the double pie crust into a 12-inch circle. Make sure it’s even in thickness, as this will contribute to the texture of your pie. Once rolled, place it in a 9-inch pie dish, gently pressing it into the corners.
- Create the filling by tossing the cherries with granulated sugar, cornstarch, either vanilla extract or almond extract, and lemon juice. This mixture should be well combined to ensure every cherry is coated with the sweet goodness.
- Carefully spoon the cherry filling into the prepared pie crust, using a spoon to distribute it evenly. Make sure to discard any excess juices at the bottom of the mixing bowl to prevent a soggy bottom crust.
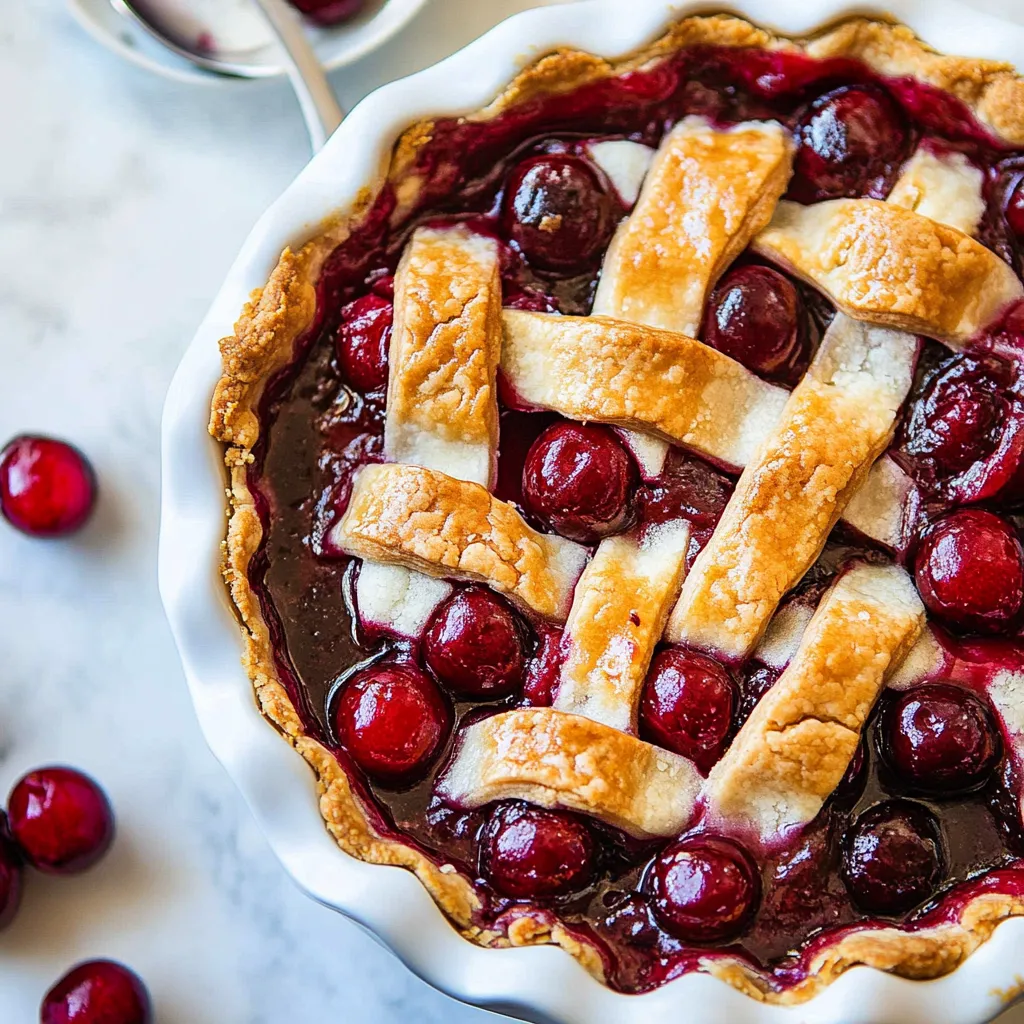
- Roll out the remaining half of the double pie crust into another 12-inch circle. Using a pastry wheel or a pizza cutter, cut the dough into long strips for the lattice top. This may sound intricate, but it’s quite simple once you get the hang of it.
- To create the lattice top, arrange the strips over the filling, weaving them over and under each other. This adds a beautiful design and allows steam to escape while the pie bakes. Don’t worry if it’s not perfect; the charm of a homemade pie lies in its imperfections.
- Trim any excess dough hanging over the edges, and use your fingers to crimp the edges, sealing in the delicious filling.
- Prepare an egg wash by whisking together one egg with a tablespoon of water. Brush this mixture over the lattice top to give it a stunning golden color once baked.
- Bake the pie for 20 minutes in the preheated oven at 425°F (220°C). After 20 minutes, reduce the heat to 375°F (190°C) and continue baking for an additional 30 minutes. This method helps to achieve a perfectly baked crust without burning it.
- Once the baking time is complete, remove the pie from the oven and allow it to cool for at least three hours before serving. This cooling period is crucial as it allows the filling to set up, making for cleaner slices.
- For an extra treat, I suggest serving your Cherry Pie with a generous scoop of vanilla ice cream on top. It’s the perfect complement to the warm pie!
Things Worth Knowing
- Choose Fresh Cherries: Always opt for fresh cherries when they’re in season for the best flavor. Look for ones that are plump and firm.
- Pre-bake the Crust: Consider blind baking the bottom crust for ten minutes before adding the filling to prevent it from becoming soggy.
- Cool Completely: Allow the pie to cool completely before slicing to help the filling set, making it easier to cut clean slices.
- Experiment with Flavors: Feel free to add spices like cinnamon or nutmeg to the filling for an extra flavor twist.
Ways to Customize

There are so many ways to put your unique spin on the classic Cherry Pie. Here are some fun ideas to consider:
- Mixing Fruit: Combine cherries with other fruits like blueberries or raspberries for a mixed berry pie that adds complexity to the flavor profile.
- Different Crusts: Experiment with different types of pie crusts, such as graham cracker or cookie crumb crusts for a unique twist.
- Decorative Toppings: Try adding a crumble topping made of oats and brown sugar for a crunchy texture contrast with the soft filling.
- Flavor Enhancements: Incorporate a splash of almond extract or a hint of orange zest to elevate the flavor of the filling.
- Serving Styles: Serve the pie warm with a scoop of vanilla ice cream for a classic dessert or chilled with whipped cream for a refreshing treat.
Serving Ideas for Cherry Pie
When it comes to serving your delicious Cherry Pie, the possibilities are endless. Here are some ideas to help you create the perfect experience:
- Classic Pairing: Serve warm slices of Cherry Pie with a generous scoop of vanilla ice cream on top. This combination is a timeless favorite.
- Whipped Cream: Lightly sweetened whipped cream makes an excellent topping, adding a creamy contrast to the tart cherries.
- Picnics and Barbecues: Bring this pie to summer gatherings or picnics. Its portability and delicious taste make it a hit at outdoor events.
- Seasonal Celebrations: Perfect for summer holidays like the Fourth of July or family reunions, this pie is sure to impress guests.
- Breakfast Treat: Leftover pie can be a delightful breakfast treat enjoyed with coffee or tea.
- Storage Tips: If you have leftovers, store the pie in the refrigerator, wrapped well with plastic wrap to maintain freshness for up to five days.
- Freezing: You can freeze the pie before baking. Wrap it tightly and bake directly from frozen, adding a few extra minutes to the baking time.
FAQ
Conclusion
The Cherry Pie is a classic dessert that brings a taste of summer into your home. Its sweet and tart filling, combined with a flaky crust, makes it a beloved treat for family and friends. I encourage you to try making this pie yourself; it’s easier than you might think and incredibly rewarding. Bake one today and enjoy a slice of nostalgia!
Cherry Pie
Ingredients
Equipment
Method
- Preheat your oven to 425°F (220°C). This is an important step to ensure your pie bakes evenly and achieves a beautiful golden crust.
- Roll out half of the double pie crust into a 12-inch circle. Make sure it's even in thickness, as this will contribute to the texture of your pie. Once rolled, place it in a 9-inch pie dish, gently pressing it into the corners.
- Create the filling by tossing the cherries with granulated sugar, cornstarch, either vanilla extract or almond extract, and lemon juice. This mixture should be well combined to ensure every cherry is coated with the sweet goodness.
- Carefully spoon the cherry filling into the prepared pie crust, using a spoon to distribute it evenly. Make sure to discard any excess juices at the bottom of the mixing bowl to prevent a soggy bottom crust.
- Roll out the remaining half of the double pie crust into another 12-inch circle. Using a pastry wheel or a pizza cutter, cut the dough into long strips for the lattice top. This may sound intricate, but it’s quite simple once you get the hang of it.
- To create the lattice top, arrange the strips over the filling, weaving them over and under each other. This adds a beautiful design and allows steam to escape while the pie bakes. Don’t worry if it’s not perfect; the charm of a homemade pie lies in its imperfections.
- Trim any excess dough hanging over the edges, and use your fingers to crimp the edges, sealing in the delicious filling.
- Prepare an egg wash by whisking together one egg with a tablespoon of water. Brush this mixture over the lattice top to give it a stunning golden color once baked.
- Bake the pie for 20 minutes in the preheated oven at 425°F (220°C). After 20 minutes, reduce the heat to 375°F (190°C) and continue baking for an additional 30 minutes. This method helps to achieve a perfectly baked crust without burning it.
- Once the baking time is complete, remove the pie from the oven and allow it to cool for at least three hours before serving. This cooling period is crucial as it allows the filling to set up, making for cleaner slices.
- For an extra treat, I suggest serving your Cherry Pie with a generous scoop of vanilla ice cream on top. It’s the perfect complement to the warm pie!
Notes
- Tip 1: If using sour cherries, increase the sugar by ¼ cup.
- Tip 2: Canned cherries can be substituted for fresh cherries, but drain or rinse any syrup before using.
- Tip 3: Wrap well with plastic wrap and store in the fridge for up to 5 days, if it lasts that long.
- Tip 4: Nutrition is calculated per slice without ice cream and is a rough estimate.