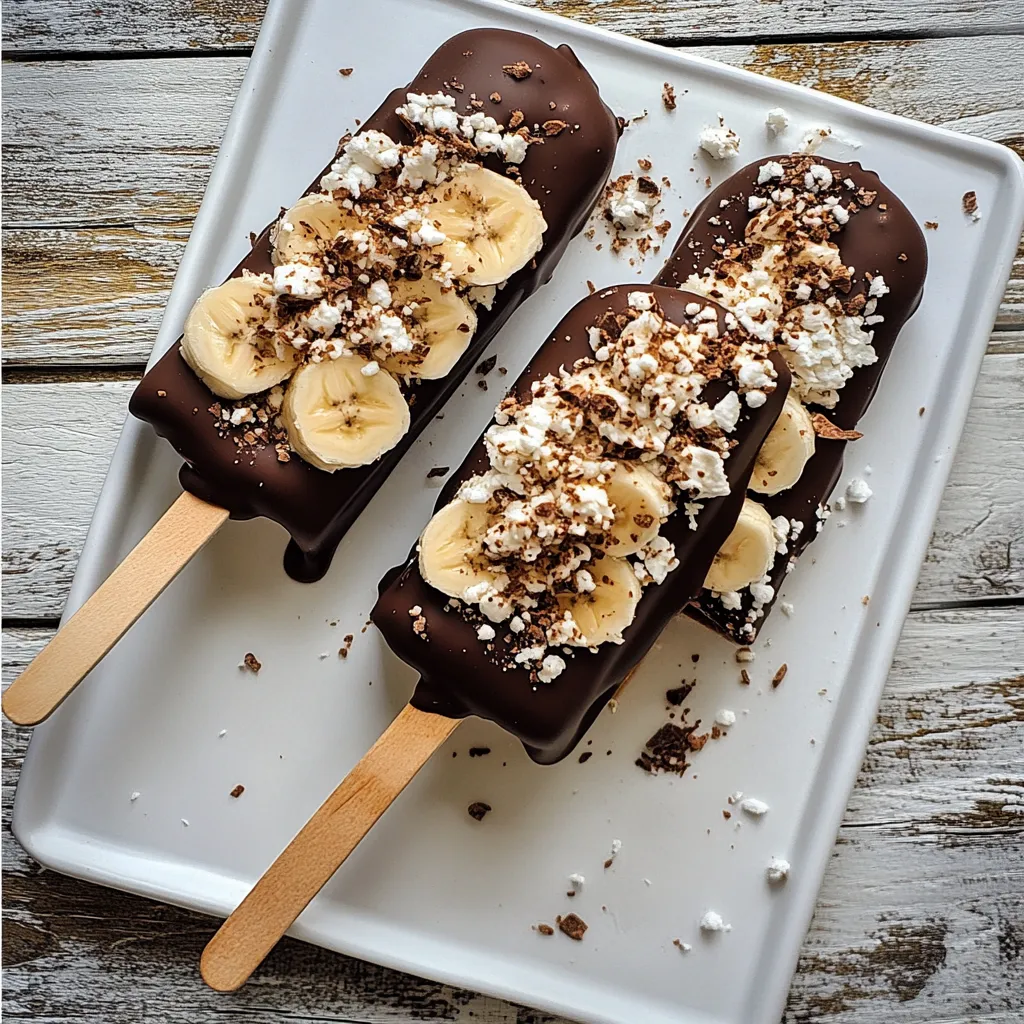
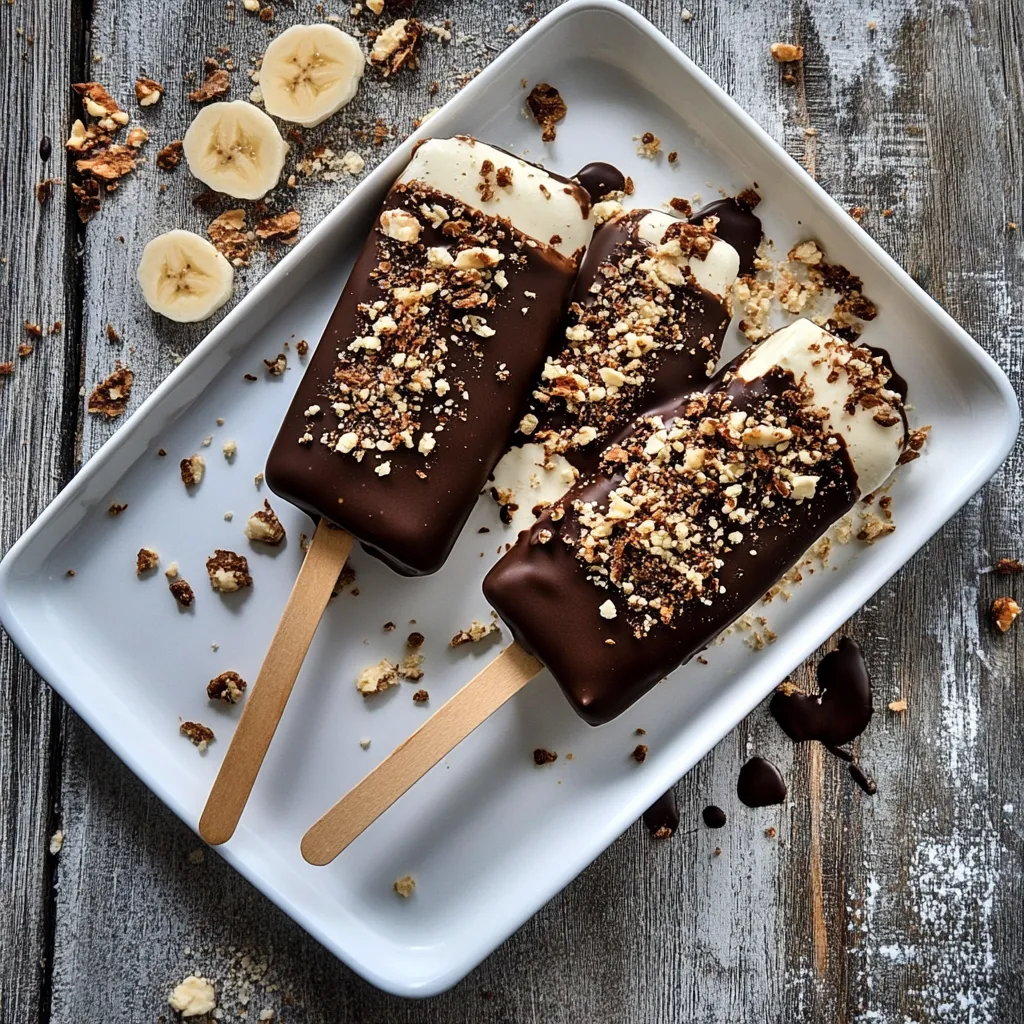
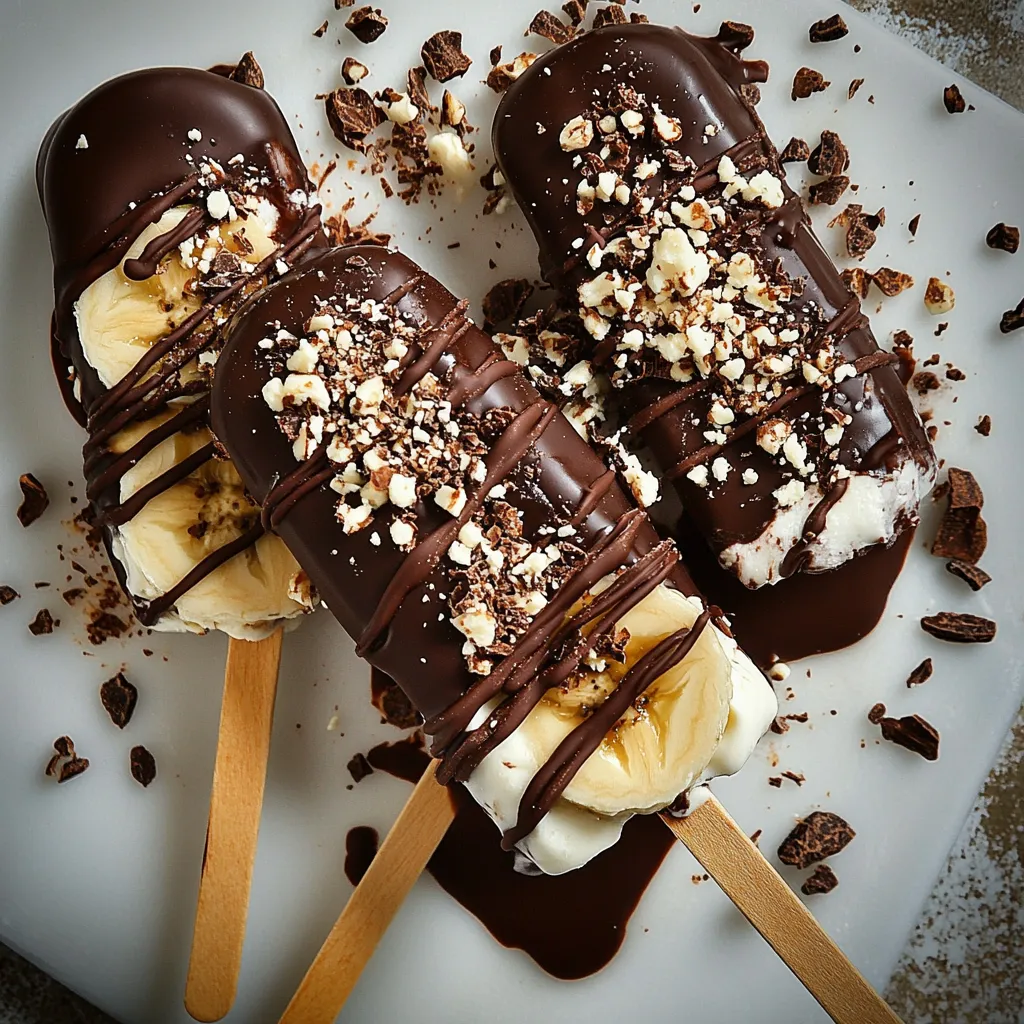
There’s something undeniably cheerful about summertime treats, and nothing captures that joy quite like Chocolate Dipped Banana Cream Pops. I remember the first time I made these with my kids. It was one of those perfect sunny afternoons when we had nothing planned but to enjoy each other’s company. We set up our little assembly line in the kitchen, with bananas, coconut milk, and all the fun toppings spread out before us. Each pop was a canvas, and the laughter and creativity flowed as freely as the ingredients. These pops are not just a treat; they’re a delightful memory in the making. With each bite, the creamy banana flavor harmonizes beautifully with the rich chocolate and crunchy toppings, making it a summer staple that we crave again and again.
Recipe Snapshot
60 mins
0 mins
0 mins
Medium
150 kcal
2g g
Keto, Gluten-Free, Low FODMAP
7g g
Chef’s Knife, Wooden Spoon, Blender, Food Processor
What We Adore About This Chocolate Dipped Banana Cream Pops
Why You’ll Love These Pops
Every recipe has its charm, but the Chocolate Dipped Banana Cream Pops truly stand out for several reasons that I can’t wait to share with you.
1. Simple Ingredients
One of the best things about these pops is that the ingredients are incredibly simple. You don’t need a long shopping list or fancy tools. Just ripe bananas, coconut milk, a splash of honey, and some dark chocolate come together to create something magical. This simplicity means you can whip them up on a whim, especially when those hot days call for something refreshing.
2. Fun to Make
Making these pops with family or friends is an experience that brings everyone together. Whether you’re filling molds or dipping them in chocolate, it’s an interactive kitchen project that’s as enjoyable as it is delicious. Kids especially love getting involved; they can choose their toppings, whether it’s shredded coconut or chopped nuts. It’s a great way to teach them about cooking and the joy of creating something from scratch.
3. Healthier Treat Option
Unlike store-bought popsicles packed with unknown additives and sugars, these Chocolate Dipped Banana Cream Pops are made with wholesome ingredients. They offer a natural sweetness from the bananas and honey, making them a guilt-free indulgence. Plus, the use of coconut milk instead of dairy adds a creamy texture while being suitable for various dietary preferences.
4. Perfect for Any Occasion
These pops are not just for casual snacking. They can be a delightful dessert at summer parties, a delightful ending to a family dinner, or even a fun addition to a picnic. Their vibrant appearance and delicious taste make them a showstopper, no matter where they’re served.
5. Customizable to Your Liking
Another fantastic aspect is the ability to personalize each pop. Want a hint of spice? Add a dash of cinnamon or cayenne pepper to the chocolate. Prefer different toppings? Go wild with nuts, seeds, or even crushed cookies. This adaptability ensures you can cater to everyone’s palate, making it a versatile recipe for gatherings.
What Goes Into Chocolate Dipped Banana Cream Pops
When it comes to the ingredients for Chocolate Dipped Banana Cream Pops, there’s a beautiful balance at play. Each component plays a pivotal role: the bananas provide natural sweetness, the coconut milk adds creaminess, and the dark chocolate gives a rich finish. Together, they create a harmonious blend that’s sure to satisfy any sweet tooth.
- 2 large, ripe bananas: The star of the show. Ripe bananas bring a natural sweetness that forms the creamy base of the pops.
- 2 cups coconut milk: This ingredient gives the pops a rich, creamy texture. It’s a great dairy-free alternative that complements the bananas beautifully.
- 1 teaspoon vanilla extract: A splash of this adds depth and enhances the overall flavor profile of the pops.
- 2 tablespoons honey: This natural sweetener not only adds sweetness but also helps bind the ingredients together.
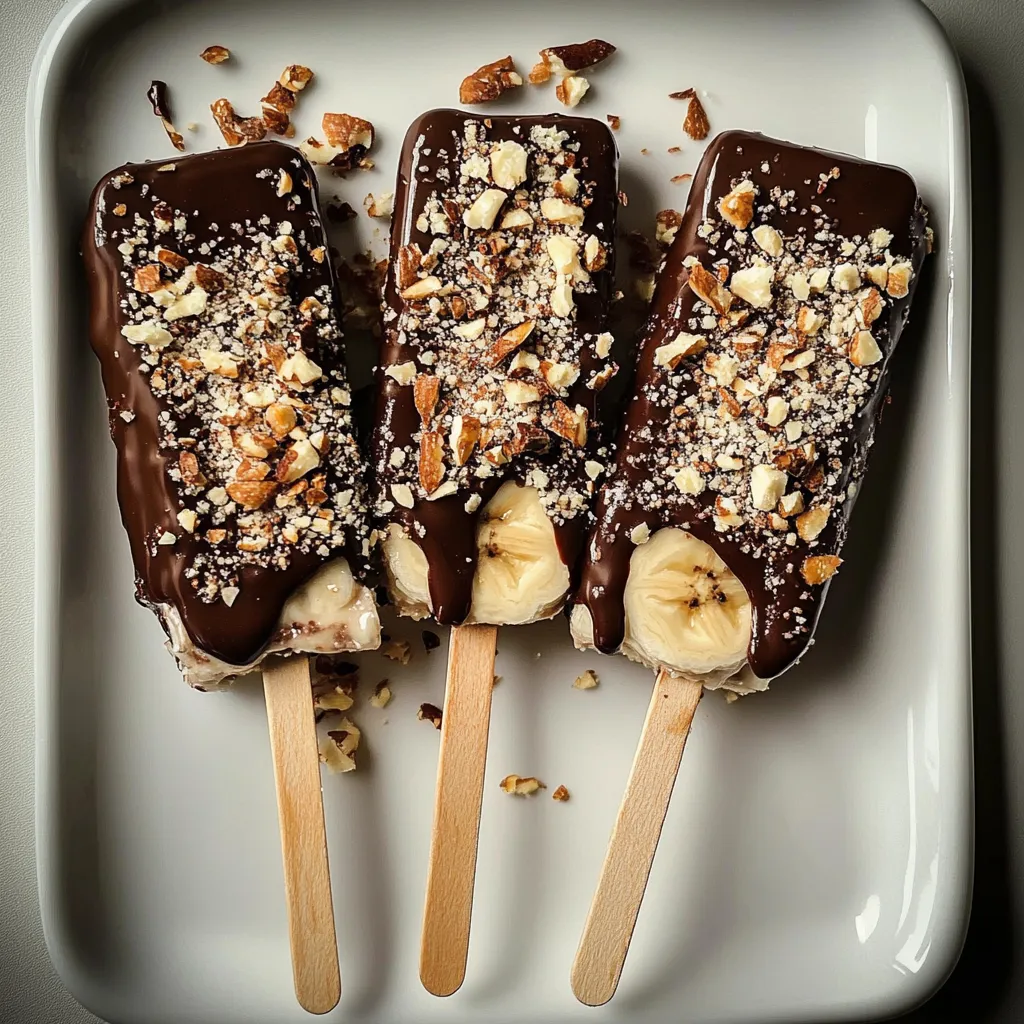
- ½ cup dark chocolate chips: Melting these down creates a luscious coating that adds decadence to each bite.
- 1 tablespoon coconut oil: Used in melting the chocolate, this helps it to achieve a silky smooth consistency that clings perfectly to the pops.
- ¾ cup unsweetened shredded coconut: This gives a delightful texture and an additional layer of coconut flavor.
- ¾ cup nuts (peanuts, walnuts, pistachios, or almonds, finely chopped): These add a crunchy topping that contrasts beautifully with the smooth chocolate.
Making Chocolate Dipped Banana Cream Pops
Creating your own Chocolate Dipped Banana Cream Pops is as straightforward as it is rewarding. Follow these simple steps to find out how easy it is to make these delicious treats!
In a food processor or blender, add the bananas, coconut milk, vanilla, and honey. Pulse until well combined. You want a smooth and creamy mixture, with no lumps left from the bananas. This will be the base of your pops.
Fill six popsicle molds, or eight for smaller popsicles, and insert sticks. Ensure not to overfill them, allowing a little room for expansion during freezing. You can use plastic or wooden sticks depending on your preference.
Freeze the molds for at least three hours, or until completely frozen. The longer they freeze, the better they’ll hold together when you remove them.
Prepare your toppings by spreading coconut on a plate and nuts on another plate. This step is crucial as it will make the coating process easier later on.
Cover a baking sheet with parchment or wax paper. This is where you’ll place the popsicles after dipping, so it’s important for easy cleanup.
Remove the popsicles from the freezer and allow them to thaw a bit on the countertop for about three to five minutes. This will make it easier to release them from the molds without breaking.
If they seem stuck, run the mold under very warm water briefly. This quick bath will loosen them without melting the pops.
In a heavy-bottomed pot over low heat, melt the dark chocolate and coconut oil, stirring constantly until melted, about two to three minutes. The chocolate should be smooth and glossy.
To coat, spoon the melted chocolate over a popsicle and gently press the popsicle into the nuts and coconut to coat. Make sure to cover all sides for an even distribution of toppings.
Continue with the other popsicles, placing them on the parchment paper-lined baking sheet. This is when you can admire your beautiful creations!
Freeze the popsicles uncovered for at least an hour to allow the coating to solidify. Once they’ve hardened, they’re ready to enjoy!
Things Worth Knowing
- Texture is Key: When blending the ingredients, ensure a smooth consistency. This is vital for the creaminess of the pops.
- Freezing Tips: For optimal results, freeze the pops for longer if possible. This allows for a firmer texture and prevents them from melting too quickly when enjoyed.
- Chocolate Coating: Make sure to work quickly when coating the pops to avoid the chocolate setting too fast, making it hard to attach the toppings.
- Storage: Keep any leftover pops in an airtight container in the freezer to avoid freezer burn. They can last up to two weeks if stored correctly.
Variations to Try
If you love experimenting in the kitchen, you’ll be delighted to know there are plenty of variations to the Chocolate Dipped Banana Cream Pops. Here are some fun ideas to elevate your pops:
- Fruit Additions: Consider adding berries or chunks of mango into the banana mixture for a fruity twist.
- Nut Butter Swirl: Swirl in some almond or peanut butter for added richness and a different flavor profile.
- Spicy Chocolate: Add a pinch of cayenne pepper or chili powder to the melted chocolate for a surprising kick.
- Different Chocolate Types: Use milk chocolate or white chocolate for different flavors and sweetness levels.
- Granola Topping: Instead of just nuts, try using granola or crushed cookies for a crunchy texture.
- Make Mini Pops: Fill tiny molds to create bite-sized pops for a fun party treat.
- Storage: To maintain freshness, wrap pops individually in plastic wrap before placing them in a container.
What to Serve Alongside Chocolate Dipped Banana Cream Pops
When it comes to serving Chocolate Dipped Banana Cream Pops, there are plenty of delightful options that can complement their creamy sweetness:
- Fresh Berries: Serve alongside a bowl of fresh strawberries or raspberries for a refreshing contrast.
- Chocolate Sauce: A drizzle of extra melted chocolate can elevate the dessert experience.
- Nut Mix: Offer a variety of mixed nuts for a crunchy pairing that balances the pops’ texture.
- Iced Tea or Lemonade: These cool beverages are perfect for summer gatherings and pair wonderfully.
- Picnic Treat: Pack these pops in a cooler for a perfect snack during outdoor activities.
- Sweet Platter: Create a dessert platter with assorted fruits and sweet dips for a perfect summer party.
- Casual Gatherings: These pops make a great treat at birthday parties or casual family get-togethers.
FAQ
Conclusion
In conclusion, the Chocolate Dipped Banana Cream Pops are not just a dessert; they’re an experience filled with laughter and creativity in the kitchen. These creamy, delectable treats are perfect for hot summer days and fun family gatherings. I encourage you to try making them for your next get-together or simply as a delightful snack at home. You won’t regret it!
Chocolate Dipped Banana Cream Pops
Ingredients
Equipment
Method
- In a food processor or blender, add the bananas, coconut milk, vanilla, and honey. Pulse until well combined. You want a smooth and creamy mixture, with no lumps left from the bananas. This will be the base of your pops.
- Fill six popsicle molds, or eight for smaller popsicles, and insert sticks. Ensure not to overfill them, allowing a little room for expansion during freezing. You can use plastic or wooden sticks depending on your preference.
- Freeze the molds for at least three hours, or until completely frozen. The longer they freeze, the better they’ll hold together when you remove them from the molds.
- Prepare your toppings by spreading coconut on a plate and nuts on another plate. This step is crucial as it will make the coating process easier later on.
- Cover a baking sheet with parchment or wax paper. This is where you’ll place the popsicles after dipping, so it’s important for easy cleanup.
- Remove the popsicles from the freezer and allow them to thaw a bit on the countertop for about three to five minutes. This will make it easier to release them from the molds without breaking.
- If they seem stuck, run the mold under very warm water briefly. This quick bath will loosen them without melting the pops.
- In a heavy-bottomed pot over low heat, melt the dark chocolate and coconut oil, stirring constantly until melted, about two to three minutes. The chocolate should be smooth and glossy.
- To coat, spoon the melted chocolate over a popsicle and gently press the popsicle into the nuts and coconut to coat. Make sure to cover all sides for an even distribution of toppings.
- Continue with the other popsicles, placing them on the parchment paper-lined baking sheet. This is when you can admire your beautiful creations!
- Freeze the popsicles uncovered for at least an hour to allow the coating to solidify. Once they’ve hardened, they’re ready to enjoy!