There’s something magical about fall, especially when it comes to baking. The warm aroma of spices fills the air, and the anticipation of a delicious treat is hard to resist. That’s why I absolutely love making Pumpkin Cream Cheese Danish during this cozy season. This recipe brings together the sweet flavors of pumpkin and the creamy goodness of cream cheese wrapped in flaky pastry, creating a perfect indulgence for brunch or dessert.
Recipe Snapshot
35 mins
15 mins
20 mins
Medium
220 kcal
3g g
Gluten-Free, Low FODMAP
11g g
Oven, Baking Sheet, Frying Pan, Mixing Bowl
The Magic of This Pumpkin Cream Cheese Danish
It’s the Perfect Fall Treat
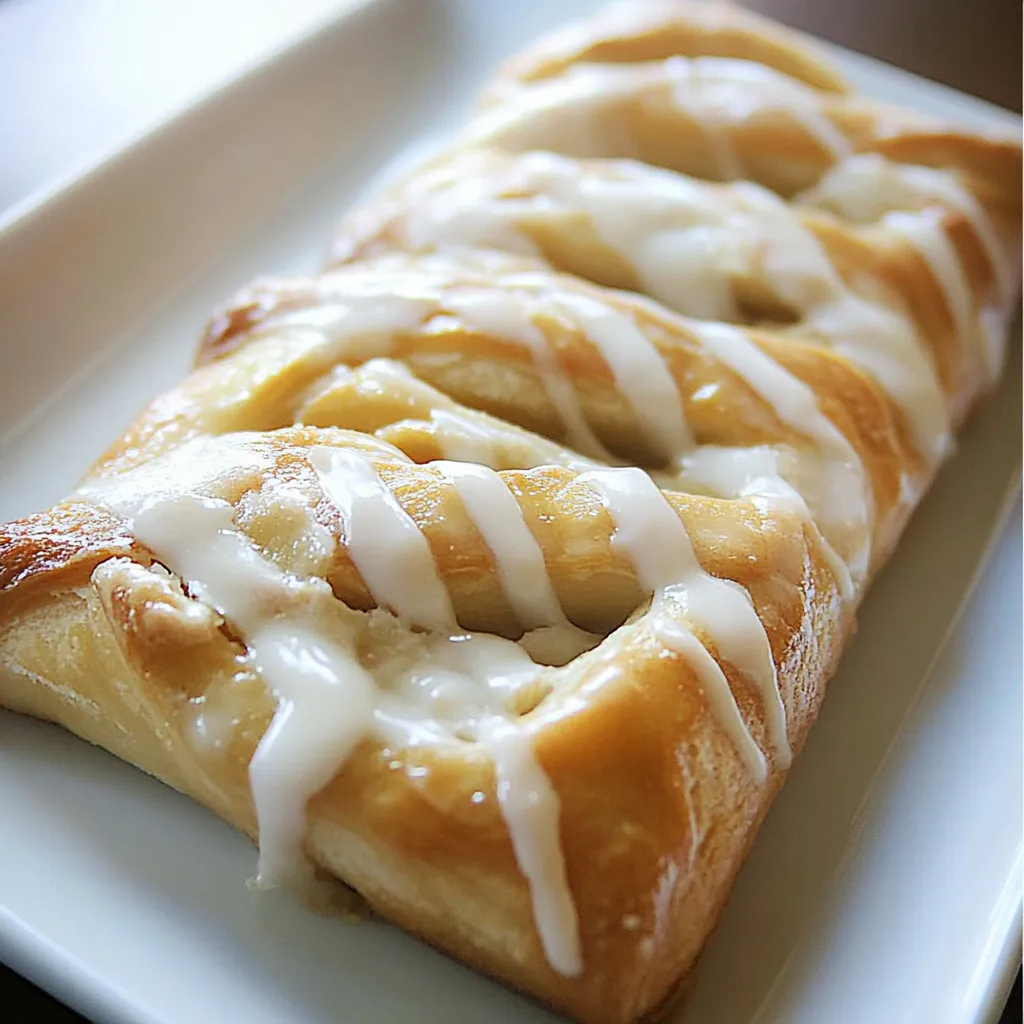
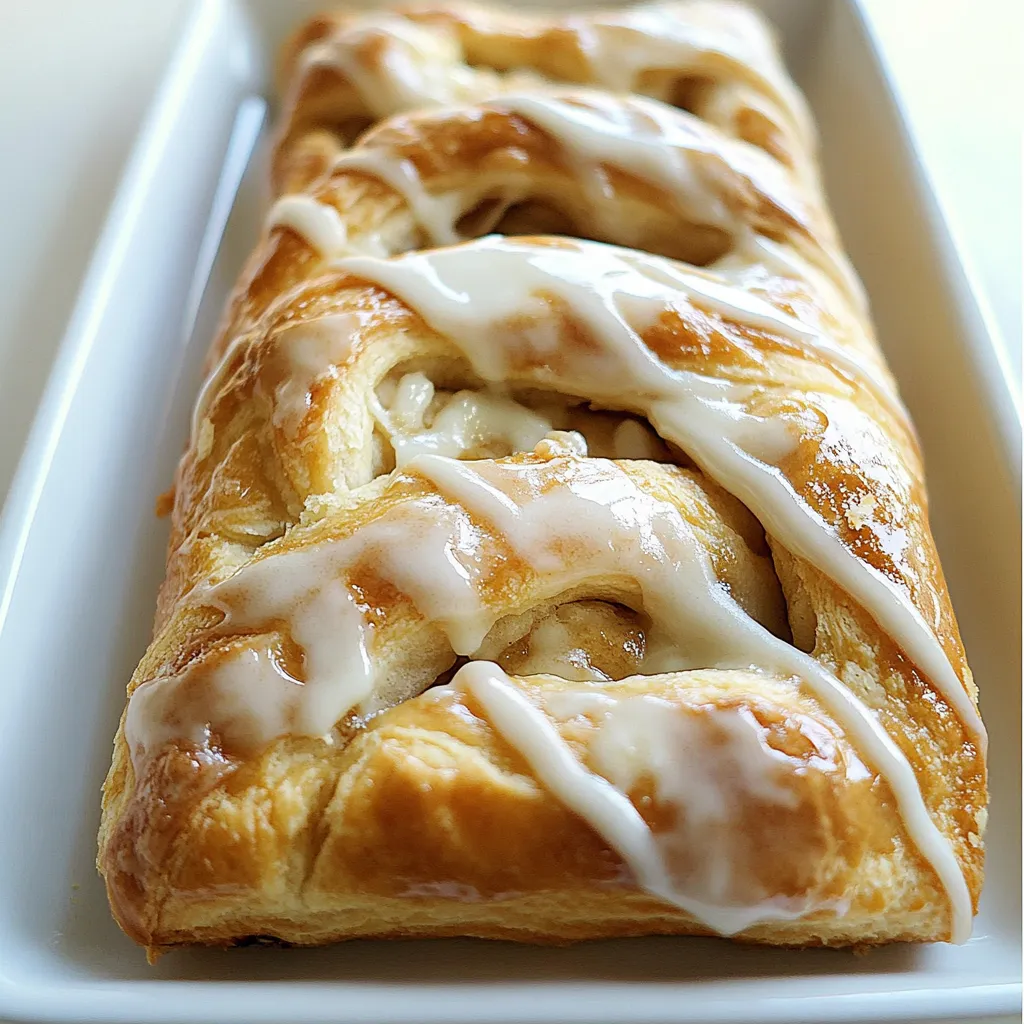
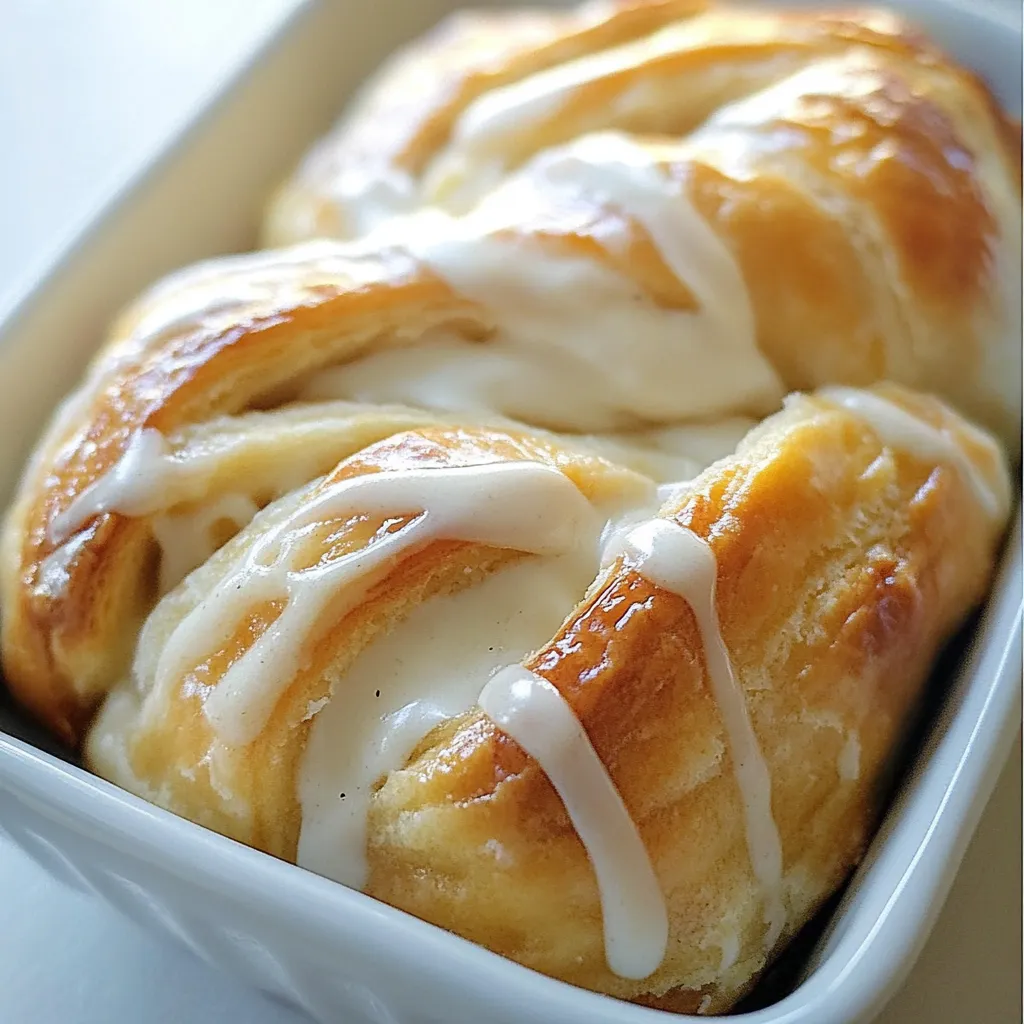
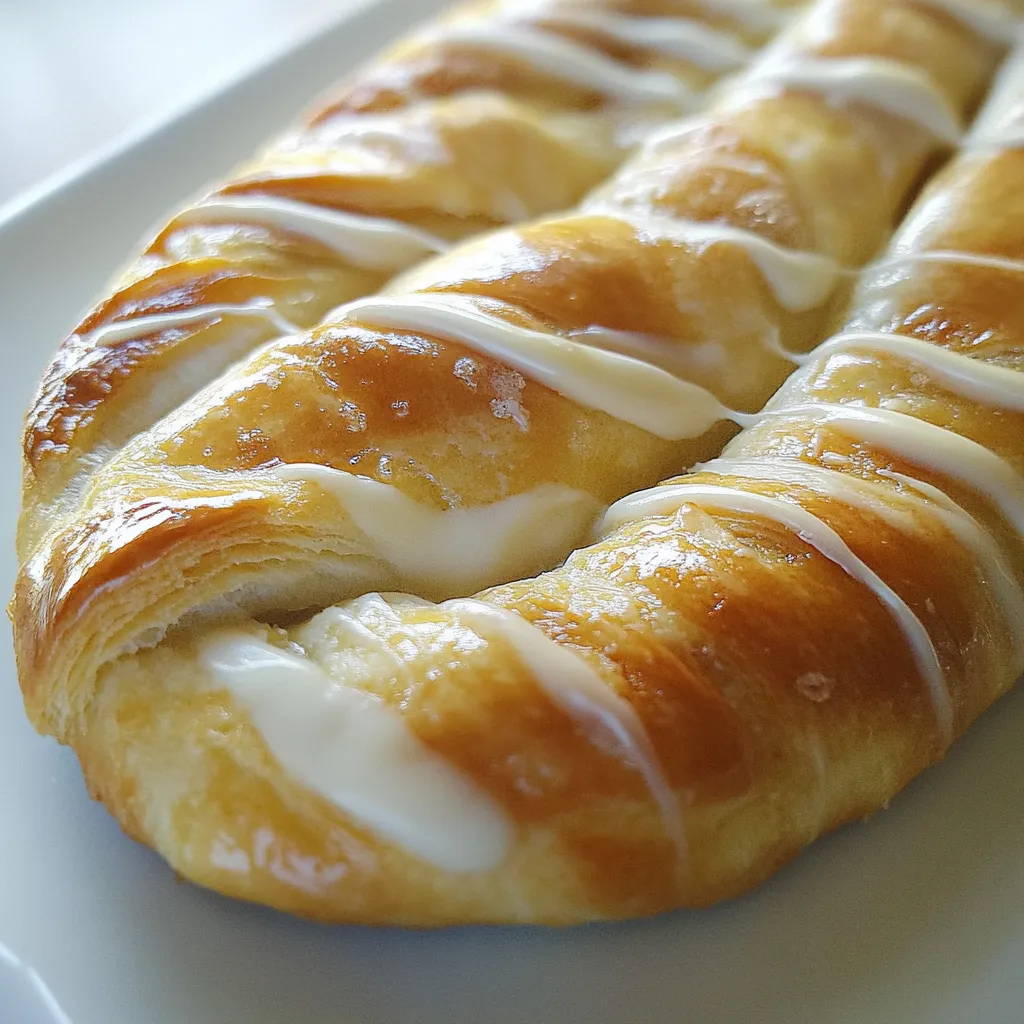
When the leaves change colors and the weather gets cooler, my cravings shift too. I find myself yearning for comfort foods that celebrate the season. The Pumpkin Cream Cheese Danish is not only visually stunning with its braided design, but it also combines that irresistible pumpkin flavor with spices that remind me of cozy evenings with loved ones.
Easy to Prepare
This recipe is surprisingly easy to prepare, making it an excellent option for both experienced bakers and beginners alike. You can whip it up while your morning coffee brews or make it ahead for a gathering. It’s as simple as mixing a few ingredients and wrapping them in crescent dough!
Impressive Presentation
What I love about this danish is how impressive it looks on a plate. It’s perfect for special occasions like Thanksgiving or a family gathering. The braided design is not only beautiful but also makes each slice a delightful surprise of creamy filling and flaky pastry.
Perfectly Flavored
The blend of spices like cinnamon and nutmeg, paired with the creamy filling, creates a delightful explosion of flavor with every bite. It’s like eating a slice of fall wrapped in pastry! Trust me, your guests will be asking for the recipe.
Enjoy Any Time of Day
Whether it’s a weekend brunch or a cozy dessert after dinner, Pumpkin Cream Cheese Danish fits any occasion. It pairs wonderfully with tea or coffee, making it a delightful way to enjoy the flavors of the season.
Ingredients You’ll Need for Pumpkin Cream Cheese Danish
This recipe features a blend of ingredients that work harmoniously together to create that coveted pumpkin flavor and creamy texture. Each ingredient plays a significant role in bringing the Pumpkin Cream Cheese Danish to life.
- Crescent rolls: These are the base of our danish, providing a flaky and buttery layer that complements the creamy filling.
- Cream cheese: Softened cream cheese brings richness and creaminess, making the filling irresistible.
- Pumpkin: Pureed pumpkin adds moisture and flavor, making it a seasonal superstar.
- Granulated sugar: Sweetens the filling perfectly, balancing the spices and creaminess.
- Cinnamon and nutmeg: Warm spices that enhance the autumn flavor profile.
- Vanilla: Adds depth and a hint of sweetness to the filling.
- All-purpose flour: Helps thicken the filling to the right consistency.
- Powdered sugar: Used for the icing, it gives a sweet finish to the danish.
- Heavy cream: Makes the icing creamy and luscious, perfect for drizzling over the danish.
Cooking Instructions for Pumpkin Cream Cheese Danish
Now that you have your ingredients ready, it’s time to bring everything together! Baking is a wonderful mix of art and science, and I’m here to guide you through each step with care.
Preheat your oven to 375 degrees. This straightforward step is crucial as it ensures your danish bakes evenly and achieves that golden color we’re looking for.
In a small bowl, combine the cream cheese, pumpkin, granulated sugar, cinnamon, nutmeg, flour, and vanilla. Use a hand mixer or a whisk to blend these ingredients until smooth. You want a creamy, dreamy filling that’s full of flavor.
Pop open the crescent roll dough and unroll it on a clean surface. Leave the crescents arranged in rectangles, which helps create a sturdy base for your filling.
On an ungreased baking sheet or silpat, lay the rectangles of crescent roll dough together, lining them up width-wise. Make sure the dough covers almost the entire length of a half sheet pan, creating a nice canvas for your filling.
Press the edges together to even them out and seal any holes that might let the filling escape. You want everything to stay wrapped up nice and snug during baking!
Using a sharp knife, cut half-inch diagonal strips up each side of the dough. These strips will help create that beautiful braided effect when you fold the dough over the filling.
Carefully spread your cream cheese filling down the center of the dough, making sure it’s about 2 to 3 inches wide. Don’t skimp on this step; this filling is the star of the show!
Fold the dough pieces up over the filling, alternating sides to create a lovely braided pattern. This is where your danish starts to take shape, and it’s a fun part of the process!
If you have excess dough once you reach the end of the danish, fold them in as best as you can. This helps keep all the delicious flavors inside.
Bake for 15 to 20 minutes, or until the filling is set and the crescent dough is golden in color. Keep an eye on it; you want that perfect golden brown!
Once baked, cool the danish before removing it from the baking sheet. This helps it set up and makes it easier to slice.
In a small bowl, mix together the powdered sugar, vanilla, and heavy cream to create your icing. If it’s too thick, add a bit more cream until you reach your desired consistency.
Drizzle the icing over the cooled danish. This final touch adds sweetness and makes it irresistible. Cut into pieces and serve!
Things Worth Knowing
- Temperature matters: Ensure your cream cheese is softened to room temperature for easy mixing and a smooth filling.
- Be gentle with the dough: When handling the crescent dough, be careful not to tear it. It’s delicate and requires a light touch.
- Baking time can vary: Depending on your oven, keep an eye on the danish as it bakes. Look for a golden color and a set filling.
- Cool before icing: Allow the danish to cool completely before icing. This prevents the icing from melting and ensures a beautiful presentation.
How to Switch It Up
While the classic Pumpkin Cream Cheese Danish is delicious as is, there are plenty of ways to add your personal touch. Here are some creative ideas!
- Experiment with spices: Try adding flavors like ginger or cloves for a different spice profile that complements the pumpkin.
- Add nuts: Incorporate chopped pecans or walnuts into the filling for added texture and crunch.
- Fruit fillings: Swap out the pumpkin for apple or pear filling for a seasonal twist.
- Glaze variations: Instead of the standard icing, consider a maple glaze for a richer flavor.
- Mini danishes: Make individual-sized portions by cutting smaller rectangles of dough and filling them accordingly.
What to Serve Alongside Pumpkin Cream Cheese Danish
When it comes to serving Pumpkin Cream Cheese Danish, the options are as delightful as the danish itself. Here are some ideas to elevate your dining experience:
- Fresh fruit salad: A colorful salad with seasonal fruits not only adds a fresh contrast but also pairs beautifully with the sweetness of the danish.
- Hot beverages: Serve with a cup of steaming coffee, tea, or even spiced cider to enhance the cozy vibe.
- Breakfast or brunch table: This danish is perfect for brunch, so consider serving it alongside quiches or savory muffins.
- Holiday gatherings: It’s a fantastic addition to Thanksgiving or Christmas brunch, adding a festive touch to your table.
- Storage tips: If you have leftovers, store them in an airtight container at room temperature for up to two days or refrigerate for longer freshness.
FAQ
Conclusion
The Pumpkin Cream Cheese Danish is a wonderful way to celebrate fall flavors in a delightful, flaky pastry. The combination of creamy pumpkin and warm spices makes for an unforgettable treat. I encourage you to try this recipe and experience its wonderful taste and beautiful presentation. Your friends and family will love it, and it’s a recipe you’ll want to make time and time again.
Pumpkin Cream Cheese Danish
Ingredients
Equipment
Method
- Preheat your oven to 375 degrees. This straightforward step is crucial as it ensures your danish bakes evenly and achieves that golden color we’re looking for.
- In a small bowl, combine the cream cheese, pumpkin, granulated sugar, cinnamon, nutmeg, flour, and vanilla. Use a hand mixer or a whisk to blend these ingredients until smooth. You want a creamy, dreamy filling that’s full of flavor.
- Pop open the crescent roll dough and unroll it on a clean surface. Leave the crescents arranged in rectangles, which helps create a sturdy base for your filling.
- On an ungreased baking sheet or silpat, lay the rectangles of crescent roll dough together, lining them up width-wise. Make sure the dough covers almost the entire length of a half sheet pan, creating a nice canvas for your filling.
- Press the edges together to even them out and seal any holes that might let the filling escape. You want everything to stay wrapped up nice and snug during baking!
- Using a sharp knife, cut half-inch diagonal strips up each side of the dough. These strips will help create that beautiful braided effect when you fold the dough over the filling.
- Carefully spread your cream cheese filling down the center of the dough, making sure it’s about 2 to 3 inches wide. Don’t skimp on this step; this filling is the star of the show!
- Fold the dough pieces up over the filling, alternating sides to create a lovely braided pattern. This is where your danish starts to take shape, and it’s a fun part of the process!
- If you have excess dough once you reach the end of the danish, fold them in as best as you can. This helps keep all the delicious flavors inside.
- Bake for 15 to 20 minutes, or until the filling is set and the crescent dough is golden in color. Keep an eye on it; you want that perfect golden brown!
- Once baked, cool the danish before removing it from the baking sheet. This helps it set up and makes it easier to slice.
- In a small bowl, mix together the powdered sugar, vanilla, and heavy cream to create your icing. If it’s too thick, add a bit more cream until you reach your desired consistency.
- Drizzle the icing over the cooled danish. This final touch adds sweetness and makes it irresistible. Cut into pieces and serve!
Notes
- Tip 1: Allow cream cheese to reach room temperature for easy mixing and a smooth filling.
- Tip 2: Handle the crescent dough gently to prevent tearing; it’s delicate!
- Tip 3: Check the danish while baking for that golden color; baking times may vary.
- Tip 4: Cool completely before icing to avoid melting and achieve a beautiful finish.