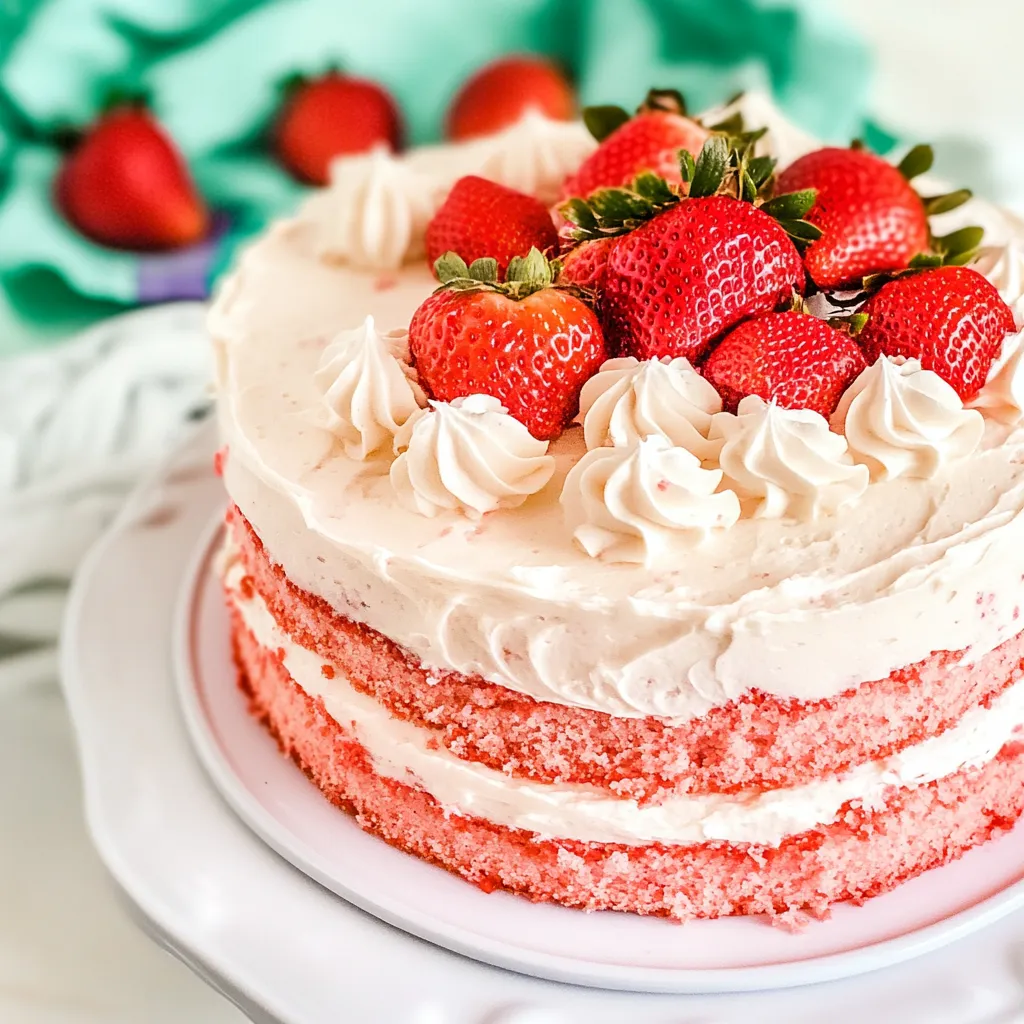
When it comes to celebrating special moments, nothing compares to a beautifully crafted Strawberry Layer Cake. I still remember the first time I made this cake for a friend’s birthday. The sun was shining, and the sweet aroma of fresh strawberries filled my kitchen. My heart raced with excitement as I layered those fluffy cakes, spreading a generous amount of cream cheese frosting in between each one. The vibrant colors of the strawberries and frosting made it a showstopper! Every slice brought smiles and joy, creating memories that lingered long after the last crumb was devoured.
Recipe Snapshot
1 hr 27 mins
60 mins
27 mins
Hard
320 kcal
4 g
Gluten-Free, Low FODMAP
15 g
Stand mixer with whisk and paddle attachment, 3 8 inch cake pans, 3 Parchment paper circles, Food processor, Offset spatula, Large piping bag fitted with a large tip optional
The Magic of This Strawberry Layer Cake
A Burst of Freshness
The star of the show in this Strawberry Layer Cake is undoubtedly the fresh strawberries. Their natural sweetness and bright flavor shine through, offering a refreshing contrast to the rich cream cheese frosting. Each bite is a delightful combination of fluffy cake and juicy fruit.
Layer Upon Layer of Happiness
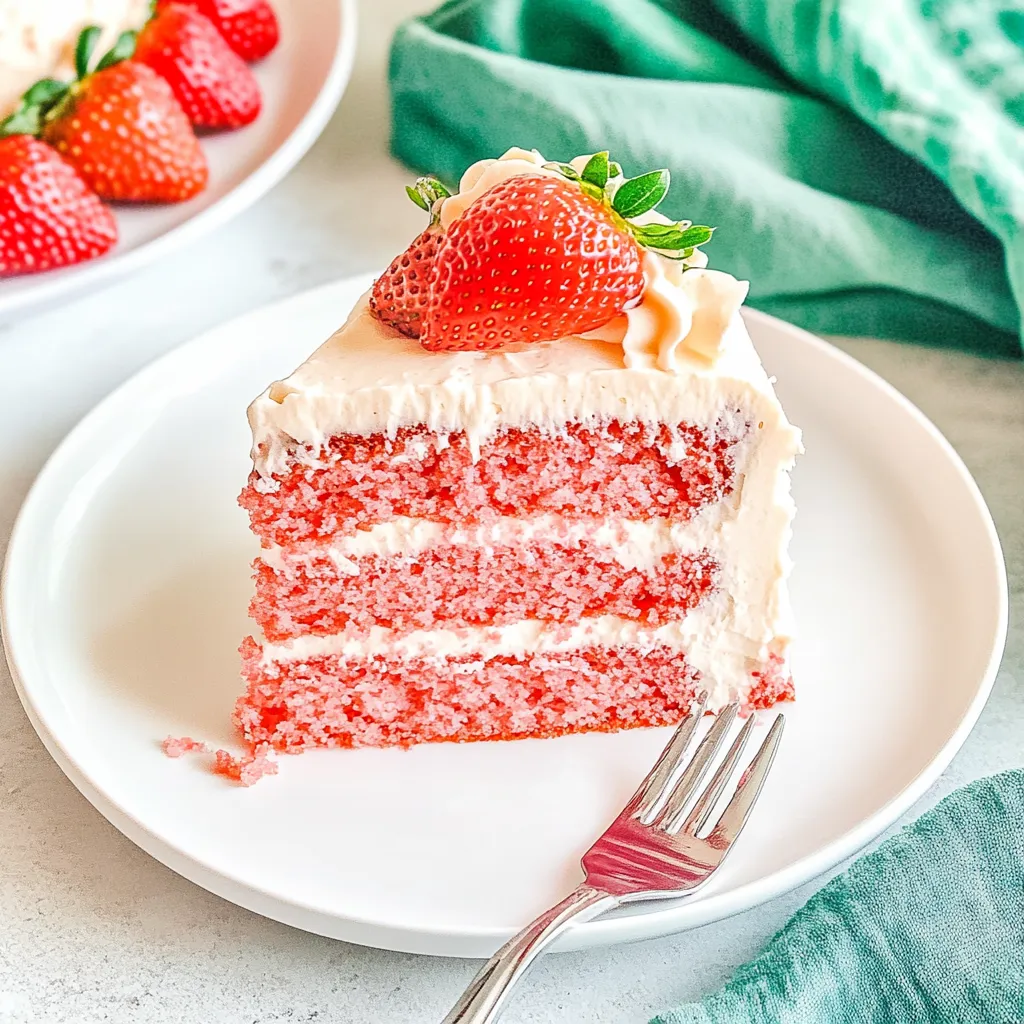
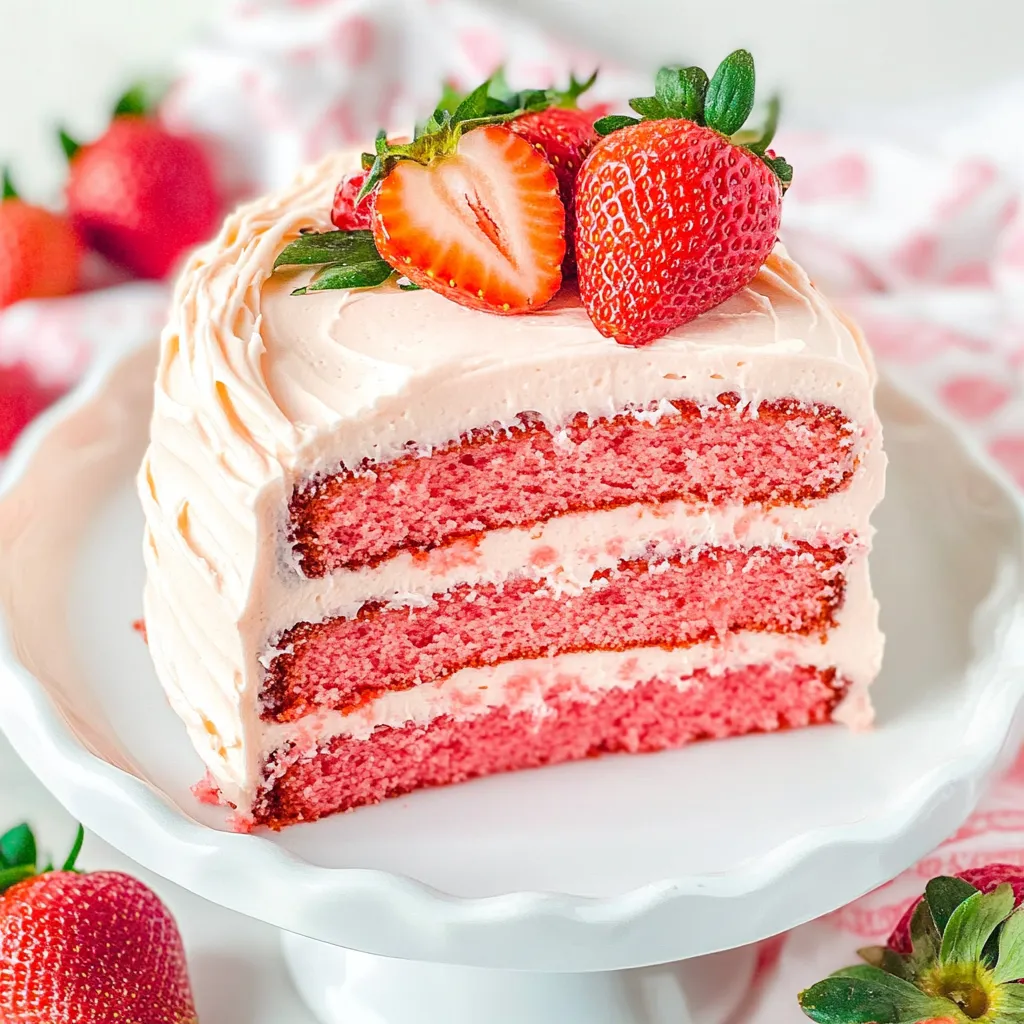
There’s something magical about layer cakes. With each layer you add, you’re not just stacking cake, you’re creating a beautiful masterpiece. This cake is not only pleasing to the eye but also provides a variety of textures and flavors in every slice.
Perfectly Creamy Frosting
Let’s not forget the frosting! The cream cheese frosting is the perfect companion for the strawberries, offering a creamy, tangy contrast that complements the flavors beautifully. It’s easy to spread, making the frosting process an enjoyable part of cake-making.
Great for Any Occasion
This cake is versatile and can be the centerpiece of any celebration. Whether it’s a birthday, an anniversary, or just a sunny spring day, the Strawberry Layer Cake fits perfectly into any gathering, bringing loved ones together over a shared love for dessert.
A Family Tradition
Since that first cake, I’ve made it for countless celebrations, and it has become a family favorite. The joy it brings is unparalleled, and I cherish the moments spent gathering around the table to enjoy a slice together. Making this cake means creating memories that will last a lifetime.
What You’ll Need for Strawberry Layer Cake
To craft a perfect Strawberry Layer Cake, it’s essential to choose the right ingredients. Each one plays a significant role in ensuring the cake is moist, fluffy, and bursting with flavor. Fresh strawberries are the highlight, while the cream cheese frosting adds a rich creaminess that ties everything together. Let’s explore the key players in this delightful dessert.
- 3 cups (500g) fresh strawberries, quartered – Sweet and juicy, these strawberries will be pureed to create a beautiful cake layer.
- ¾ cup (188g) sour cream – Adds moisture and a slight tang, enhancing the cake’s flavor.
- ¼ cup (60ml) whole milk – This helps to achieve a tender cake crumb.
- 4 large eggs – Essential for structure and richness, eggs help bind the ingredients together.
- 1 teaspoon pure vanilla extract – Enhances the overall flavor profile of the cake.
- 2 ½ cups (300g) all-purpose flour – The backbone of the cake, providing the necessary structure.
- 1 ½ cups (300g) granulated sugar – Adds sweetness and helps create a tender texture.
- 2 teaspoons baking powder – This leavening agent ensures the cake rises beautifully.
- 1 ½ teaspoons baking soda – Works alongside baking powder to create a light and fluffy cake.
- ¾ cup (170g) salted butter, at room temperature – Provides richness and a tender crumb.
- 9-10 drops pink food color (optional) – For a touch of fun and vibrancy in the cake layers.
- 16 ounces (450g) cream cheese, at room temperature – The base for the luscious frosting.
- ¾ cup (170g) salted butter, at room temperature – Also in the frosting, it adds creaminess.
- 10 cups powdered sugar – Sweetens the frosting and gives it a perfect spreadable consistency.
- 1 teaspoon pure vanilla extract – Added to the frosting for an extra layer of flavor.
The Method for Strawberry Layer Cake

Creating a stunning Strawberry Layer Cake is an enjoyable process that requires attention and love. Follow these steps closely to ensure your cake turns out perfectly every time. Let’s dive into the delightful journey of baking!
Start the strawberry reduction by adding the sliced strawberries into a food processor and pulse until you have about 1 ½ cups puree. This step is crucial as it intensifies the flavors of the strawberries.
Add the puree into a medium saucepan and heat over medium-high heat, stirring often, until thickened and reduced by about half. This should take about 20 minutes. It’s important to keep an eye on it as it cooks to achieve the right consistency.
Set the reduction aside to cool. This cooling process is essential to ensure it doesn’t cook the eggs when combined later.
Preheat your oven to 350°F (180°C), or 160°C if using a fan oven, and prepare three 8-inch (20 cm) cake pans by spraying generously with non-stick spray and placing a round of parchment paper in the bottom of each pan. This ensures easy release after baking.
In a medium bowl, add the sour cream, milk, eggs, vanilla, and cooled puree. Whisk to combine and set aside. This mixture adds moisture and flavor to your cake.
In the bowl of a stand mixer equipped with a whisk attachment, add the flour, sugar, baking powder, and baking soda. Whisk to combine. This dry mix forms the foundation of your cake.
Slowly add the room temperature butter into the dry ingredients, 1 tablespoon at a time. Once all the butter is combined, the flour should have a sand-like texture. This technique ensures a smooth batter.
With the mixer on low speed, slowly pour half of the wet ingredients into the flour mixture. Mix until combined. Be careful not to overmix, as this can toughen the cake.
Add the remaining wet ingredients and mix until just combined. Scrape the sides and bottom of the bowl and mix additionally if needed. This ensures everything is well incorporated.
Divide the batter evenly between the three prepared cake pans and gently tap the pans on the counter to release any air bubbles. This helps achieve an even bake.
Bake for 25 to 27 minutes or until a toothpick inserted in the center of each cake comes out clean. The cakes should be lightly golden on top.
Remove the cakes from the oven and allow to cool for five minutes, then flip the cakes onto a wire rack to cool completely. This step is vital to prevent soggy bottoms.
Prepare the frosting by adding the cream cheese and butter into the bowl of a stand mixer equipped with a paddle attachment. Cream on medium-high speed until soft and fluffy, about 3 to 4 minutes.
Scrape the sides and bottom of the bowl and add half of the powdered sugar. Mix until just combined and smooth.
Add the remaining powdered sugar and vanilla. Mix until combined and smooth. The frosting should be creamy and spreadable.
Remove the domes off the top of the cake layers if necessary, using a large, serrated knife. This ensures even layering.
Place one layer of cake on a serving tray and top with about 1 cup of frosting. Smooth it evenly. Repeat with the remaining cake layers. It’s great to alternate the direction of the strawberries on each layer to create a beautiful pattern.
Once the cakes are stacked, smooth a thin layer of frosting over the entire cake. This crumb coat helps keep the layers intact.
Place the cake in the refrigerator for 15 to 20 minutes until the frosting crumb coat slightly sets. This step helps firm up the frosting for a smooth finish.
Smooth the remaining frosting over the entire cake and smooth. If desired, pipe some frosting around the top border of the cake and garnish with fresh berries. This adds an elegant touch!
Keep refrigerated until ready to serve. Keep leftovers in an airtight container in the refrigerator for up to three days. Trust me, this cake tastes even better the next day!
Things Worth Knowing
- Avoid Over Mixing the Cake Batter: An overmixed cake can become tough after baking. Mix ingredients until just combined.
- Make Ahead Option: Bake the cakes, let them cool most of the way, and wrap them individually with plastic wrap. From here you can store them in the fridge for up to 3 days before stacking and decorating the cake. The cakes can also be frozen this way for up to 3 months.
- 8-inch cake pans: For the most beautiful layer cakes, straight-sided pans will give you the best results.
- Cooling Time: Allow the cake layers to cool completely before frosting; this prevents the frosting from melting.
- Decorating Tip: Use fresh strawberries for garnish to enhance the cake’s appearance and flavor.
Make It Your Own
Customizing your Strawberry Layer Cake can make it even more special and tailored to your taste. Here are some ideas to get creative!
- Storage: Store leftovers in an airtight container in the refrigerator for up to three days. However, it’s best enjoyed fresh!
- Freezing: You can freeze the cake layers individually wrapped in plastic wrap for up to three months. Just thaw before frosting.
- Variations: Try incorporating other fruits, such as raspberries or blueberries, for a mixed berry cake.
- Flavor Enhancements: Add lemon zest to the cake batter for a citrus twist.
- Frosting Options: Experiment with whipped cream or a different flavored frosting for a unique touch.
What Complements This Strawberry Layer Cake
Serving the Strawberry Layer Cake is just as delightful as making it! Here are some fantastic ideas to enhance your dessert experience:
- Pair with Fresh Cream: Serve slices with a dollop of whipped cream for added richness.
- Seasonal Sides: Complement the cake with a light fruit salad or a scoop of vanilla ice cream.
- Perfect for Celebrations: This cake makes a stunning centerpiece for weddings, birthdays, or family gatherings.
- Tea Time Treat: Enjoy the cake alongside a cup of tea or coffee for a relaxing afternoon.
- Festive Garnish: Dress the cake up with edible flowers or mint leaves for a sophisticated look.
FAQ
Conclusion
The Strawberry Layer Cake is not just a dessert; it’s a celebration of flavors, colors, and memories. This cake embodies the joy of gathering together with loved ones over a slice of heaven. I encourage you to try making this delightful cake for your next occasion. You won’t regret it, and your guests will be in awe of your baking skills!
Strawberry Layer Cake
Ingredients
Equipment
Method
- Start the strawberry reduction by adding the sliced strawberries into a food processor and pulse until you have about 1 ½ cups puree.
- Add the puree into a medium saucepan and heat over medium-high heat, stirring often, until thickened and reduced by about half. This should take about 20 minutes.
- Set the reduction aside to cool.
- Preheat your oven to 350°F (180°C), or 160°C if using a fan oven, and prepare three 8-inch (20 cm) cake pans by spraying generously with non-stick spray and placing a round of parchment paper in the bottom of each pan.
- In a medium bowl, add the sour cream, milk, eggs, vanilla, and cooled puree. Whisk to combine and set aside.
- In the bowl of a stand mixer equipped with a whisk attachment, add the flour, sugar, baking powder, and baking soda. Whisk to combine.
- Slowly add the room temperature butter into the dry ingredients, 1 tablespoon at a time. Once all the butter is combined, the flour should have a sand-like texture.
- With the mixer on low speed, slowly pour half of the wet ingredients into the flour mixture. Mix until combined.
- Add the remaining wet ingredients and mix until just combined. Scrape the sides and bottom of the bowl and mix additionally if needed.
- Divide the batter evenly between the three prepared cake pans and gently tap on the pans on the counter to release any air bubbles.
- Bake for 25 to 27 minutes or until a toothpick inserted in the center of each cake comes out clean.
- Remove the cakes from the oven and allow to cool for five minutes, then flip the cakes onto a wire rack to cool completely.
- Prepare the frosting by adding the cream cheese and butter into the bowl of a stand mixer equipped with a paddle attachment. Cream on medium-high speed until soft and fluffy, about 3 to 4 minutes.
- Scrape the sides and bottom of the bowl and add half of the powdered sugar. Mix until just combined and smooth.
- Add the remaining powdered sugar and vanilla extract. Mix until combined and smooth.
- Remove the domes off the top of the cake layers if necessary, using a large, serrated knife.
- Place one layer of cake on a serving tray and top with about 1 cup of frosting. Smooth evenly. Repeat with the remaining cake layers.
- Once the cakes are stacked, smooth a thin layer of frosting over the entire cake.
- Place the cake in the refrigerator for 15 to 20 minutes until the frosting crumb coat slightly sets.
- Smooth the remaining frosting over the entire cake and smooth. If desired, pipe some frosting around the top border of the cake, and garnish with fresh berries.
- Keep refrigerated until ready to serve. Keep leftovers in an airtight container in the refrigerator for up to three days.
Notes
- Avoid Over Mixing the Cake Batter: An overmixed cake can become tough after baking. Mix ingredients until just combined.
- Make Ahead Option: Bake the cakes, let them cool most of the way, and wrap them individually with plastic wrap. From here you can store them in the fridge for up to 3 days before stacking and decorating the cake. The cakes can also be frozen this way for up to 3 months.
- 8-inch cake pans: For the most beautiful layer cakes, straight-sided pans will give you the best results.