Every time I think of Lemon Sweet Rolls, I’m transported back to my grandmother’s warm kitchen, where the scent of fresh-baked goods filled the air. It was a sunny Saturday morning, and I was always eager to help her in the kitchen. As she whisked the ingredients together, I watched in awe as the dough transformed under her skilled hands. Those moments were more than just about baking; they were about love, laughter, and sharing delicious treats. Each roll was a masterpiece, soft and gooey, topped with a zesty lemon glaze that was simply irresistible. Making Lemon Sweet Rolls has become a cherished tradition in my own home, a way to bring a little sunshine into the everyday hustle. Whether you’re preparing for a family gathering or just want to indulge in a sweet treat, these rolls are sure to make your day brighter and your taste buds happier.
Recipe Snapshot
58 mins
30 mins
28 mins
Hard
250 kcal
4 g
Gluten-Free, Low FODMAP
10 g
Oven, Chef’s Knife, Whisk, Mixing Bowl, Baking Sheet
Why You’ll Love This Lemon Sweet Rolls
Perfect for Any Occasion
There’s something about Lemon Sweet Rolls that makes them suitable for any occasion. Whether it’s brunch, a holiday gathering, or simply a sweet snack during the week, these rolls fit right in. Their delightful lemony flavor and soft texture make them a crowd-pleaser, sure to impress family and friends alike.
Easy to Make
One of the best things about Lemon Sweet Rolls is how approachable the recipe is. With just a few simple steps, you can create these delicious rolls from scratch. The process can be therapeutic, allowing you to connect with the ingredients and enjoy the fruits of your labor.
Versatile Flavors
These rolls are not just about lemon. You can easily experiment with other flavors too! Adding some poppy seeds, vanilla, or even a touch of lavender can elevate your rolls to a new level. This versatility allows you to cater to your taste preferences and those of your loved ones.
Great for Meal Prep
If you love prepping meals for the week, Lemon Sweet Rolls are a fantastic addition. You can make them ahead of time and freeze them. Just pop them in the oven when you need a quick treat or breakfast option. The fresh-baked aroma will fill your home, and it’s a nice treat for unexpected visitors.
Kid-Friendly Activity
Getting kids involved in the kitchen can be a fun and educational experience. Lemon Sweet Rolls are a perfect project! Kids can help with measuring, mixing, and even rolling the dough. It’s a great way to bond over baking and instill a love of cooking in the next generation.
What You’ll Need for Lemon Sweet Rolls

To create the magic of Lemon Sweet Rolls, you’ll need a handful of ingredients that work perfectly together. Each component contributes to the overall flavor and texture, making them irresistibly soft and delicious with a bright citrus zing. The combination of flour, sugar, and lemon zest creates a mouthwatering experience that you won’t want to miss.
- 1 ½ cups whole milk, warmed to 110°F
- 2 ¼ teaspoons instant yeast (1 packet)
- 1 large egg, room temperature
- 3 tablespoons granulated sugar
- 2 teaspoons lemon zest
- ½ teaspoon salt
- 3 tablespoons unsalted butter, melted
- 3 ½ to 4 ¼ cups bread flour or all-purpose flour, spooned and leveled
- Olive oil or butter for greasing the bowl
- ¾ cup granulated sugar
- 1 ½ tablespoons lemon zest, packed, about 2 large lemons
- 5 tablespoons unsalted butter, softened
- 1 tablespoon unsalted butter for greasing
- 4 ounces full-fat cream cheese, brick style
- 2 tablespoons unsalted butter, softened
- 1 ¼ cups powdered sugar
- Pinch of salt
- 2 tablespoons lemon juice, about 1 large lemon
- Lemon slices for garnish
- Lemon zest for garnish
Making Lemon Sweet Rolls
Creating Lemon Sweet Rolls is an enjoyable and rewarding experience. It’s a delightful way to spend time in the kitchen, and the results are sure to impress everyone. Let’s dive into the steps to make these heavenly rolls!
- In the large bowl of a stand mixer, combine the lukewarm milk, yeast, egg, sugar, lemon zest, melted butter, and salt. Whisk it together by hand until it gets foamy. This foamy mixture indicates that the yeast is active and ready to work its magic.
- Add the flour to the mixture and use the stand mixer with a dough hook attachment to knead the dough for 3 minutes. If you don’t have a stand mixer, you can use a spatula to mix until a dough forms, then turn it out onto a surface dusted with flour and knead by hand for about 5 minutes. Your dough should feel a little tacky but not stick to your fingers. If it does, add more flour a tablespoon at a time until it reaches the right consistency.
- Lightly oil a bowl with some olive oil. Place the dough in it, coating it lightly with the oil, then cover the bowl with plastic wrap. Leave it in a warm spot to rise until it doubles in size, which will take about an hour.
- Once the dough has risen, turn it out onto a lightly floured surface. With a floured rolling pin, roll the dough into a large rectangle, roughly 16 inches by 12 inches. Make sure to keep the thickness even throughout.
- In a bowl, combine the granulated sugar and lemon zest, mixing well. This mixture will create a delightful lemony filling that enhances the flavor of your rolls.
- Dot the softened butter all over the rolled-out dough, then use the back of a spoon or an offset spatula to spread it into an even layer across the entire surface of the dough.
- Evenly sprinkle the lemon-sugar mixture over the butter on the dough. This will give your rolls a sweet, citrusy kick!
- Starting with the long side facing you, tightly roll the dough rectangle into a long log shape. Pinch the seam closed with your fingers to ensure it holds together. To make cutting easier, cut the log of dough in half.
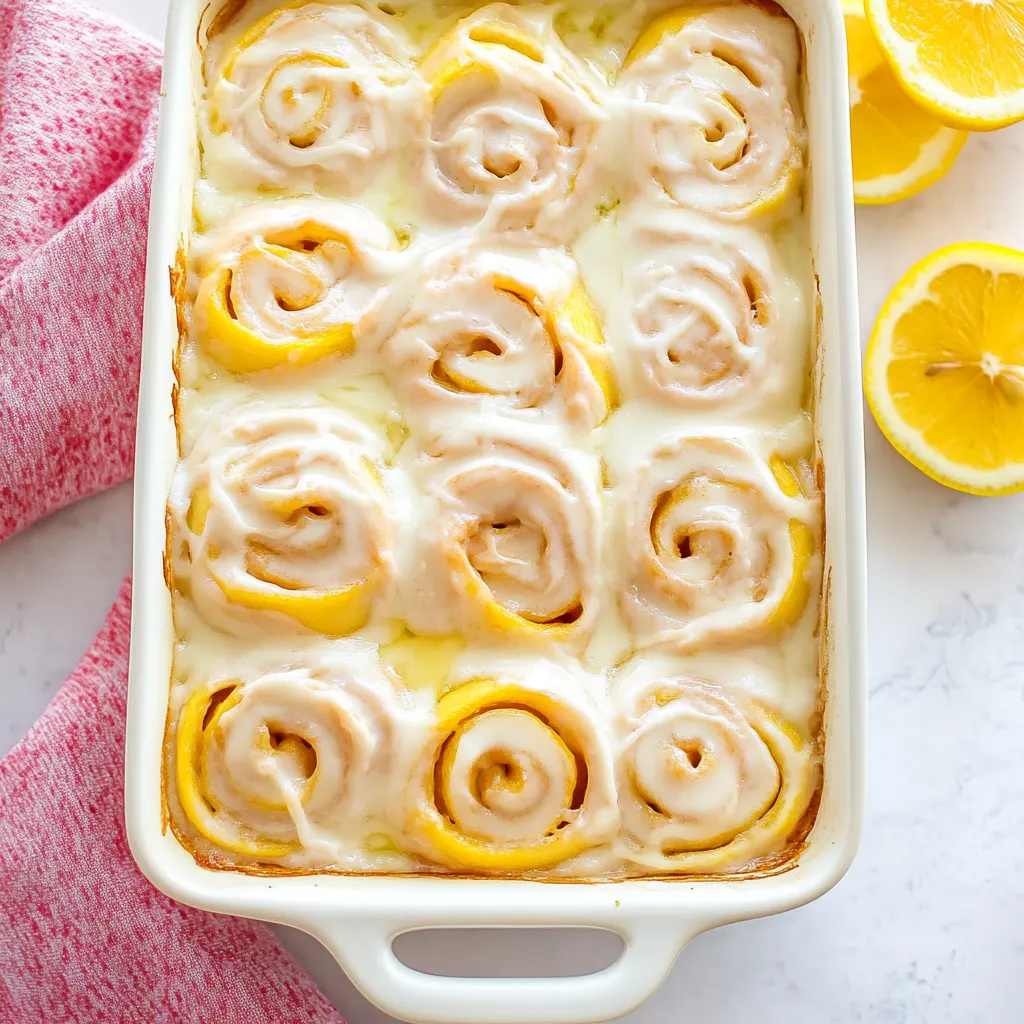
- Use a sharp knife or dough cutter to cut each half of the dough into 6 equal pieces. You will have 12 pieces total, each one ready to puff up in the oven.
- Grease a 9”x13” baking dish with 1 tablespoon of melted butter. Place the rolls in the dish, leaving a little space between each one to allow them to rise and expand.
- Cover the dish with plastic wrap again and put it somewhere warm to rise for the second time. This will take 45 to 60 minutes. The rolls will puff up and become close together during this time.
- Preheat your oven to 350°F. Once the lemon rolls have puffed up, take off the plastic wrap and brush them with the remaining tablespoon of melted butter.
- Bake for 28 to 30 minutes, checking on the rolls after 25 minutes. If they’re not golden brown, bake for an additional 5 to 10 minutes, or until golden brown. If they are brown but not yet cooked, tent with foil and continue baking until fully done.
- Remove the rolls from the oven and set them aside to cool slightly.
- In a large mixing bowl, add the cream cheese and softened butter, beating to combine until smooth.
- Add the powdered sugar, salt, and lemon juice, beating until you reach a smooth, pourable consistency. Adjust the glaze by adding more lemon juice for a thinner texture or more powdered sugar for a thicker glaze.
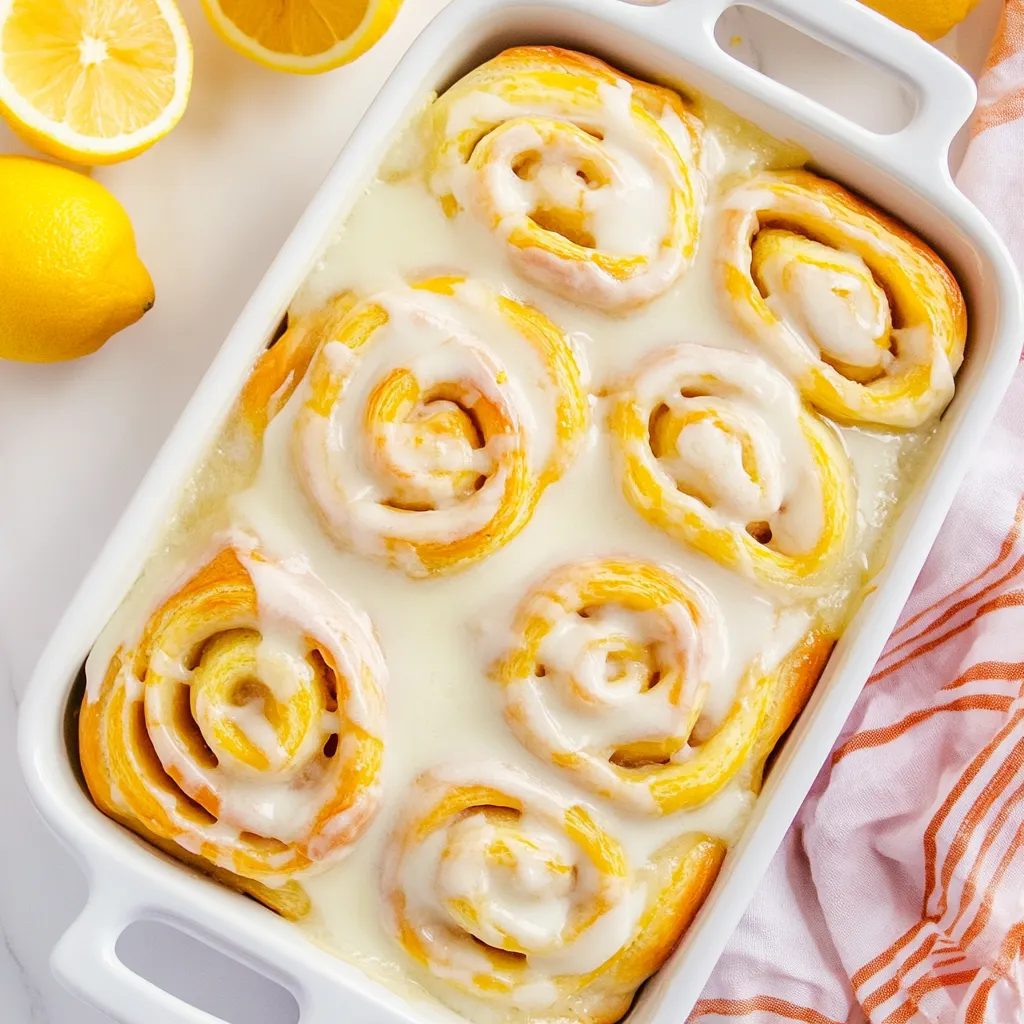
- While the Lemon Rolls are still warm in the dish, drizzle the glaze over them. Scatter the lemon slices and lemon zest for garnish, enhancing both flavor and presentation.
- Serve the rolls right away while they’re still warm, and enjoy the delightful burst of lemon in every bite!
Things Worth Knowing
- Proofing: Ensure your dough rises in a warm environment. If it’s too cold, the yeast won’t work effectively, resulting in dense rolls.
- Flour Measurement: Spoon your flour into the measuring cup instead of scooping it directly, which can lead to using too much and making the dough dry.
- Glaze Consistency: Adjust the glaze thickness according to your preference. If you want it thicker, add more powdered sugar, and for a thinner glaze, add more lemon juice.
- Storage: Store leftovers in an airtight container at room temperature for a day or two. For longer storage, refrigerate them.
- Overnight Option: You can prepare the rolls the night before and refrigerate them after the second rise. Just bring them back to room temperature before baking.
Ways to Customize
There are countless ways to put your own spin on Lemon Sweet Rolls. Here are some ideas to get you started!
- Filling Variations: Consider adding different fillings like chocolate chips, nuts, or poppy seeds combined with the lemon sugar mix for added texture and flavor.
- Frosting Alternatives: Instead of a lemon glaze, try a cream cheese frosting or a simple powdered sugar glaze for a different take.
- Fruit Additions: Incorporate fresh berries into the filling for a fruity twist that complements the lemon nicely.
- Spice it Up: Adding a hint of cinnamon or nutmeg to the dough can create a warm, aromatic flavor profile that pairs beautifully with the lemon.
- Size Adjustments: If you prefer smaller bites, roll the dough into mini rolls instead, and adjust the baking time accordingly.
What to Pair With Lemon Sweet Rolls
When it comes to serving Lemon Sweet Rolls, the possibilities are endless! Here’s how you can make the most out of them:
- Morning Delight: These rolls are perfect for breakfast or brunch. Pair them with a cup of coffee or tea for a refreshing start to your day.
- Brunch Gatherings: Perfect for a cheerful brunch table. Serve alongside fresh fruit, yogurt, and a selection of pastries to create an inviting spread.
- Picnic Treat: Pack them for a picnic! They’re easy to transport and make for a delightful addition to your outdoor feast.
- Snack Time: Enjoy them as a sweet afternoon snack. The balance of sweet and tangy makes them a satisfying treat.
- Seasonal Celebrations: These rolls are particularly great during spring and summer occasions, adding a bright touch to your celebrations.
- Storage Tips: Store any leftovers in an airtight container at room temperature for up to two days. They can be reheated for a warm treat!
FAQ
Conclusion
Lemon Sweet Rolls are a delightful treat that brings warmth and joy to any occasion. Their soft texture and zesty flavor make them irresistible, and they’re perfect for sharing with family and friends. I encourage you to try making these rolls; you’ll not only create a delicious dessert but also memories that will last a lifetime. So roll up your sleeves and get ready to enjoy a taste of sunshine!

Lemon Sweet Rolls
Ingredients
Equipment
Method
- 1. In the large bowl of a stand mixer, combine the lukewarm milk, yeast, egg, sugar, lemon zest, melted butter, and salt. Whisk it together by hand until it gets foamy.
- 2. Add the flour to the mixture and use the stand mixer with a dough hook attachment to knead the dough for 3 minutes.
- 3. Lightly oil a bowl with some olive oil. Place the dough in it, coating it lightly with the oil, then cover the bowl with plastic wrap.
- 4. Once the dough has risen, turn it out onto a lightly floured surface.
- 5. In a bowl, combine the granulated sugar and lemon zest, mixing well.
- 6. Dot the softened butter all over the rolled-out dough, then use the back of a spoon to spread it evenly across the surface.
- 7. Sprinkle the lemon-sugar mixture over the butter on the dough.
- 8. Starting with the long side facing you, roll the dough tightly and pinch the seam closed.
- 9. Use a sharp knife to cut each half into 6 equal pieces to make a total of 12 rolls.
- 10. Grease a 9”x13” baking dish with 1 tablespoon of melted butter and place the rolls in it.
- 11. Cover the dish with plastic wrap and let rise again for 45 to 60 minutes.
- 12. Preheat your oven to 350°F. Once the rolls have puffed up, brush them with melted butter.
- 13. Bake for 28 to 30 minutes, checking for a golden brown color.
- 14. Remove from the oven and set aside to cool slightly.
- 15. In a separate bowl, add the cream cheese and softened butter and beat until smooth.
- 16. Add the powdered sugar, salt, and lemon juice, beating until smooth.
- 17. Drizzle the glaze over the warm Lemon Rolls and garnish with lemon slices and lemon zest.
- 18. Serve warm and enjoy!
Notes
- Refrigeration: Store leftovers in an airtight container in the fridge for 2 to 3 days.
- Freezing: Let baked rolls cool completely, then wrap them tightly and freeze for up to one month.
- Reheating: Fresh is always best! But leftover rolls can be reheated in the microwave for 30 seconds to soften the dough and glaze.
- Making Ahead: You can make these rolls up to 48 hours in advance. After the second rise, refrigerate them before baking.
- Yeast Activation: Make sure the milk is warmed to 110°F, as scalding hot milk can kill the yeast.