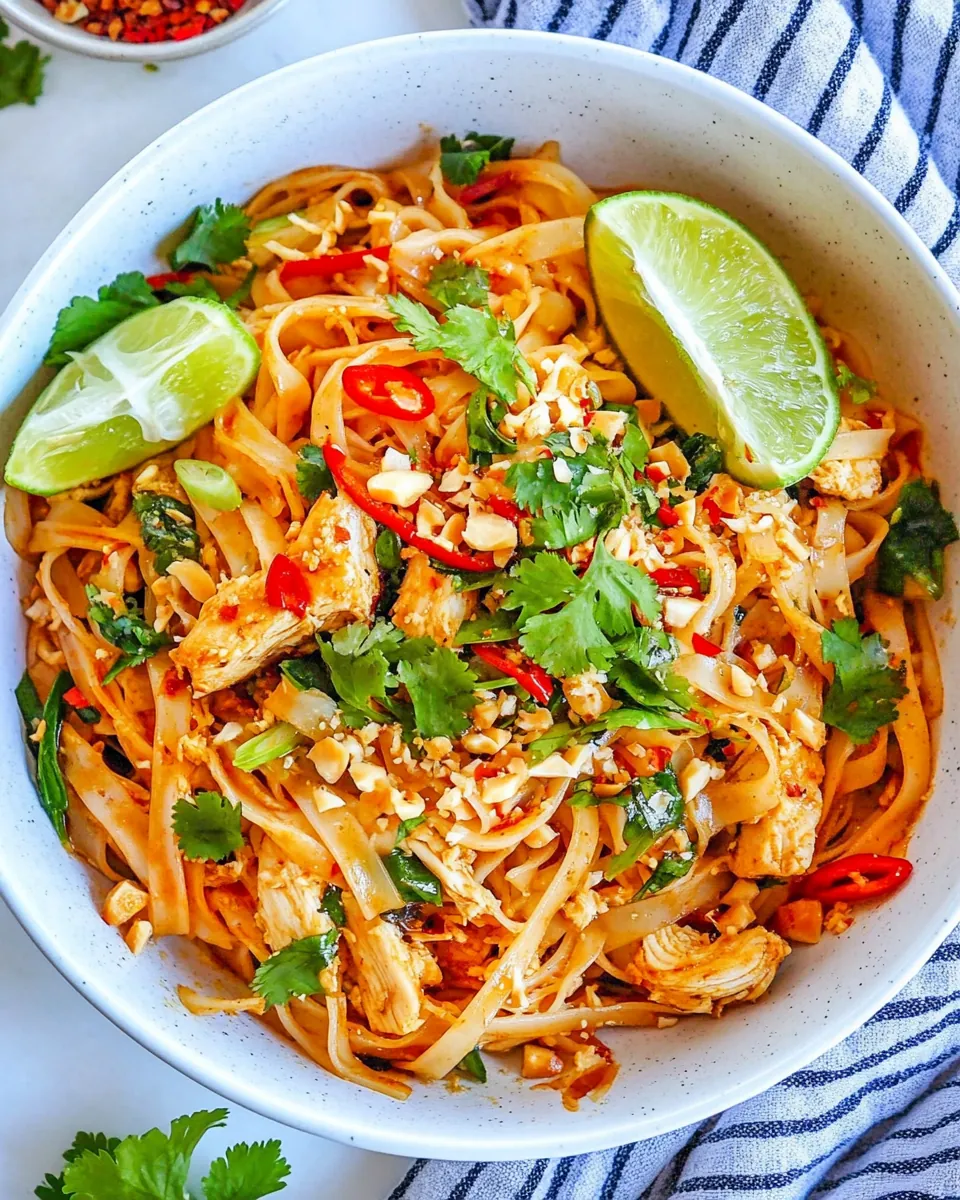
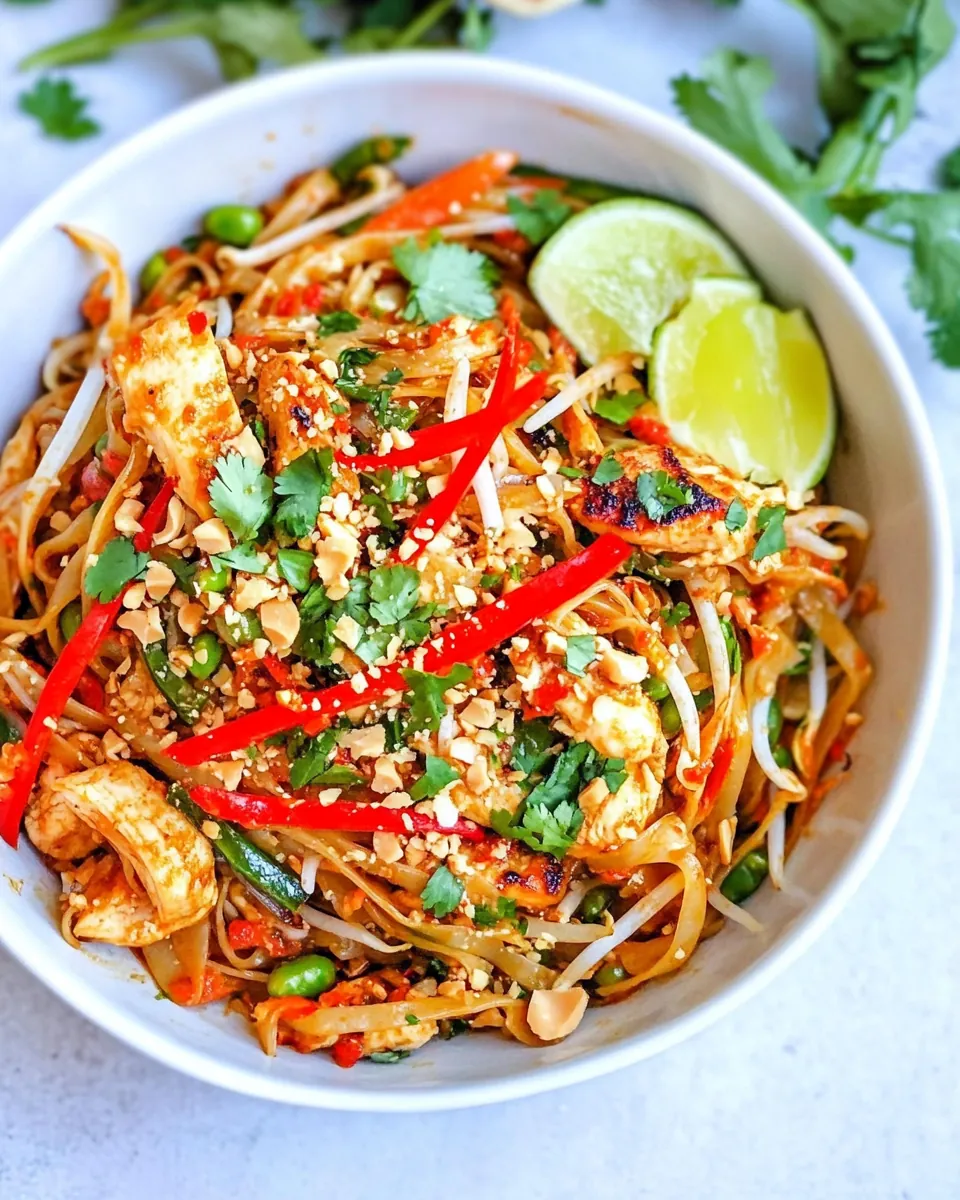
Every time I make Homemade Pad Thai, I can’t help but remember those bustling street markets in Thailand, where the aroma of fresh ingredients fills the air, and the sizzle of noodles dances on the grill. It’s a memory that evokes warmth, comfort, and a bit of wanderlust. This dish isn’t just a meal; it’s a culinary journey that brings back a piece of that vibrant culture right to my kitchen. As I stir-fry the ingredients, I can hear the chatter of locals and the clinking of dishes, making every bite of Homemade Pad Thai a delightful escape. It’s amazing how something as simple as rice noodles and fresh veggies can transport me back to those lively streets. Whether it’s a cozy dinner at home or a gathering with friends, this dish always makes a statement. The balance of flavors—from savory to sweet—combined with the crunch of peanuts and the freshness of herbs, makes it irresistible. Trust me, once you try it, you’ll understand why Homemade Pad Thai has become a beloved favorite in many households, including mine!
Recipe Snapshot
28 mins
20 mins
8 mins
Medium
496 kcal
28 g
Whole30, Low FODMAP
20 g
Skillet, Whisk, Mixing Bowl, Chef’s Knife, Frying Pan, Wooden Spoon
We all have those recipes that we fall in love with for a reason. This particular pad thai stands out not just for its delicious flavor but also for its versatility and simplicity. It can easily be adapted to suit various dietary preferences, making it a crowd-pleaser. Let’s explore why this dish has become a staple in my cooking repertoire.
Why You Need This Homemade Pad Thai
It’s Bursting with Flavor
The beauty of Homemade Pad Thai lies in its ability to blend multiple flavors seamlessly. The savory notes from the chicken and the sweetness from the brown sugar create a delightful balance that keeps you coming back for more. The addition of lime juice and fish sauce elevates this dish, making every bite a harmony of tastes that dance on your palate.
Quick and Easy to Make
When life gets busy, I love knowing that Homemade Pad Thai can be whipped up in no time. With just a few fresh ingredients and a bit of prep, you can have a satisfying meal ready in under thirty minutes. It’s perfect for those weeknight dinners when you want something delicious without spending hours in the kitchen.
A Versatile Dish
This recipe is incredibly adaptable. Whether you’re a fan of tofu, prefer shrimp, or want to keep it vegetarian, you can easily modify the ingredients to suit your taste. This flexibility not only makes it approachable for everyone but also encourages creativity in the kitchen!
Nutritious Ingredients
Each component of Homemade Pad Thai carries its own nutritional value. From the fiber-rich bean sprouts to the vitamin-packed carrots and bell peppers, this dish offers a well-rounded meal that satisfies both your taste buds and your body. It’s a great way to incorporate more vegetables into your diet while enjoying an authentic flavor profile.
A Dish for Any Occasion
Whether it’s a casual lunch, a cozy dinner, or even a special occasion, Homemade Pad Thai fits the bill perfectly. It’s not just food; it’s an experience that brings people together. The communal nature of sharing a dish like this makes it ideal for gatherings and celebrations.
Budget-Friendly Meal
Cooking can be expensive, but Homemade Pad Thai utilizes ingredients that are both affordable and accessible. You can feed a family or a group of friends without breaking the bank, making it a practical choice that doesn’t compromise on flavor.
Ingredients for Homemade Pad Thai

Creating a delicious Homemade Pad Thai starts with fresh, quality ingredients that work beautifully together. Each component plays a vital role, contributing to the overall flavor and texture of the dish. The combination of rice noodles, chicken, and an array of vibrant vegetables ensures that every bite is satisfying and wholesome. Let’s take a closer look at what you’ll need.
- 8 oz. ¼” wide rice noodles — The heart of the dish, these noodles are the perfect canvas for the flavors to come.
- 1 tsp toasted sesame oil — Adds a rich, nutty flavor.
- 1 tbsp vegetable or peanut oil — Essential for frying and imparting flavor.
- 1 lb. chicken breast, sliced into thin strips then 2” pieces — The protein that makes this dish hearty.
- 1 red bell pepper, thinly sliced then halved — Adds sweetness and color.
- ⅓ cup minced shallots — Brings a mild onion flavor.
- 1 ½ cups Matchstick carrots — A crunchy and nutritious addition.
- 4 garlic cloves, minced — Enhances the aromatic profile.
- 2 eggs, beaten — Provides richness and helps bind the ingredients.
- 3 cups (6 oz.) bean sprouts — A classic Pad Thai ingredient that adds crunch.
- 2 green onions, chopped — Freshness that brightens the dish.
- ½ cup unsalted peanuts, roughly chopped — For that delightful crunch and nuttiness.
- ¼ cup cilantro leaves, chopped — A fresh herb that lifts the flavors.
- 1 tbsp lime juice (optional) — For a tangy finish.
- ⅓ cup packed brown sugar — Adds sweetness and depth.
- 3 tbsp low sodium soy sauce — The savory component.
- 3 tbsp fish sauce — A key flavor enhancer.
- 3 tbsp lime juice — Balances flavors.
- 3 tbsp rice vinegar — Adds acidity.
- 3 tbsp smooth peanut butter — Adds creaminess.
- 1-1 ½ tbsp chili paste like Sambal Oelek — For heat.
- ¾ tsp EACH dried basil, ground coriander, ground ginger — A blend of spices that deepen the flavor.
- ¼-½ tsp pepper — For seasoning.
The Process for Making Homemade Pad Thai

Now let’s dive into the fun part: preparing your Homemade Pad Thai. The cooking process is quick and straightforward, yet it’s all about timing and technique to ensure everything comes together perfectly. Here’s how you can create this delicious dish step by step.
- Start by preparing the rice noodles according to the package directions, ensuring they remain slightly crunchy or al dente. This is crucial as they will continue to cook in the sauce. Once cooked, rinse them under cold water, drain well, and toss with 1 teaspoon of toasted sesame oil to keep them from sticking together. Set them aside.
- In a medium mixing bowl, combine all the sauce ingredients—the brown sugar, low sodium soy sauce, fish sauce, lime juice, rice vinegar, and smooth peanut butter. Whisk everything until well blended and set this mixture aside. This sauce is key to infusing flavor into the noodles and veggies.
- Next, in a deep, large nonstick skillet, heat 1 tablespoon of vegetable or peanut oil over medium-high heat. Once the oil is hot, add in the sliced chicken. Allow it to cook undisturbed for about one minute, then stir fry until it’s cooked through. This should take around 3 to 4 minutes. Once done, transfer the chicken to a plate and wipe out the skillet to remove any excess oil.
- In the same skillet, heat another tablespoon of oil. Add the red bell pepper and minced shallots. Sauté these for about one minute until they become tender and fragrant. Then, add the matchstick carrots and minced garlic, sautéing for an additional minute. You want the vegetables to maintain a bit of crunch, so keep an eye on them!
- Reduce the heat to medium and pour the beaten eggs over the sautéed vegetables. Stir constantly until the eggs are scrambled and cooked through. This whole process should take no longer than 2 minutes.
- Now it’s time to add in the sauce and noodles to the skillet. Increase the heat to medium-high, tossing everything together until evenly combined. You’ll want to keep stirring for about 1 to 2 minutes until the noodles are heated and flavorful.
- Stir back in the cooked chicken, along with the bean sprouts, green onions, and chopped peanuts. Heat everything through for about another 1 to 2 minutes, ensuring all the flavors meld together beautifully. At this stage, you can taste and decide if you want to add an extra tablespoon of lime juice for additional tang.
- Once everything is heated through and well combined, remove the skillet from the heat. Top your Homemade Pad Thai with fresh cilantro leaves and serve immediately. Enjoy this dish hot for the best experience!
These steps will guide you through making a delicious and authentic Homemade Pad Thai. With practice, you’ll master your technique, and soon it will become one of your go-to recipes!
Things Worth Knowing
- Use fresh ingredients: Always opt for fresh vegetables and herbs to enhance the flavor of your Homemade Pad Thai. Freshness can make a huge difference in the overall taste.
- Cooking chicken: Ensure that your chicken is cooked thoroughly by letting it sit undisturbed for a minute before stirring. This helps achieve a nice sear.
- Don’t overcook noodles: Keep an eye on the noodles while cooking; you want them to be slightly crunchy as they’ll continue cooking in the sauce.
- Balance flavors: Taste your dish before serving. Adjust the lime juice or chili paste based on your preference for tanginess or heat.
- Serve immediately: Pad Thai is best enjoyed fresh. The longer it sits, the soggier it becomes.
Ways to Customize
One of the most exciting things about cooking is the ability to customize recipes to suit your taste. With Homemade Pad Thai, there are countless ways to make it your own. Here are some creative ideas to enhance your dish:
- Protein alternatives: Substitute chicken with tofu for a vegetarian option or switch to shrimp for a seafood twist.
- Extra veggies: Add any of your favorite vegetables such as broccoli, zucchini, or snap peas for more color and nutrition.
- Spice it up: Increase the amount of chili paste for a spicier kick or add sliced fresh chilies to garnish.
- Make it nut-free: Use sunflower seeds instead of peanuts for those with nut allergies.
- Fresh herbs: Experiment with different herbs like Thai basil or mint for a unique flavor profile.
- Sauce variations: Try out different sauces like hoisin or teriyaki for a different taste.
- Serving suggestions: Serve with lime wedges and extra cilantro on the side for guests to personalize their plates.
Serve This Homemade Pad Thai With
When it comes to serving your Homemade Pad Thai, the possibilities are endless. Here are some ideas to elevate your meal:
- Light salads: Pair with a crisp salad like a cucumber salad dressed in a tangy vinaigrette to refresh your palate.
- Spring rolls: Serve alongside fresh spring rolls for a light and complementary appetizer.
- Soups: A bowl of hot and sour soup can enhance the meal and offer a comforting contrast.
- Drinks: Consider pairing with a cold iced tea or a refreshing lemon mint drink to balance the flavors.
- Storage: Leftovers can be stored in an airtight container in the fridge for up to three days.
- Freezing: While not ideal, you can freeze leftovers for up to one month. Just be sure to reheat thoroughly before serving.
- Occasions: This dish is perfect for both casual weekday dinners and special gatherings, making it versatile for any occasion.
FAQ
Conclusion
The beauty of Homemade Pad Thai lies in its incredible flavor and versatility. It’s a dish that can easily be customized to fit your tastes and dietary preferences while still providing that authentic taste. I encourage you to give this recipe a try; it’s a fantastic way to bring a touch of Thailand to your kitchen. Share it with loved ones, and enjoy the delightful experience of cooking and feasting together!
Homemade Pad Thai
Ingredients
Equipment
Method
- Start by preparing the rice noodles according to the package directions, ensuring they remain slightly crunchy or al dente. This is crucial as they will continue to cook in the sauce. Once cooked, rinse them under cold water, drain well, and toss with 1 teaspoon of toasted sesame oil to keep them from sticking together. Set them aside.
- In a medium mixing bowl, combine all the sauce ingredients—the brown sugar, low sodium soy sauce, fish sauce, lime juice, rice vinegar, and smooth peanut butter. Whisk everything until well blended and set this mixture aside. This sauce is key to infusing flavor into the noodles and veggies.
- Next, in a deep, large nonstick skillet, heat 1 tablespoon of vegetable or peanut oil over medium-high heat. Once the oil is hot, add in the sliced chicken. Allow it to cook undisturbed for about one minute, then stir fry until it’s cooked through. This should take around 3 to 4 minutes. Once done, transfer the chicken to a plate and wipe out the skillet to remove any excess oil.
- In the same skillet, heat another tablespoon of oil. Add the red bell pepper and minced shallots. Sauté these for about one minute until they become tender and fragrant. Then, add the matchstick carrots and minced garlic, sautéing for an additional minute. You want the vegetables to maintain a bit of crunch, so keep an eye on them!
- Reduce the heat to medium and pour the beaten eggs over the sautéed vegetables. Stir constantly until the eggs are scrambled and cooked through. This whole process should take no longer than 2 minutes.
- Now it’s time to add in the sauce and noodles to the skillet. Increase the heat to medium-high, tossing everything together until evenly combined. You’ll want to keep stirring for about 1 to 2 minutes until the noodles are heated and flavorful.
- Stir back in the cooked chicken, along with the bean sprouts, green onions, and chopped peanuts. Heat everything through for about another 1 to 2 minutes, ensuring all the flavors meld together beautifully. At this stage, you can taste and decide if you want to add an extra tablespoon of lime juice for additional tang.
- Once everything is heated through and well combined, remove the skillet from the heat. Top your Homemade Pad Thai with fresh cilantro leaves and serve immediately. Enjoy this dish hot for the best experience!
Notes
- Storage: Leftovers can be stored in an airtight container in the fridge for up to three days.
- Freezing: While not ideal, you can freeze leftovers for up to one month. Just be sure to reheat thoroughly before serving.
- Pairing: Consider pairing your Homemade Pad Thai with a refreshing cucumber salad or spring rolls for a light meal.
- Adjust spice: Feel free to adjust the amount of chili paste based on your heat preference.
- Fresh herbs: Top with additional fresh herbs when serving for extra flavor.