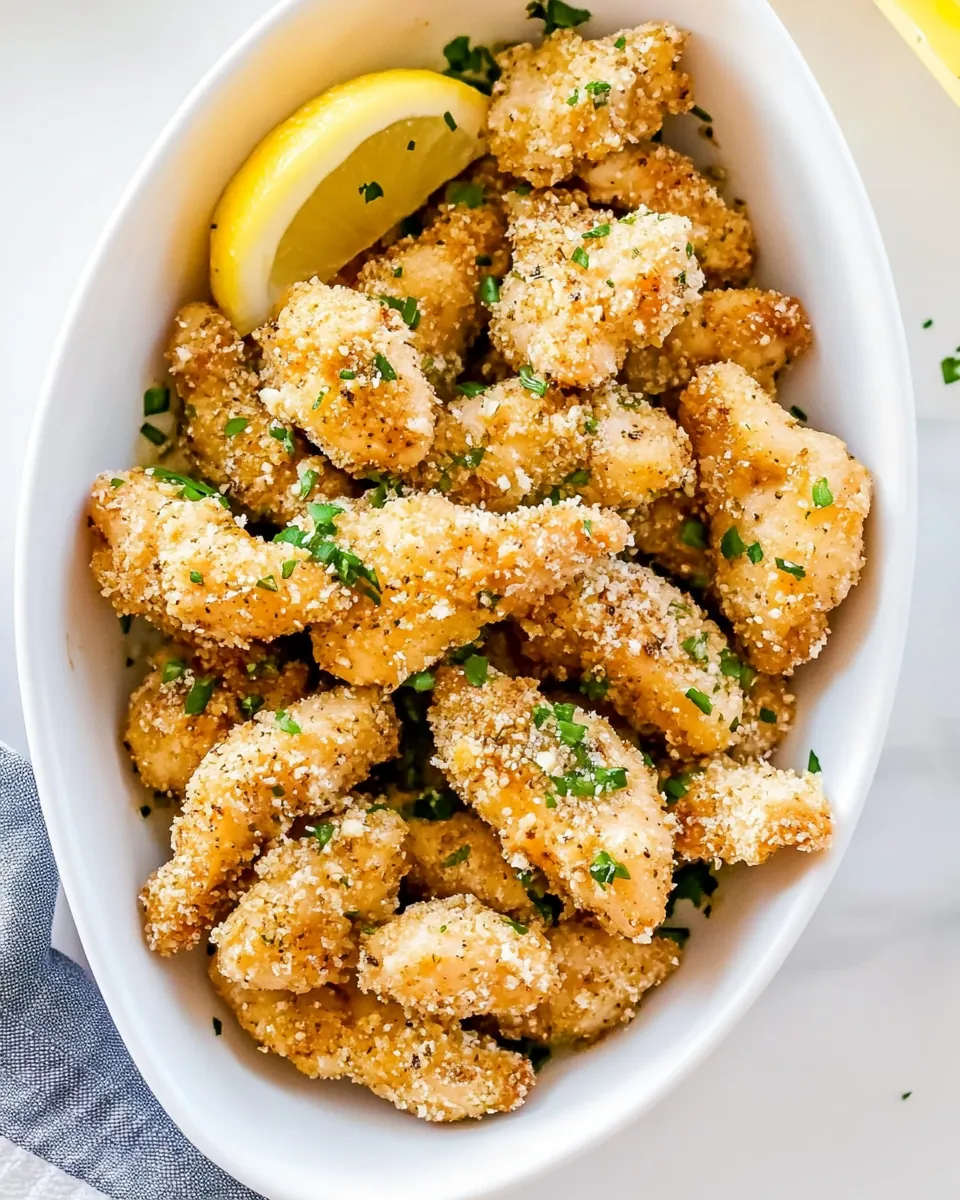
Whenever I think of comfort food, the first dish that comes to mind is Garlic Knot Chicken. This dish has a special place in my heart because it brings back memories of cozy family dinners. I remember the aroma of sizzling chicken filling the kitchen, and the excitement as we gathered around the table to enjoy a meal together. The combination of juicy chicken, rich garlic, and creamy Parmesan cheese makes this dish irresistible. It’s perfect for a weeknight dinner, yet impressive enough to serve at gatherings. The best part? It’s easy to make, so you can whip it up even after a long day!
Recipe Snapshot
20 mins
10 mins
10 mins
Medium
400 kcal
35 g
Gluten-Free, Low FODMAP
25 g
Skillet, Grater, Chef’s Knife, Frying Pan, Wooden Spoon
What’s Great About This Garlic Knot Chicken
A Flavor Explosion
One of the things I absolutely love about Garlic Knot Chicken is the explosion of flavors it brings to the plate. The use of fresh garlic and parsley adds an aromatic touch that transforms ordinary chicken into a culinary delight. You can really taste the love in each bite!
Comforting Texture
The texture of this dish is something to marvel at. The chicken is perfectly cooked, leaving it tender and juicy, while the sauce has a rich and buttery consistency. Paired with the crispy edges from the pan-searing, it’s a match made in heaven.
Versatile for Any Occasion
This recipe is wonderfully versatile. Whether you’re hosting a dinner party, enjoying a quiet family meal, or preparing a cozy date night dinner, Garlic Knot Chicken fits the bill. You can easily pair it with various sides, from pasta to fresh salads.
Quick and Simple
In our busy lives, we often seek quick and easy meals without compromising on taste. This dish checks all the boxes! With just a few simple ingredients, you can have a gourmet meal ready in about twenty minutes.
Fun to Cook
Cooking Garlic Knot Chicken is an enjoyable experience. The steps are straightforward, making it a perfect dish for beginners or anyone looking to hone their culinary skills. Plus, there’s something cathartic about watching the chicken turn golden brown in the skillet.
Always a Crowd-Pleaser
Finally, one of the best parts about this dish is that it’s always a hit with guests. No one can resist the combination of garlic, butter, and chicken. It’s a recipe that guarantees smiles all around!
What to Gather for Garlic Knot Chicken
When it comes to creating the perfect Garlic Knot Chicken, the quality of your ingredients can make all the difference. Each component plays a crucial role in enhancing the overall flavor and texture. From the tender chicken to the aromatic garlic, every ingredient works harmoniously to create a delightful dish.
- 2 boneless, skinless chicken breasts: The star of the dish, ensuring a juicy and tender meal.
- 1 teaspoon kosher salt: Essential for seasoning and enhancing the flavors.
- ½ teaspoon ground black pepper: Adds a subtle kick to the chicken.
- ¼ cup all-purpose flour: Used for coating the chicken, giving it a delightful crisp.
- 2 tablespoons olive oil: A healthy fat for cooking that adds flavor.
- 6 tablespoons unsalted butter: Provides richness and depth to the sauce.
- 6 cloves garlic: The key ingredient that infuses the dish with incredible flavor.
- 2 tablespoons minced fresh parsley: Adds freshness and color.
- ¼ cup grated Parmesan cheese: A finishing touch that adds a lovely creaminess.
- Lemon wedges: Optional, but they brighten the dish when served.
Step by Step Instructions for Garlic Knot Chicken
Cooking Garlic Knot Chicken is a simple yet rewarding process. I love how quickly it all comes together. Follow these steps to create a dish that will surely impress your family or guests.
- Start by patting the chicken breasts dry with paper towels. This helps to achieve a beautiful sear. Cut each breast in half lengthwise to form two thinner cutlets. Season the pieces generously with kosher salt and ground black pepper.
- In a large bowl, place the all-purpose flour. Dredge the seasoned chicken cutlets in the flour, ensuring they are well coated. Shake off any excess flour to prevent clumping during cooking.
- Heat a large nonstick skillet over medium heat and add the olive oil and 2 tablespoons of unsalted butter. Swirl the pan until the butter is melted and bubbling, indicating it’s ready for the chicken.
- Carefully place the coated chicken cutlets in the skillet. Cook them for about 3 to 4 minutes on each side, or until they turn a beautiful golden brown and reach an internal temperature of 165°F. Remove the chicken from the skillet and set it aside on a plate.
- Reduce the heat to low and add the remaining 4 tablespoons of unsalted butter to the skillet. Once melted, add the garlic and sauté for 30 to 60 seconds, just until it’s fragrant but not browned. You want to extract all that lovely flavor!
- Next, stir in the minced fresh parsley. This will brighten the garlic sauce and give it some lovely color.
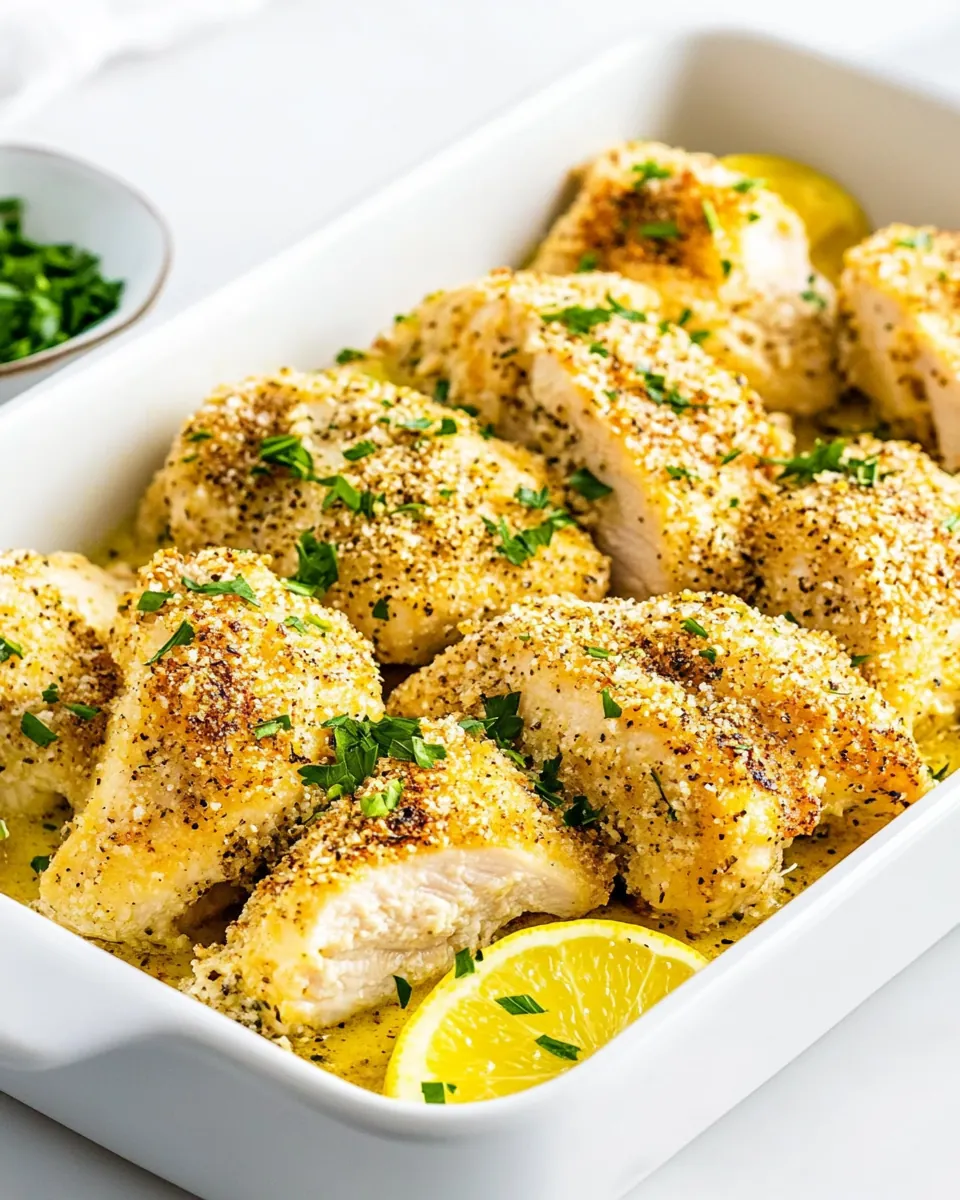
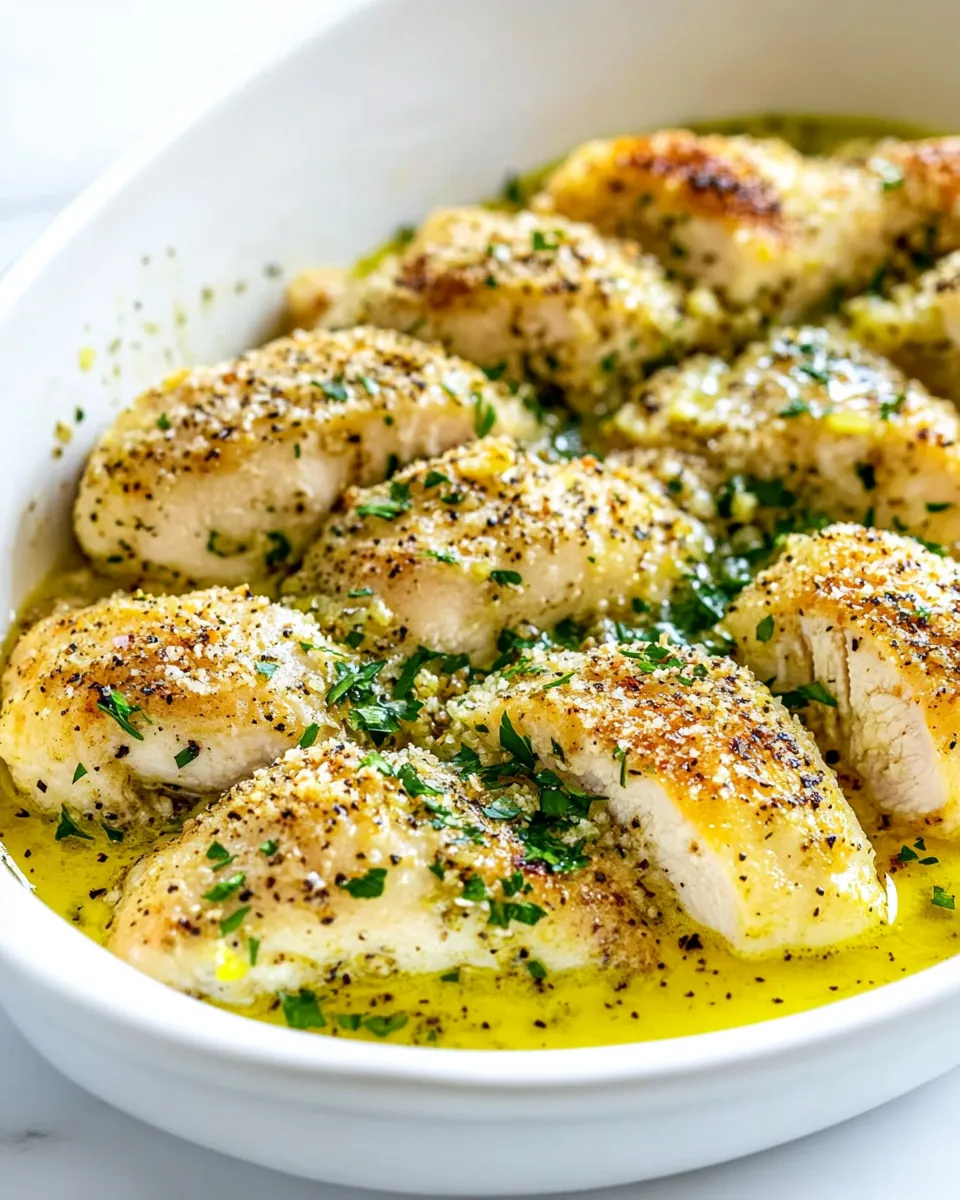
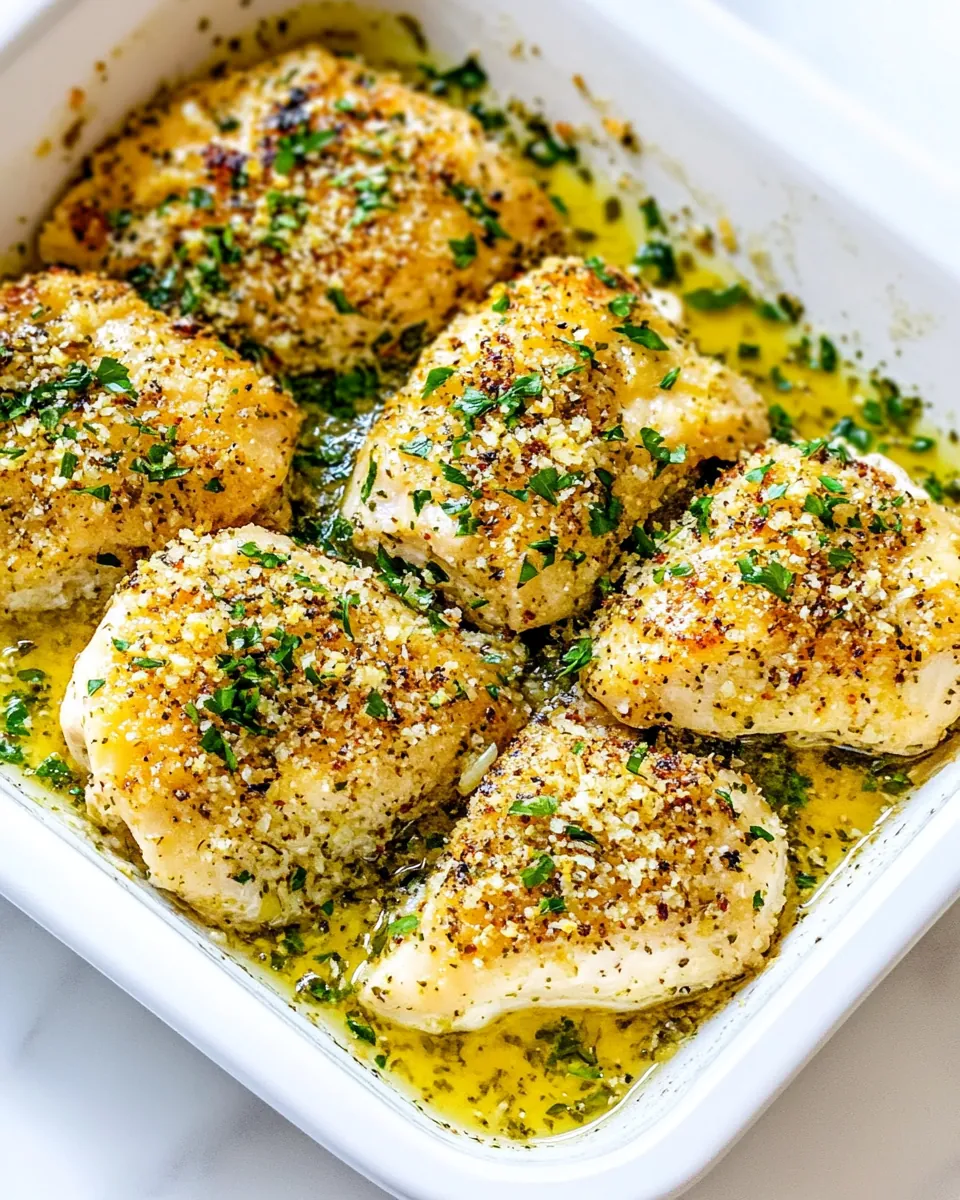
- Return the chicken to the skillet, spooning the fragrant garlic butter over the top of each piece. Let it cook for an additional minute to meld the flavors.
- Finally, remove the skillet from the heat. Sprinkle the grated Parmesan cheese generously over the chicken, allowing it to melt slightly from the residual heat.
- Serve your Garlic Knot Chicken immediately with fresh lemon wedges on the side. This adds a wonderful zest when squeezed over the chicken just before enjoying.
Things Worth Knowing
- Quality Matters: Always choose high-quality chicken for the best flavor and texture. Organic or free-range chicken can enhance the dish significantly.
- Butter vs. Olive Oil: Combining both fats helps achieve a great balance of flavor. Butter adds richness, while olive oil can handle higher heat without burning.
- Don’t Rush the Sear: Allowing the chicken to sear properly without moving it around will result in that coveted golden brown crust.
- Resting Time: Allow the chicken to rest for a few minutes after cooking; this helps retain the juices, keeping it moist.
Pro Tips and Tweaks
Every recipe has its secrets, and Garlic Knot Chicken is no different. Here are some valuable tips to take your dish to the next level!
- Storage: Store any leftovers in an airtight container in the refrigerator for up to 3 days for best quality.
- Freezing: You can freeze the cooked chicken for up to 3 months. Just be sure to let it cool completely before placing it in a freezer-safe container.
- Variations: Experiment with different herbs. Adding thyme or rosemary can give it a unique twist!
- Serving Suggestions: Pair it with a fresh garden salad or roasted vegetables for a complete meal.
- Grilling Option: You can also grill the chicken cutlets for a smoky flavor. Just watch the cooking time to prevent drying out.
Best Served With
When it comes to serving Garlic Knot Chicken, the possibilities are endless. Here are some delicious ideas to complement your dish:
- Side Salads: A fresh Caesar or mixed greens salad pairs beautifully with the rich flavors of the chicken.
- Pasta Dishes: Consider serving it with a side of garlic spaghetti or creamy fettuccine for an Italian feast.
- Roasted Vegetables: Seasonal roasted vegetables bring color to your plate while adding nutrition.
- Occasions: This dish is perfect for family dinners, casual gatherings, or holiday celebrations. Everyone will love it!
- Storage Tips: Ensure leftovers are stored properly to maintain freshness. Use airtight containers for the best results.
FAQ
Conclusion
In summary, Garlic Knot Chicken is a delicious and comforting dish that’s perfect for any occasion. Its rich flavors and simple preparation make it a favorite in my kitchen, and I know it will become a favorite in yours too. So go ahead and give it a try tonight, and enjoy the warmth and joy it brings to your table.
Garlic Knot Chicken
Ingredients
Equipment
Method
- Start by patting the chicken breasts dry with paper towels. This helps to achieve a beautiful sear. Cut each breast in half lengthwise to form two thinner cutlets. Season the pieces generously with kosher salt and ground black pepper.
- In a large bowl, place the all-purpose flour. Dredge the seasoned chicken cutlets in the flour, ensuring they are well coated. Shake off any excess flour to prevent clumping during cooking.
- Heat a large nonstick skillet over medium heat and add the olive oil and 2 tablespoons of unsalted butter. Swirl the pan until the butter is melted and bubbling, indicating it's ready for the chicken.
- Carefully place the coated chicken cutlets in the skillet. Cook them for about 3 to 4 minutes on each side, or until they turn a beautiful golden brown and reach an internal temperature of 165°F. Remove the chicken from the skillet and set it aside on a plate.
- Reduce the heat to low and add the remaining 4 tablespoons of unsalted butter to the skillet. Once melted, add the garlic and sauté for 30 to 60 seconds, just until it's fragrant but not browned. You want to extract all that lovely flavor!
- Next, stir in the minced fresh parsley. This will brighten the garlic sauce and give it some lovely color.
- Return the chicken to the skillet, spooning the fragrant garlic butter over the top of each piece. Let it cook for an additional minute to meld the flavors.
- Finally, remove the skillet from the heat. Sprinkle the grated Parmesan cheese generously over the chicken, allowing it to melt slightly from the residual heat.
- Serve your Garlic Knot Chicken immediately with fresh lemon wedges on the side. This adds a wonderful zest when squeezed over the chicken just before enjoying.
Notes
- Tip 1: You can also use 4 boneless, skinless chicken thighs. Do not slice them into cutlets; use the whole thigh, and cook them longer in step 4 to 165°F.
- Tip 2: Store Garlic Knot Chicken in an airtight container in the refrigerator for up to 3 days.
- Tip 3: You can freeze the cooked chicken for up to 3 months. Just be sure to let it cool completely before placing it in a freezer-safe container.