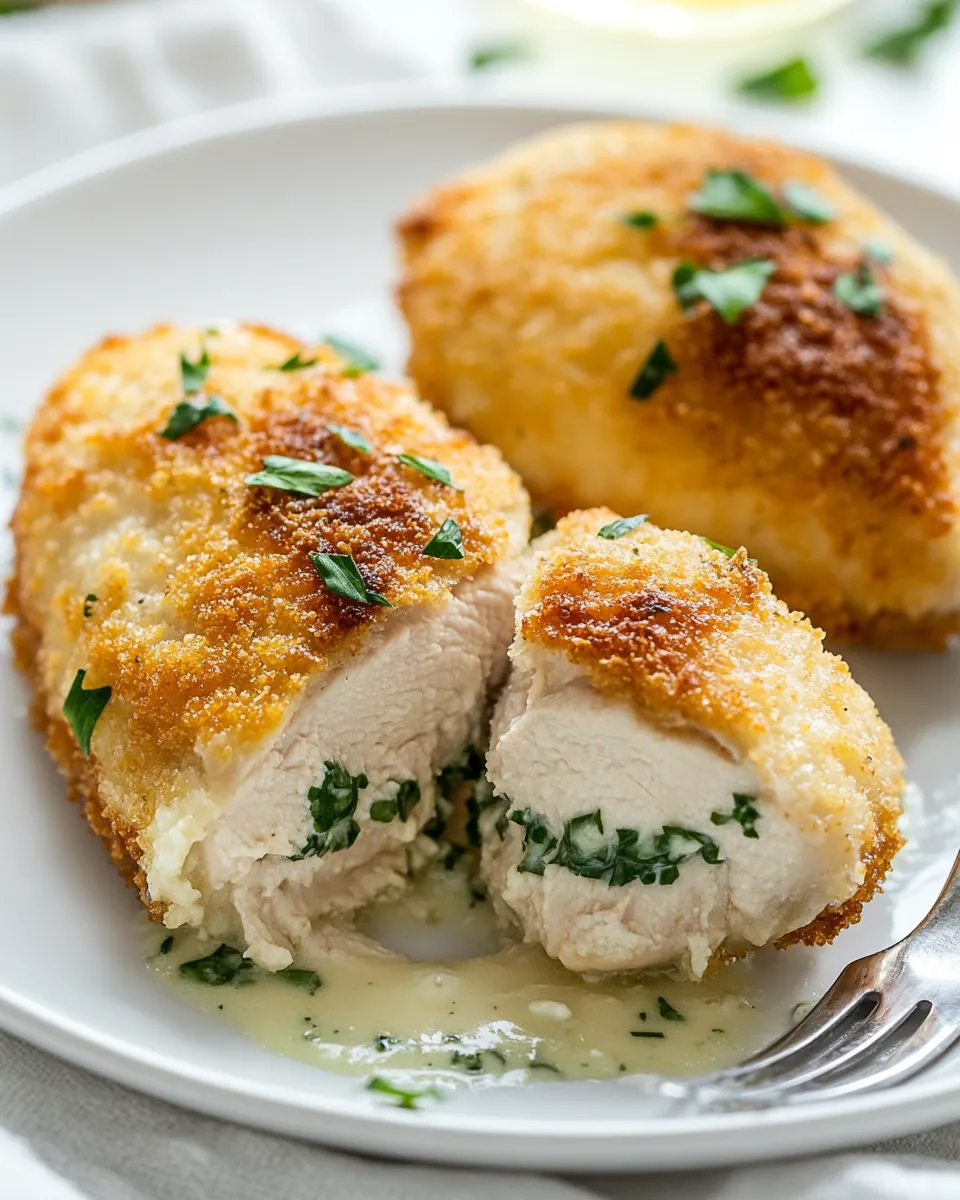
Whenever I think of comfort food, Easy Chicken Kiev instantly comes to mind. It brings back memories of cozy family dinners where the golden crusted chicken was the star of the table. I can still remember the excitement of cutting into the chicken and watching the luscious butter and herbs spill out, filling the room with an irresistible aroma. This dish not only warms the heart but is also surprisingly simple to make, making it perfect for both busy weeknights and special occasions. The first time I made it, I was amazed at how easily I could transform simple ingredients into a gourmet meal that everyone loved. If you’re looking for a dish that will impress your family and friends while also satisfying your cravings, Easy Chicken Kiev is the way to go. Let me share my journey with you as we dive into this delightful recipe.
Recipe Snapshot
25 mins
15 mins
10 mins
Medium
450 kcal
28 g
Paleo, Whole30, Gluten-Free
25 g
Chef’s Knife, Mixing Bowl, Frying Pan, Skillet
Why We Love This Easy Chicken Kiev
It’s a Crowd-Pleaser
One of the reasons I love Easy Chicken Kiev is its ability to please everyone at the table. Whether it’s kids or adults, the crispy coating and savory filling are always a hit. Every time I serve it, I see happy faces and hear compliments, which makes the effort all worthwhile.
Flavorful Ingredients
The combination of butter, parsley, and garlic creates an explosion of flavor that takes the humble chicken to another level. You’ll find that each bite is rich and satisfying, with the herb-infused butter melting in your mouth. I remember experimenting with the ingredient ratios until I found the perfect balance that pleases my palate.
Simplicity at Its Best
Despite being a dish often served at fancy restaurants, Easy Chicken Kiev is surprisingly simple to prepare. It doesn’t require any complicated techniques or hard-to-find ingredients. I appreciate that I can whip it up quickly, making it ideal for a weeknight dinner or a last-minute entertaining option.
Versatile Cooking Methods
This recipe is adaptable to different cooking methods, whether you prefer frying it on the stovetop or baking it in the oven. I often choose to fry it because it gives a wonderful crispiness, but I’ve enjoyed the baked version just as much. It’s comforting to know that there are options depending on my mood or dietary preferences.
Perfect for Meal Prep
If you’re someone who enjoys meal prepping, Easy Chicken Kiev is a fantastic option. I often prepare a batch ahead of time and freeze them, so I always have a delicious meal ready to go. Just pop it in the oven or air fryer when you’re ready to enjoy!
Great for Special Occasions
Lastly, this dish is just perfect for special occasions. I’ve made Easy Chicken Kiev for anniversaries and family gatherings, and it never fails to impress. The presentation of the golden crust with the melted butter oozing out is sure to delight your guests and make your gathering feel extra special.
What You Need for Easy Chicken Kiev

When it comes to making Easy Chicken Kiev, the choice of ingredients is crucial. The key players here are the chicken and the flavorful filling that brings the dish to life. Each ingredient plays a vital role, from the rich butter that provides moisture and flavor, to the crunchy panko breadcrumbs that create a crispy exterior. Together, they combine to deliver a harmony of flavors that will leave you wanting more.
- 4 small boneless chicken breasts: The main ingredient, these breasts are perfect for butterflying and stuffing with flavor.
- 6 tablespoons butter: Essential for the filling, this rich component is what makes each bite of chicken indulgent.
- 4 teaspoons parsley: Freshly chopped, it adds a delightful herbaceous note to the filling.
- 1 clove garlic: Minced, this ingredient brings a wonderful aroma and flavor to the dish.
- 1 teaspoon lemon pepper seasoning: A zesty touch that brightens up the overall flavor profile.
- 2 large eggs: Used for coating, they help the breadcrumbs adhere to the chicken.
- 1 ½ cups panko breadcrumbs: These provide an irresistible crunch that takes the dish over the top.
- ½ cup all-purpose flour: Used in the breading process to create a lovely crust.
- 2 teaspoons salt: Essential for seasoning the chicken and ensuring every layer is flavorful.
- Oil for frying: Necessary for cooking the chicken to golden perfection.
Cooking Instructions for Easy Chicken Kiev
Cooking Easy Chicken Kiev is a delightful experience that allows you to unleash your inner chef. Each step is straightforward, yet it results in a dish that feels special. Let’s get started on creating this delicious meal that will surely impress everyone around your table!
- First, lay the chicken breasts out on a cutting board. Using a sharp knife, carefully butterfly each breast by cutting it horizontally through the middle, but leaving one long edge intact. This allows you to open the breast like a book, creating a pocket for the filling.
- Open the breasts wide and in the center of each, place approximately 1 ½ tablespoons of butter, followed by 1 teaspoon of chopped parsley, a scant sprinkle of freshly minced garlic, and a generous sprinkle of lemon pepper seasoning. These layers of flavor will melt together while cooking.
- Once filled, gently close the chicken breasts, pressing around the edges to seal in the filling. This step is important to prevent the butter from leaking out during cooking.
- Now, set up your dredging station with three shallow pans. In the first pan, crack the eggs and beat them well. The second pan is for the panko breadcrumbs, and in the third, combine the flour and salt together, mixing thoroughly.
- Heat a large skillet over medium heat and add enough oil to create about ¾ inch of depth. Wait for the oil to get hot enough; it should shimmer when ready.
- Take each stuffed chicken breast and first dunk it into the flour mixture, shaking off any excess. Next, immerse it in the egg mixture, ensuring it’s fully coated. Finally, press it into the panko breadcrumbs to create a crispy crust. Repeat this for each piece of chicken.
- Once the oil is hot, carefully place the breaded chicken breasts in the skillet. Cook for around 4 to 5 minutes on each side, gently flipping them only once to avoid splattering oil. Look for that golden brown color that signals they’re ready to flip.
- After cooking, remove the chicken from the skillet and let them rest on a paper towel-lined plate to absorb any excess oil. This ensures your Easy Chicken Kiev stays crispy while cooling.
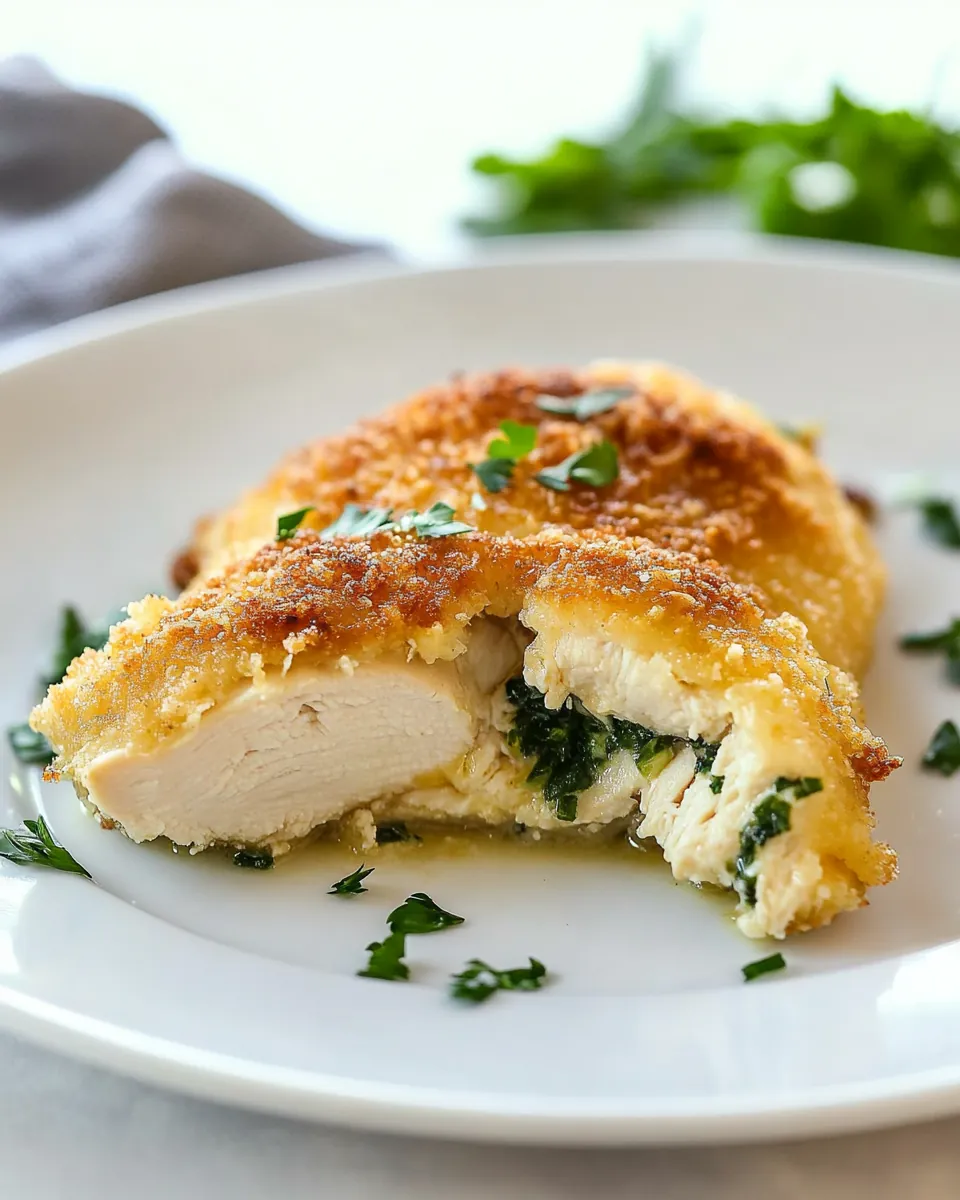
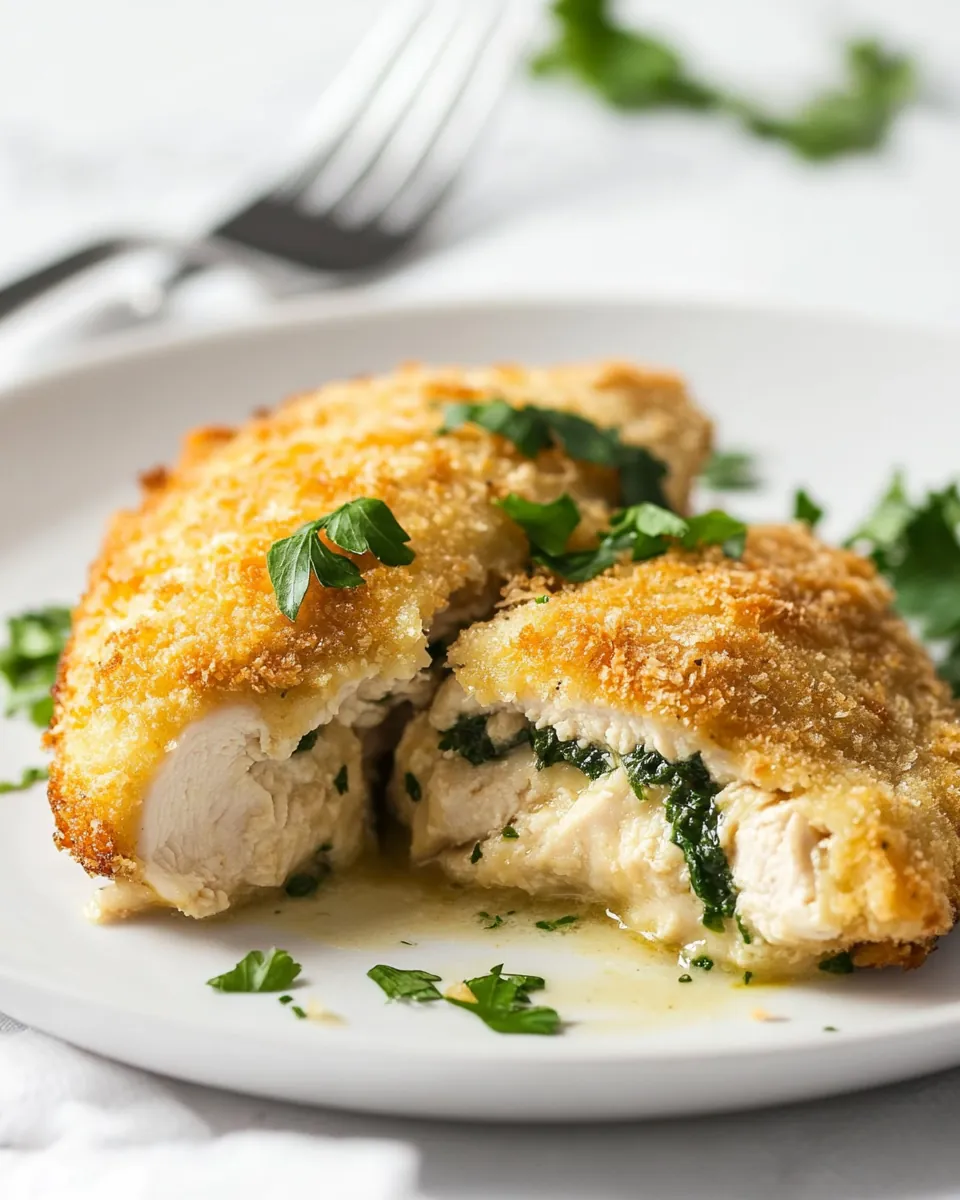
- Serve the chicken warm. As you cut into the chicken, be prepared for the glorious melt of butter and herbs to come spilling out. Enjoy every bite!
Things Worth Knowing
- Chicken Size Matters: It’s crucial to choose small chicken breasts, around 4 to 5 ounces each, to ensure they cook thoroughly on the stovetop without burning the crust.
- Resting Time: Allow the chicken to rest after frying to maintain its crispiness and give the filling time to settle.
- Oil Temperature: Make sure the oil is hot enough before adding the chicken to achieve that perfect golden crust without overcooking the meat.
- Freezing: You can prepare these chicken breasts ahead of time and freeze them. Just be sure to thaw before cooking.
Helpful Hints
Cooking Easy Chicken Kiev can be a breeze with the right tips. Here are some helpful hints to ensure your dish turns out perfectly each time.
- Storage: To store leftovers, keep the chicken in an airtight container in the refrigerator. They can last for up to three days.
- Reheating: For best results, reheat in an oven or air fryer to maintain the crispiness of the coating.
- Freezing: You can also freeze the uncooked, breaded chicken. Just make sure to separate them with parchment paper to avoid sticking.
- Pairing: Serve Easy Chicken Kiev with a side salad or roasted vegetables for a balanced meal.
- Variations: Feel free to experiment with different herbs and spices in the filling for a unique twist.
Accompaniments for Easy Chicken Kiev
When serving Easy Chicken Kiev, consider these delightful accompaniments:
- Green Salad: A fresh green salad complements the richness of the chicken and adds a refreshing crunch.
- Mashed Potatoes: Creamy mashed potatoes are a classic pairing that soaks up the flavorful butter that oozes from the chicken.
- Steamed Vegetables: Lightly steamed broccoli or green beans add color and balance to the plate.
- Rice Pilaf: A light rice pilaf with herbs can provide a great base for the chicken.
- Occasions: This dish is perfect for a cozy family dinner, a romantic date night, or even a festive gathering during the holidays.
- Wine Pairing: A crisp white wine can beautifully enhance the flavors of the dish, but it’s completely optional.
FAQ
Conclusion
Easy Chicken Kiev stands out as a comforting and satisfying dish that combines crispy texture with rich flavors. I encourage you to try making it for your next family dinner or special occasion. It’s a dish that brings joy to the table and is sure to become a favorite in your home!
Easy Chicken Kiev
Ingredients
Equipment
Method
- First, lay the chicken breasts out on a cutting board. Using a sharp knife, carefully butterfly each breast by cutting it horizontally through the middle, but leaving one long edge intact. This allows you to open the breast like a book, creating a pocket for the filling.
- Open the breasts wide and in the center of each, place approximately 1 ½ tablespoons of butter, followed by 1 teaspoon of chopped parsley, a scant sprinkle of freshly minced garlic, and a generous sprinkle of lemon pepper seasoning. These layers of flavor will melt together while cooking.
- Once filled, gently close the chicken breasts, pressing around the edges to seal in the filling. This step is important to prevent the butter from leaking out during cooking.
- Now, set up your dredging station with three shallow pans. In the first pan, crack the eggs and beat them well. The second pan is for the panko breadcrumbs, and in the third, combine the flour and salt together, mixing thoroughly.
- Heat a large skillet over medium heat and add enough oil to create about ¾ inch of depth. Wait for the oil to get hot enough; it should shimmer when ready.
- Take each stuffed chicken breast and first dunk it into the flour mixture, shaking off any excess. Next, immerse it in the egg mixture, ensuring it’s fully coated. Finally, press it into the panko breadcrumbs to create a crispy crust. Repeat this for each piece of chicken.
- Once the oil is hot, carefully place the breaded chicken breasts in the skillet. Cook for around 4 to 5 minutes on each side, gently flipping them only once to avoid splattering oil. Look for that golden brown color that signals they’re ready to flip.
- After cooking, remove the chicken from the skillet and let them rest on a paper towel-lined plate to absorb any excess oil. This ensures your Easy Chicken Kiev stays crispy while cooling.
- Serve the chicken warm. As you cut into the chicken, be prepared for the glorious melt of butter and herbs to come spilling out. Enjoy every bite!
Notes
- Chicken Size Matters: It's crucial to choose small chicken breasts, around 4 to 5 ounces each, to ensure they cook thoroughly on the stovetop without burning the crust.
- Resting Time: Allow the chicken to rest after frying to maintain its crispiness and give the filling time to settle.
- Oil Temperature: Make sure the oil is hot enough before adding the chicken to achieve that perfect golden crust without overcooking the meat.
- Freezing: You can prepare these chicken breasts ahead of time and freeze them. Just be sure to thaw before cooking.