When I think of summer gatherings, one dessert comes to mind: Berry Trifle. This delightful treat has been the star of many family picnics and backyard barbecues. I remember the first time I made it, I was a little nervous, but as soon as the vibrant layers of berries and fluffy cream came together, I knew I had created something special. The combination of sweet, juicy berries with the lightness of whipped cream and airy angel food cake is simply irresistible. Each bite is a burst of flavor that transports me right back to those sunny afternoons with family and friends. Berry Trifle is not just a dessert; it’s a celebration in a bowl. I love how it looks so elegant, yet it’s surprisingly easy to prepare. Whether it’s a holiday or just a casual summer day, this dessert is always a hit and brings everyone together, sharing laughs and memories. So, let’s dive into this amazing recipe that will surely become a staple in your home as well!
Recipe Snapshot
25 mins
25 mins
0 mins
Medium
350 kcal
5 g
Gluten-Free, Low FODMAP
16 g
Blender, Food Processor, Chef’s Knife, Whisk, Mixing Bowl
What’s Great About This Berry Trifle
Fresh and Fruity
One of the standout features of Berry Trifle is its fresh and vibrant flavor profile. It’s like a burst of summer in each bite! The combination of strawberries, blueberries, and raspberries creates a deliciously sweet and tangy flavor that pairs perfectly with the creamy layers. This dessert is a fantastic way to showcase seasonal fruits at their peak ripeness.
Beautiful Presentation
There’s something undeniably beautiful about a layered dessert. The colorful berries contrasting with the white whipped cream and soft cake makes Berry Trifle a stunning centerpiece for any gathering. Whether served in a large trifle dish or individual glasses, it’s sure to impress your guests and elevate your dessert table.
Easy to Assemble
Despite its impressive appearance, Berry Trifle is incredibly easy to prepare. With just a few simple steps, you can layer the ingredients and have a dessert that looks like it took hours to create. You don’t need to be a pastry chef to master this recipe; it’s all about layering the elements beautifully. This makes it a perfect choice for novice cooks who want to wow their friends and family.
Perfect for Any Occasion
Berry Trifle is versatile and can be enjoyed at a variety of events. Whether it’s a birthday party, family reunion, or a cozy dinner at home, this dessert fits right in. It’s light enough to serve after a hearty meal, and its refreshing flavors make it a favorite in warm weather.
Make Ahead Convenience
Another reason to love Berry Trifle is that it can be prepared ahead of time. You can assemble it a few hours or even the day before your event, allowing the flavors to meld beautifully. This means less stress on the day of your gathering, giving you more time to enjoy with your guests.
Customizable Layers
Finally, Berry Trifle is completely customizable. While the classic combination of berries is fantastic, you can experiment with different fruits or even add layers of chocolate or nuts for an extra twist. This flexibility allows you to adapt the recipe to suit your taste preferences or the season, making it a recipe you’ll return to time and again.
Key Ingredients for Berry Trifle
The ingredients in Berry Trifle come together to create a delightful harmony of textures and flavors. Each element plays a crucial role in crafting this dessert. The angel food cake provides a light and airy base, while the heavy cream and cream cheese contribute a rich, creamy layer. Fresh berries add a pop of color and natural sweetness, making every bite a refreshing experience.
- Angel Food Cake: A light and fluffy cake that serves as the base of the trifle. It absorbs the flavors of the cream and fruits beautifully.
- Lemon Juice: Adds a refreshing tang that brightens the flavors of the dessert.
- Lemon Zest: Enhances the lemon flavor, contributing a fragrant aroma and brightness to the cream mixture.
- Honey: A natural sweetener that adds depth and richness to the whipped cream layers.
- Heavy Cream: Whipped to perfection, it forms the creamy layers of the trifle, providing a luscious texture.
- Cream Cheese: Adds a rich, velvety creaminess that balances the sweetness of the dessert.
- Powdered Sugar: Sweetens the cream mixture while helping to maintain a smooth texture.
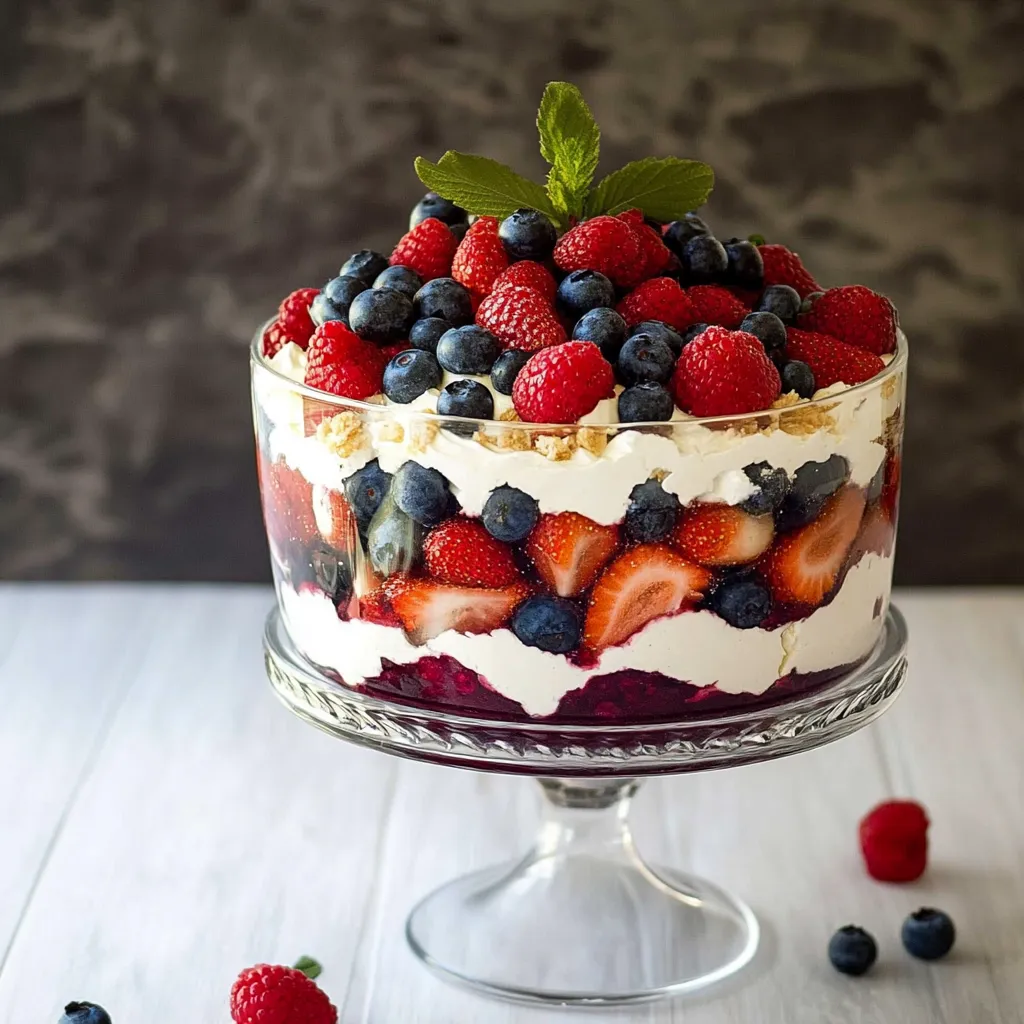
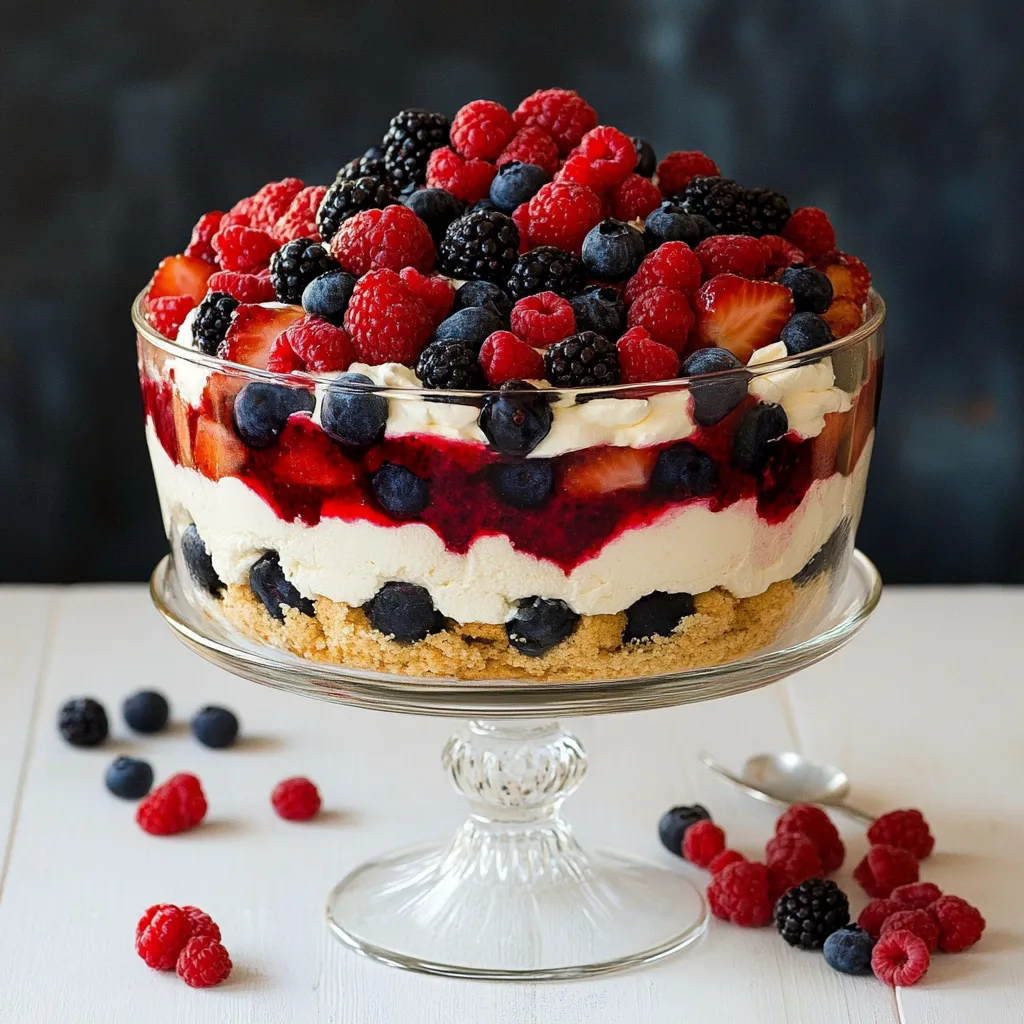
- Fresh Berries: A mix of strawberries, blueberries, and raspberries provides vibrant flavors and colors, making the trifle visually appealing.
- Mint Leaves: Optional, but they add a refreshing touch when garnished on top of the trifle.
Recipe Steps for Berry Trifle
Getting started with Berry Trifle is a fun and rewarding experience. This layered dessert is all about assembling beautiful layers, so let’s dive right into the steps to create this delicious treat. Just follow along, and you’ll have a stunning dessert ready in no time!
Begin by slicing the angel food cake into 3/4-inch thick slices. This will be the base of your trifle, so make sure the slices are uniform for even layering.
In a small mixing bowl, whisk together the lemon juice, lemon zest, and honey until well combined. This mixture will add a delightful citrus flavor to the trifle.
Brush the lemon mixture over both sides of the angel food cake slices, ensuring they are well coated. This will help infuse the cake with flavor and moisture.
Cut the coated angel food cake slices into 3/4-inch cubes and set them aside. These cubes will be layered into the trifle dish.
In a large mixing bowl, use an electric hand mixer to whip the heavy cream on medium speed until it starts to thicken. Then, increase the speed to high and whip until very stiff peaks form. The whipped cream should lose its wet sheen and become fluffy and airy.
In another large mixing bowl, whip together the cream cheese, powdered sugar, and vanilla extract using an electric hand mixer. Start on low speed to combine, then increase to high speed and whip until light and fluffy, about 2 to 3 minutes.
Once the whipped cream is ready, gently fold it into the cream cheese mixture using a spatula. Be careful not to deflate the cream; you want to keep the light and airy texture.
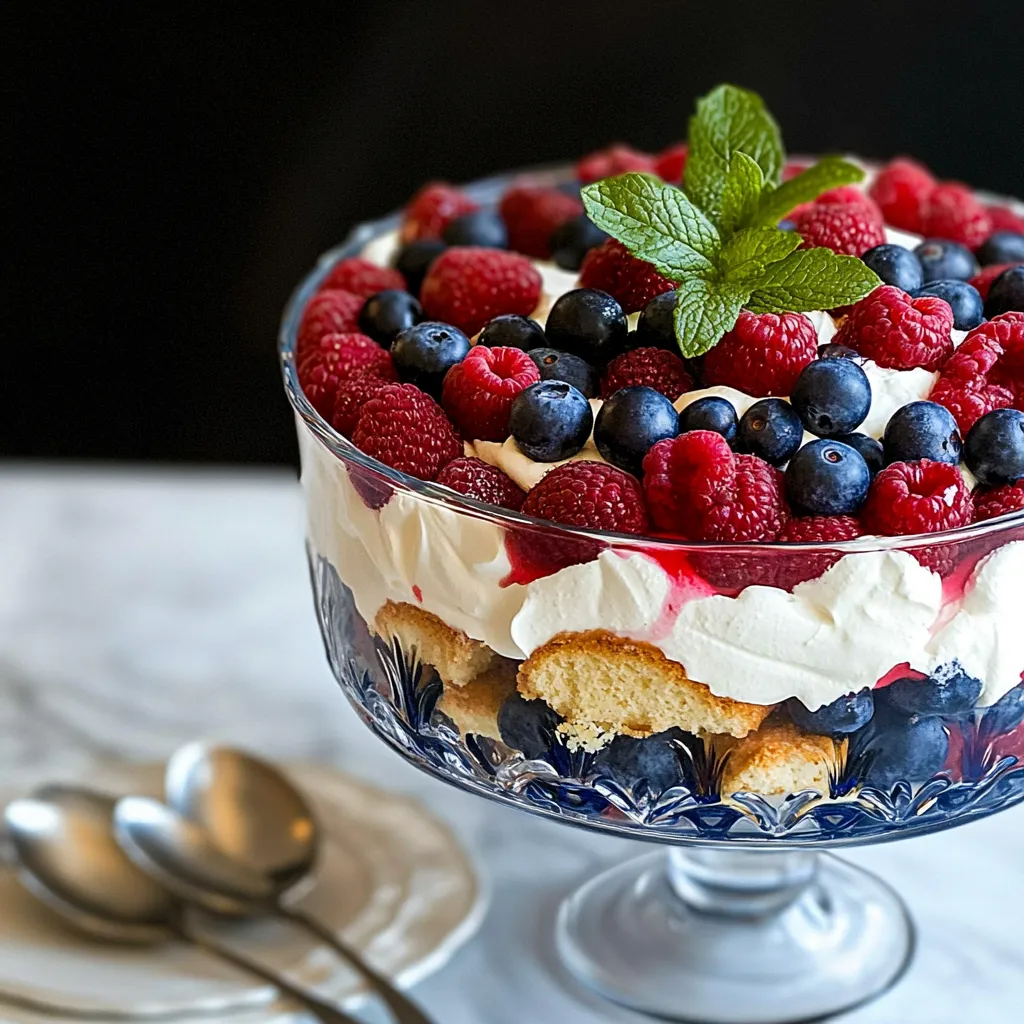
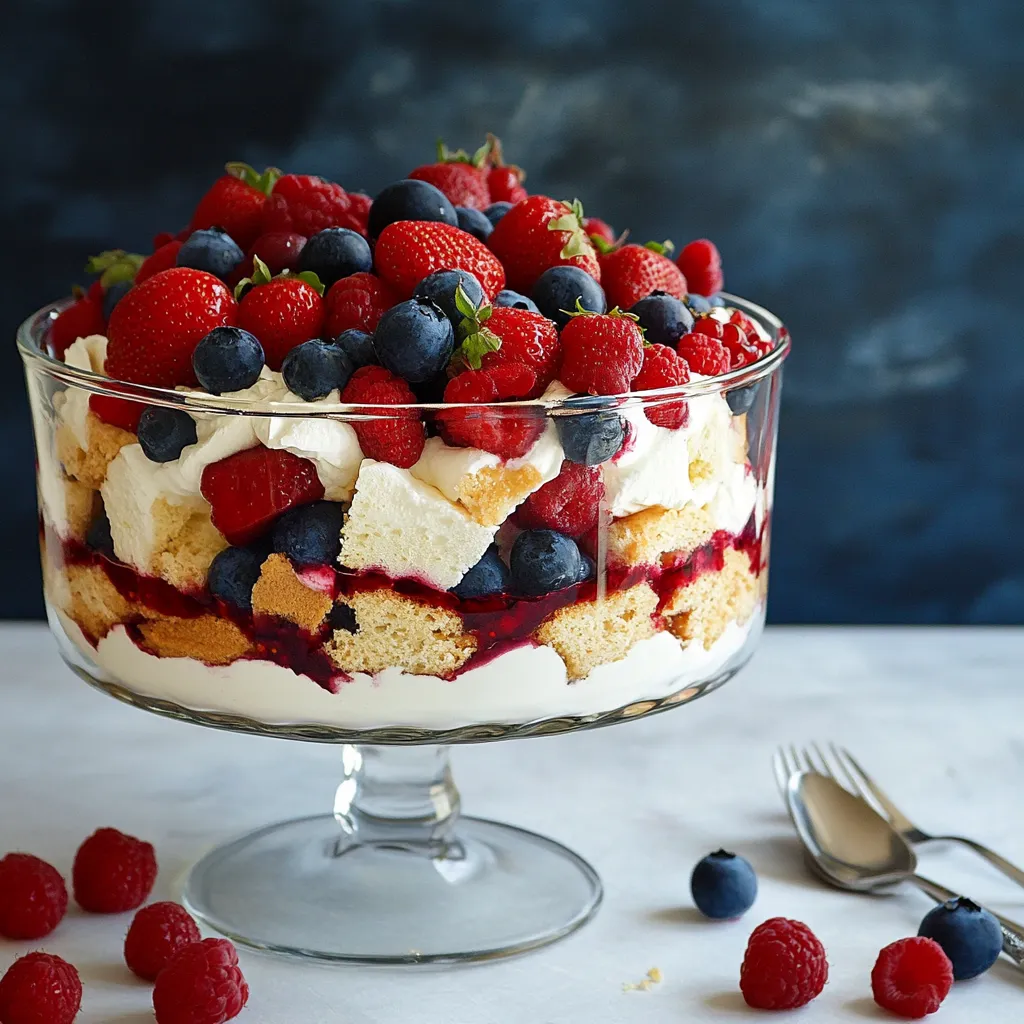
To assemble the trifle, layer half of the angel food cake pieces in an even layer at the bottom of a trifle dish. Next, sprinkle half of the blueberries over the cake layer.
Add half of the whipped cream mixture on top of the blueberries and spread it evenly. Follow with half of the strawberries, creating a beautiful layer of fruit.
Repeat the layering process with the remaining angel food cake, blueberries, whipped cream mixture, and strawberries. Remember to leave some space in the center for more fruit.
Finish off the trifle with the remaining blueberries and raspberries in the center. If you like, decorate with mint leaves just before serving for an extra touch of freshness.
For the best flavor, serve the trifle the same day it’s prepared. However, it can be stored in the refrigerator for up to 24 hours if needed.
Things Worth Knowing
- Use Fresh Ingredients: The quality of your berries and cream greatly affects the overall taste. Fresh, ripe fruits will enhance the flavor.
- Layering Technique: For a beautiful presentation, make sure to layer ingredients evenly. This will make a striking visual display once served.
- Whipping Cream: When whipping heavy cream, ensure it is well-chilled. Cold cream whips better and holds its shape.
- Chill Time: Allow your trifle to chill in the refrigerator for at least an hour before serving. This helps the flavors meld together and improves the overall taste.
Tips and Tricks about Berry Trifle
Making the perfect Berry Trifle can be a breeze with the right tips! Here are some suggestions to help you create a masterpiece:
- Storage: If you have leftovers, cover the trifle with plastic wrap to keep it fresh in the refrigerator. Consume within 24 hours for the best flavor and texture.
- Freezing: Freezing is not recommended for Berry Trifle due to the cream and fruit layers. It’s best enjoyed fresh.
- Variations: Feel free to mix and match different berries based on what’s in season or your personal preference. Try adding blackberries or peaches for a unique twist.
- Serving Size: The recipe serves about ten, but you can easily halve it for a smaller gathering or increase it for a party.
- Presentation: Consider using individual serving glasses for a fun twist. It makes serving easier and adds a personal touch for each guest.
- Garnishing: Always add fresh mint leaves on top just before serving for an added layer of flavor and color.
- Ensure Balance: When layering, aim for a balance of cream, cake, and fruit in each layer for a cohesive taste experience.
What to Pair With Berry Trifle
The beauty of Berry Trifle is that it pairs wonderfully with a variety of foods and occasions. Here are some ideas for what to serve alongside this delicious dessert:
- Refreshing Beverages: This dessert goes perfectly with a light, fruity beverage such as iced tea or lemonade.
- Light Lunches: Serve Berry Trifle as a sweet finish to a light lunch featuring salads or sandwiches for a delightful meal.
- Picnics and Barbecues: It’s a fantastic addition to outdoor gatherings, bringing a refreshing end to your summer barbecue meals.
- Seasonal Occasions: Great for summer gatherings, it’s also a wonderful treat during holidays when berries are at their peak.
- Brunch Buffets: Consider including Berry Trifle in your next brunch spread alongside pastries and fruit salads for a colorful display.
- Storage Tips: If you have leftovers, store them in the refrigerator and enjoy within a day for optimal freshness.
- Flavor Pairings: Consider serving with a simple whipped cream topping or a scoop of vanilla ice cream for extra indulgence.
FAQ
Conclusion
Berry Trifle is a delightful dessert that brings together the best of summer’s bounty in a light and refreshing way. Each layer of fluffy cake, creamy goodness, and fresh fruit creates a perfect balance that will keep your guests coming back for more. I encourage you to try making this dessert for your next gathering; it’s sure to impress and satisfy everyone’s sweet tooth. Enjoy the process of layering and the joy it brings to your table!
Berry Trifle
Ingredients
Equipment
Method
- Slice angel food cake into 3/4-inch thick slices.
- In a small mixing bowl whisk together lemon juice, lemon zest and honey until well blended. Brush mixture over each both sides of the angel food cake slices (try to use all of it up).
- Cut angel food cake slices into 3/4-inch cubes. Set aside.
- In a large mixing bowl using an electric hand mixer whip the heavy cream on medium speed until slightly thickened then increase speed to high and whip until very stiff peaks form (it should start to lose that wet sheen).
- In a separate large mixing bowl using electric hand mixer (no need to clean beater blades) whip cream cheese, powdered sugar and vanilla extract on low speed until blended. Increase speed to high and whip until light and fluffy, about 2 to 3 minutes.
- Add whipped cream to the cream cheese mixture and fold with a spatula until mixtures are evenly combined.
- To assemble the trifle, layer 1/2 of the angel food cake pieces into an even layer at the bottom of a 13 to 14 cup trifle dish. Set aside 3/4 cup blueberries, then sprinkle 1/2 of the remaining blueberries over the angel food cake layer.
- Top with 1/2 of the whipped cream mixture and spread into an even layer. Top with a layer of 1/2 of the strawberries.
- Repeat this layering process once more with the angel food cake, blueberries, whipped cream mixture and strawberries (leave some space in center of strawberries for next step).
- Finish with remaining blueberries and raspberries on top in the center if using, and decorate with mint leaves just before serving if using.
- This trifle will be best the day it is prepared though it will keep in the fridge for up to 24 hours.
Notes
- Tip 1: Store leftovers in the refrigerator and consume within 24 hours for best flavor.
- Tip 2: Freezing is not recommended due to the cream and fruit layers.
- Tip 3: Customize with different fruits to suit your taste.
- Tip 4: Consider individual servings for a fun twist.
- Tip 5: Add mint leaves right before serving for a touch of freshness.