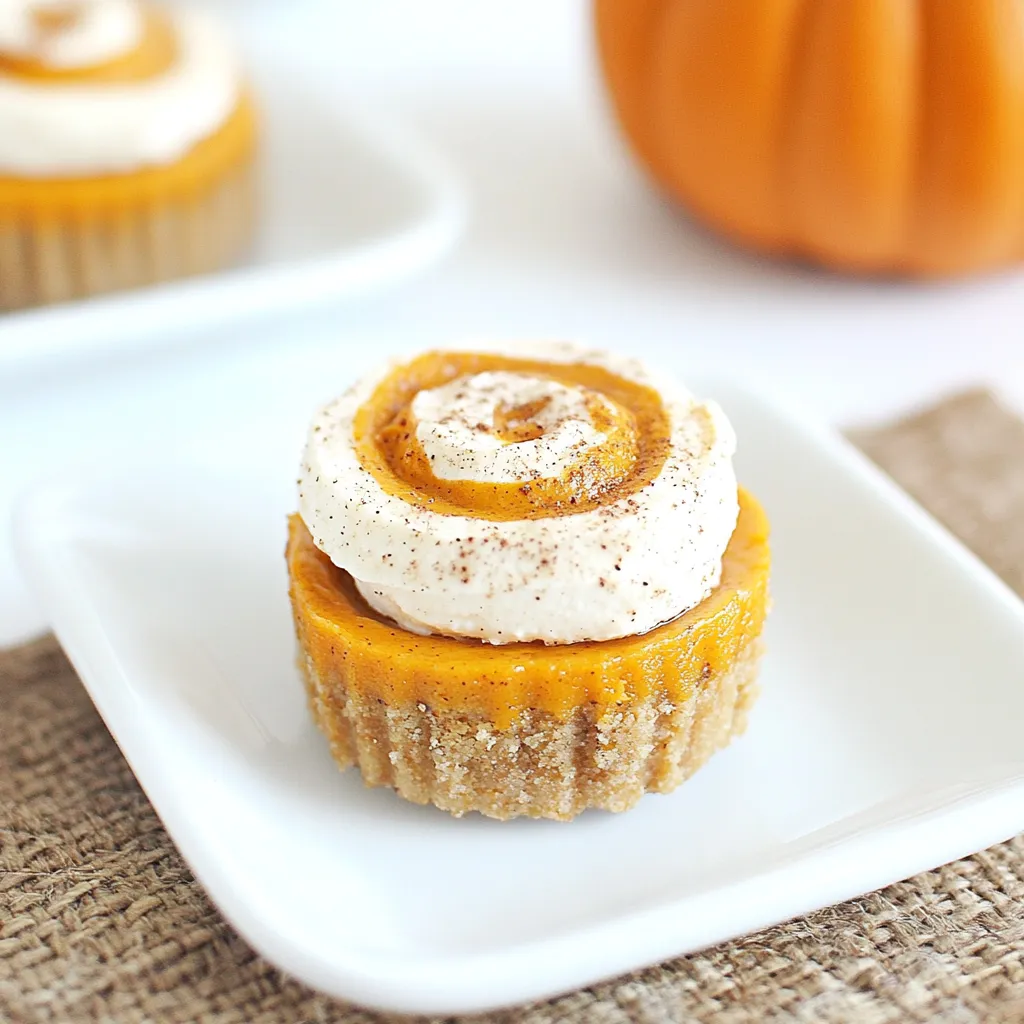
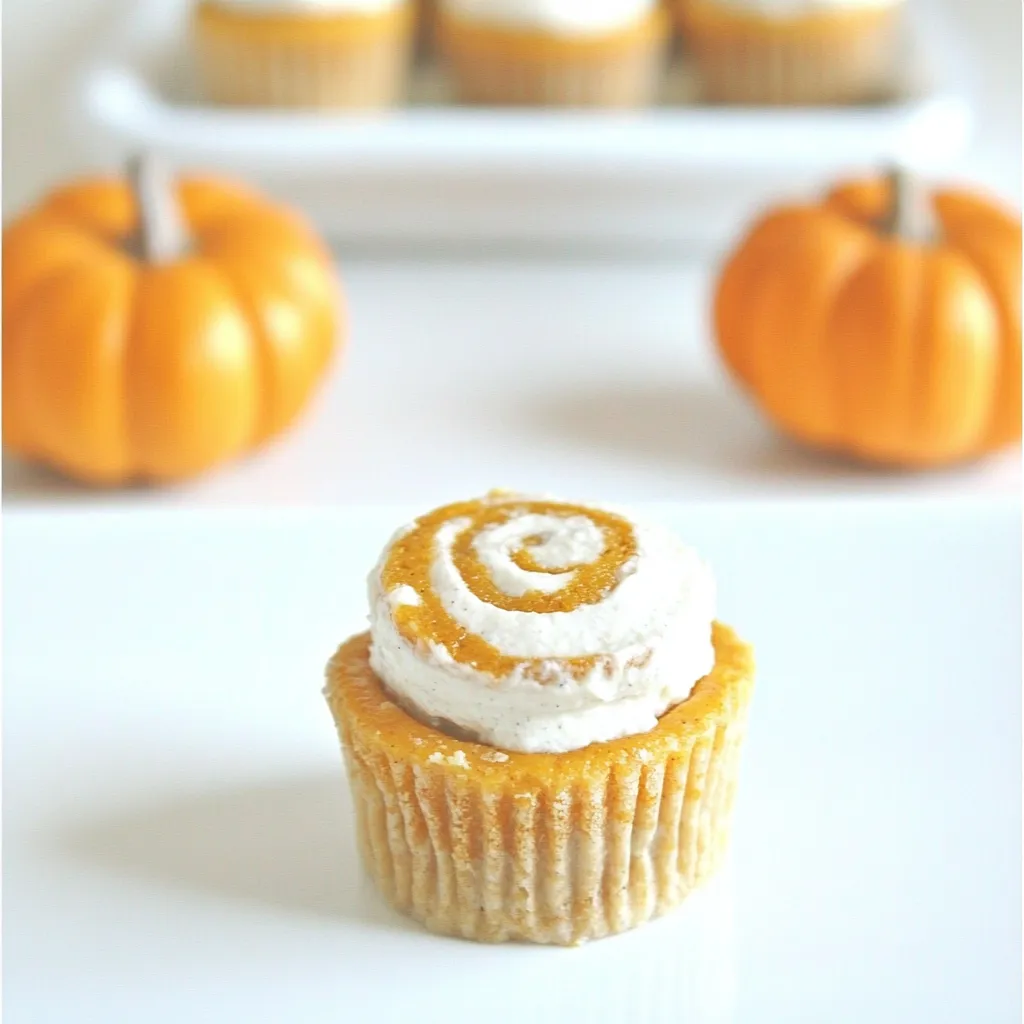
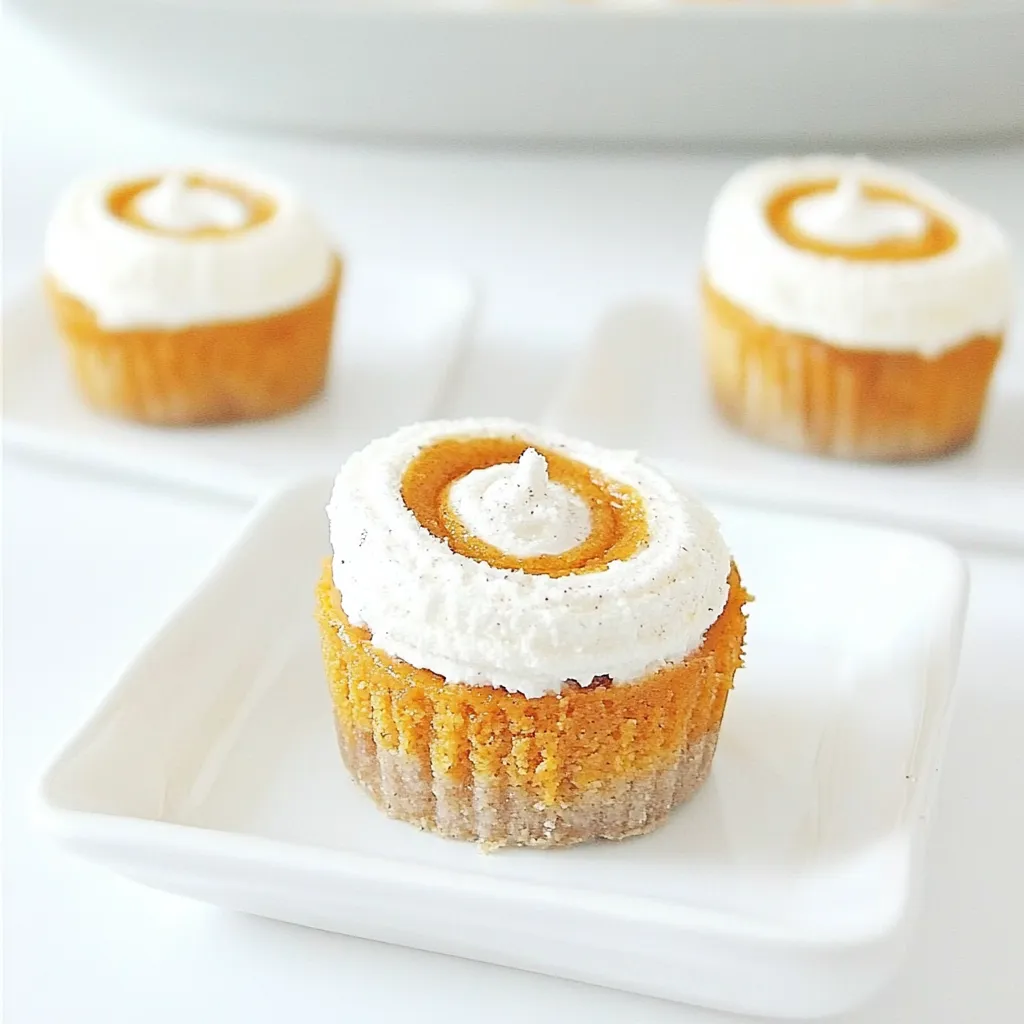
There’s something incredibly special about fall, and when I think of fall flavors, I can’t help but think of the Mini Pumpkin Swirl Cheesecake. Each year, as the leaves change and the air turns crisp, I find myself craving this delightful dessert. It’s a family tradition to gather around the table for Thanksgiving, and this cheesecake is always the star of the dessert spread. The combination of creamy cream cheese and fragrant pumpkin puree creates a rich flavor profile that is both comforting and festive. The swirling effect not only looks beautiful but tastes divine, with each bite offering a blend of sweetness and spice. I can’t tell you how many times I’ve been asked for the recipe!
Recipe Snapshot
20 mins
20 mins
0 mins
Medium
150 kcal
3 g
Gluten-Free, Low FODMAP
6 g
Frying Pan, Wooden Spoon, Mixing Bowl, Food Processor
Why We Love This Mini Pumpkin Swirl Cheesecake
Perfect for Any Occasion
One of the best things about the Mini Pumpkin Swirl Cheesecake is its versatility. It’s not just for Thanksgiving; it makes an appearance at Halloween parties, fall gatherings, and even as a delightful treat for weekend get-togethers. No matter the occasion, this cheesecake brings warmth and joy to the table.
Easy to Make
Despite its impressive appearance, this cheesecake is surprisingly easy to prepare. I love how the combination of fat-free cream cheese and fat-free Cool Whip makes the process so simple without sacrificing flavor. You don’t need to be a baking expert to whip this up—just follow the steps, and you’ll be good to go!
Creamy and Decadent
The texture of the Mini Pumpkin Swirl Cheesecake is something special. The creamy filling is incredibly satisfying, and when paired with the crumbly graham cracker crust, it’s a match made in dessert heaven. Every bite is a delightful mix of creaminess and crunch.
Healthier Indulgence
What I also love about this recipe is that it offers a healthier option without skimping on taste. Using fat-free ingredients allows you to enjoy a slice (or two) guilt-free! With the perfect balance of sweetness from the sugar and the spices, it’s a dessert that’s both satisfying and mindful.
Impressive Presentation
Let’s face it—everyone loves a dessert that looks as good as it tastes! The swirls of pumpkin and cheesecake create a stunning visual that’s sure to impress your guests. It’s the kind of dish that sparks conversation, and people will be raving about it long after the last slice is gone.
Mini Pumpkin Swirl Cheesecake Shopping List
When it comes to making the Mini Pumpkin Swirl Cheesecake, the ingredients you use are key. Each component works together to create a harmonious blend of flavors and textures. The star players are the pumpkin puree, which brings that beloved fall flavor, and the cream cheese, which provides that signature creamy base. The graham cracker crust adds a crunchy contrast that complements the smooth filling perfectly.
- 7 full graham cracker sheets – The base of your cheesecake, providing a sweet and crunchy foundation.
- ½ teaspoon ground cinnamon – Adds warmth and spiciness to the filling.
- 2 tablespoons sugar – Sweetens the crust nicely.
- 4 tablespoons unsalted butter, melted – Binds the graham cracker crumbs together for a solid crust.
- 8 ounces fat-free Cool Whip – Creates a light and fluffy texture.
- 6 ounces fat-free cream cheese – The creamy base of the cheesecake filling.
- ¼ cup sugar or 6 Splenda packets – Sweetens the filling without adding too many calories.
- 2 teaspoons vanilla extract – Enhances the flavors in your cheesecake.
- ⅓ cup pumpkin puree – The star ingredient that brings that pumpkin flavor.
- 1 teaspoon ground cinnamon – Adds more spice to the filling.
- 1 teaspoon ground nutmeg – A classic autumn spice for depth of flavor.
- ½ teaspoon ground ginger – Contributes to the warm, spicy profile.
- ⅛ teaspoon allspice – Complements the other spices beautifully.
Step by Step Guide for Mini Pumpkin Swirl Cheesecake
Making the Mini Pumpkin Swirl Cheesecake is an enjoyable process that fills your kitchen with the sweet aroma of spices. As you go through the steps, you’ll find it’s all about layering flavors and textures. Follow along, and I promise you’ll have a show-stopping dessert in no time!
Start by preparing the graham cracker crust. In a food processor, pulse the graham cracker sheets until they become fine crumbs. This will take only a few pulses. You want them fine but not dust—aim for a sandy texture.
Next, transfer the crumbs to a medium bowl and add the ground cinnamon, sugar, and melted unsalted butter. Stir everything together until the crumbs are well-coated and resemble wet sand.
Line a cupcake pan with cupcake liners. This is where the individual cheesecakes will take shape. Place one tablespoon of the graham cracker mixture in the bottom of each liner. Use your fingers to press down on the crumbs firmly, creating a solid crust.
Now, let’s work on the cheesecake filling. In a large bowl, combine the fat-free cream cheese, vanilla extract, and sugar. Using an electric hand mixer, beat the mixture until it’s fluffy and creamy. This should take about two minutes; you want it smooth with no lumps.
Once your cream cheese mixture is fluffy, gently fold in the fat-free Cool Whip. Be careful not to deflate it too much; you want to maintain that light texture.
In a separate small bowl, combine the pumpkin puree, ground cinnamon, ground nutmeg, ground ginger, and allspice. Mix until everything is well incorporated and fragrant.
Take two-thirds of the cheesecake mixture and add it to the pumpkin mixture. Stir gently until combined, being careful to keep it smooth and free of lumps.
Now it’s time to assemble! Fill each cupcake liner with the cheesecake mixture evenly, just below the top. Then, take small dollops of the pumpkin mixture and place three dots onto the cheesecake batter in each liner.
Using a toothpick or a skewer, gently swirl the two mixtures together for that beautiful marbled effect. Don’t overdo it; you want to see both colors.
Finally, place the cupcake pans in the fridge to chill for at least three hours, or until they are firm. This step is critical—impatience is not your friend here! Once chilled, serve them cold and enjoy every bite!
Things Worth Knowing
- Cheesecake Texture: The texture of your cheesecake is crucial. It should be creamy and smooth without any lumps. Ensure your cream cheese is at room temperature before mixing for best results.
- Swirling Technique: When swirling the pumpkin and cheesecake mixtures, use a light hand to avoid fully combining them. You want to see distinct layers and patterns.
- Chilling Time: Allow the cheesecakes to chill completely. If you try to cut them too soon, they may not hold their shape.
- Presentation: Consider garnishing with a dollop of Cool Whip or a sprinkle of cinnamon before serving to make them even more appealing!
Tips for Success
While making the Mini Pumpkin Swirl Cheesecake is straightforward, these tips will help ensure your dessert turns out perfectly every time.
- Storage: Store any leftovers in an airtight container in the fridge for up to three days. Enjoy them cold for a refreshing dessert.
- Freezing: You can freeze these cheesecakes! Wrap them tightly in plastic wrap and then in aluminum foil. They’ll last for up to a month in the freezer.
- Serving Size: Each cheesecake is perfectly portioned, but feel free to cut the liners to make them even smaller for bite-sized treats.
- Variations: Play around with flavors! Consider adding some chocolate chips or nuts for an extra crunch.
- Garnishing: For a festive touch, you can top with whipped cream and a sprinkle of cinnamon or nutmeg.
What Goes Well With This Mini Pumpkin Swirl Cheesecake
When it comes to serving the Mini Pumpkin Swirl Cheesecake, there are plenty of delightful pairings that can enhance the experience. Here are some ideas:
- Autumn Spices: Consider serving with a sprinkle of cinnamon or nutmeg on top for additional flavor and aroma.
- Whipped Cream: A dollop of freshly whipped cream adds a lightness and creaminess that complements the cheesecake.
- Hot Beverages: Pair it with a warm cup of spiced chai or a pumpkin spice latte for a cozy treat.
- Seasonal Fruits: Fresh slices of apples or pears can provide a refreshing contrast to the richness of the cheesecake.
- Gatherings: This cheesecake is an excellent choice for fall gatherings, from Thanksgiving dinners to cozy Halloween parties.
- Elegant Presentation: Serve on a beautiful platter with decorative fall leaves for a stunning display.
FAQ
Conclusion
The Mini Pumpkin Swirl Cheesecake is a comforting and delicious dessert that truly embodies the flavors of fall. Its creamy texture and delightful pumpkin-spice flavor make it a perfect treat for any occasion. I encourage you to give this recipe a try and share it with your family and friends. They will surely be impressed by your baking prowess and will be asking for seconds!

Mini Pumpkin Swirl Cheesecake
Ingredients
Equipment
Method
- Start by preparing the graham cracker crust. In a food processor, pulse the graham cracker sheets until they become fine crumbs. This will take only a few pulses. You want them fine but not dust—aim for a sandy texture.
- Next, transfer the crumbs to a medium bowl and add the ground cinnamon, sugar, and melted unsalted butter. Stir everything together until the crumbs are well-coated and resemble wet sand.
- Line a cupcake pan with cupcake liners. This is where the individual cheesecakes will take shape. Place one tablespoon of the graham cracker mixture in the bottom of each liner. Use your fingers to press down on the crumbs firmly, creating a solid crust.
- Now, let’s work on the cheesecake filling. In a large bowl, combine the fat-free cream cheese, vanilla extract, and sugar. Using an electric hand mixer, beat the mixture until it’s fluffy and creamy. This should take about two minutes; you want it smooth with no lumps.
- Once your cream cheese mixture is fluffy, gently fold in the fat-free Cool Whip. Be careful not to deflate it too much; you want to maintain that light texture.
- In a separate small bowl, combine the pumpkin puree, ground cinnamon, ground nutmeg, ground ginger, and allspice. Mix until everything is well incorporated and fragrant.
- Take two-thirds of the cheesecake mixture and add it to the pumpkin mixture. Stir gently until combined, being careful to keep it smooth and free of lumps.
- Now it’s time to assemble! Fill each cupcake liner with the cheesecake mixture evenly, just below the top. Then, take small dollops of the pumpkin mixture and place three dots onto the cheesecake batter in each liner.
- Using a toothpick or a skewer, gently swirl the two mixtures together for that beautiful marbled effect. Don’t overdo it; you want to see both colors.
- Finally, place the cupcake pans in the fridge to chill for at least three hours, or until they are firm. This step is critical—impatience is not your friend here! Once chilled, serve them cold and enjoy every bite!
Notes
- Storage: Store any leftovers in an airtight container in the fridge for up to three days. Enjoy them cold for a refreshing dessert.
- Freezing: You can freeze these cheesecakes! Wrap them tightly in plastic wrap and then in aluminum foil. They’ll last for up to a month in the freezer.
- Serving Size: Each cheesecake is perfectly portioned, but feel free to cut the liners to make them even smaller for bite-sized treats.
- Variations: Play around with flavors! Consider adding some chocolate chips or nuts for an extra crunch.
- Garnishing: For a festive touch, you can top with whipped cream and a sprinkle of cinnamon or nutmeg.