There’s something truly magical about whipping up a Pavlova in the kitchen. It takes me back to my childhood when my grandmother would prepare this stunning dessert for our family gatherings. The anticipation would build as the sweet aroma filled the air, and I could hardly wait to dig in. Each bite was a delightful experience, a balance of light and airy meringue, topped with luscious cream and fresh fruits. Now, I find joy in making the Pavlova for my own loved ones, creating beautiful memories just like those I cherish. This elegant dessert is a showstopper, perfect for celebrations or simply to satisfy a sweet craving. Whether it’s a summer picnic or a festive holiday feast, the Pavlova never fails to impress. So, put on your apron, and let’s embark on this delightful journey together!
Recipe Snapshot
2 hr 10 mins
40 mins
90 mins
Hard
220 kcal
3 g
Keto, Gluten-Free, Low FODMAP
9 g
Wooden Spoon, Oven, Chef’s Knife, Whisk, Mixing Bowl, Baking Sheet
Why This Pavlova Is a Winner
It’s a Showstopper
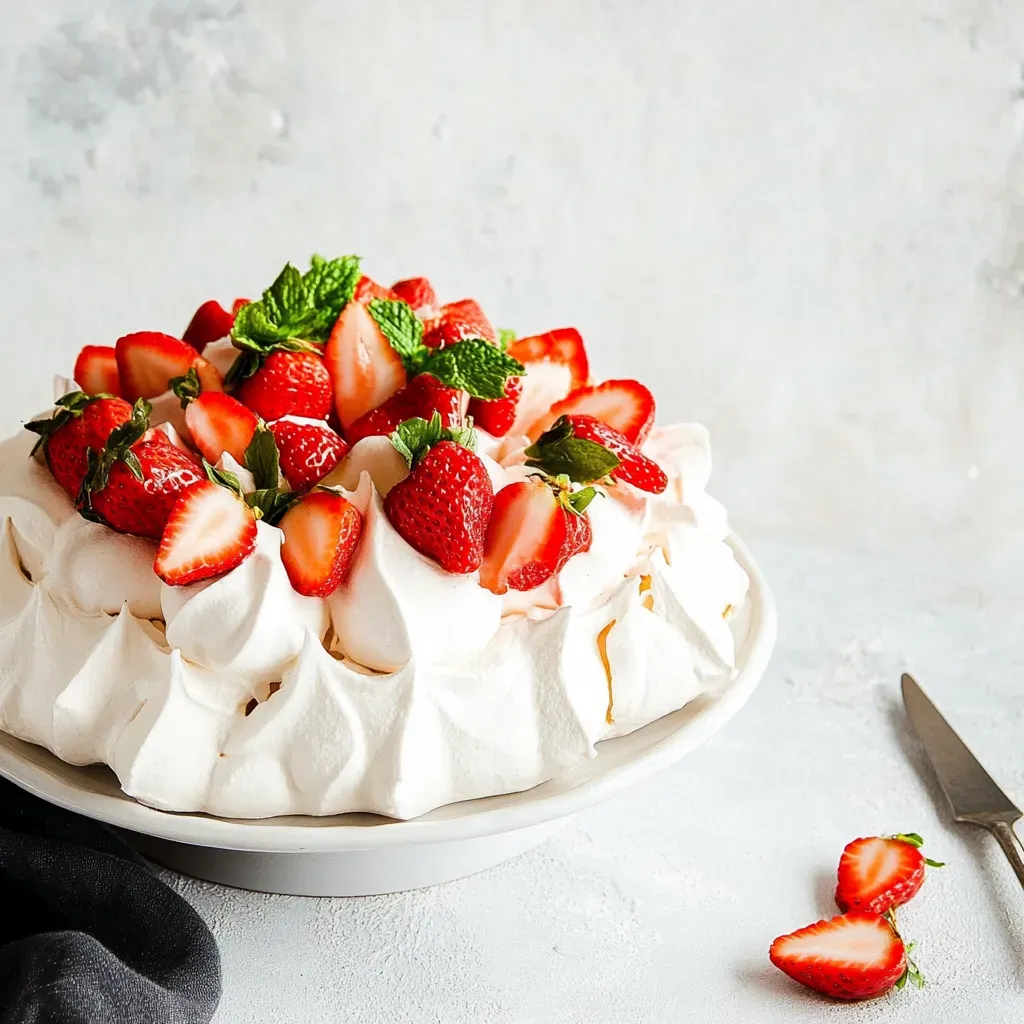
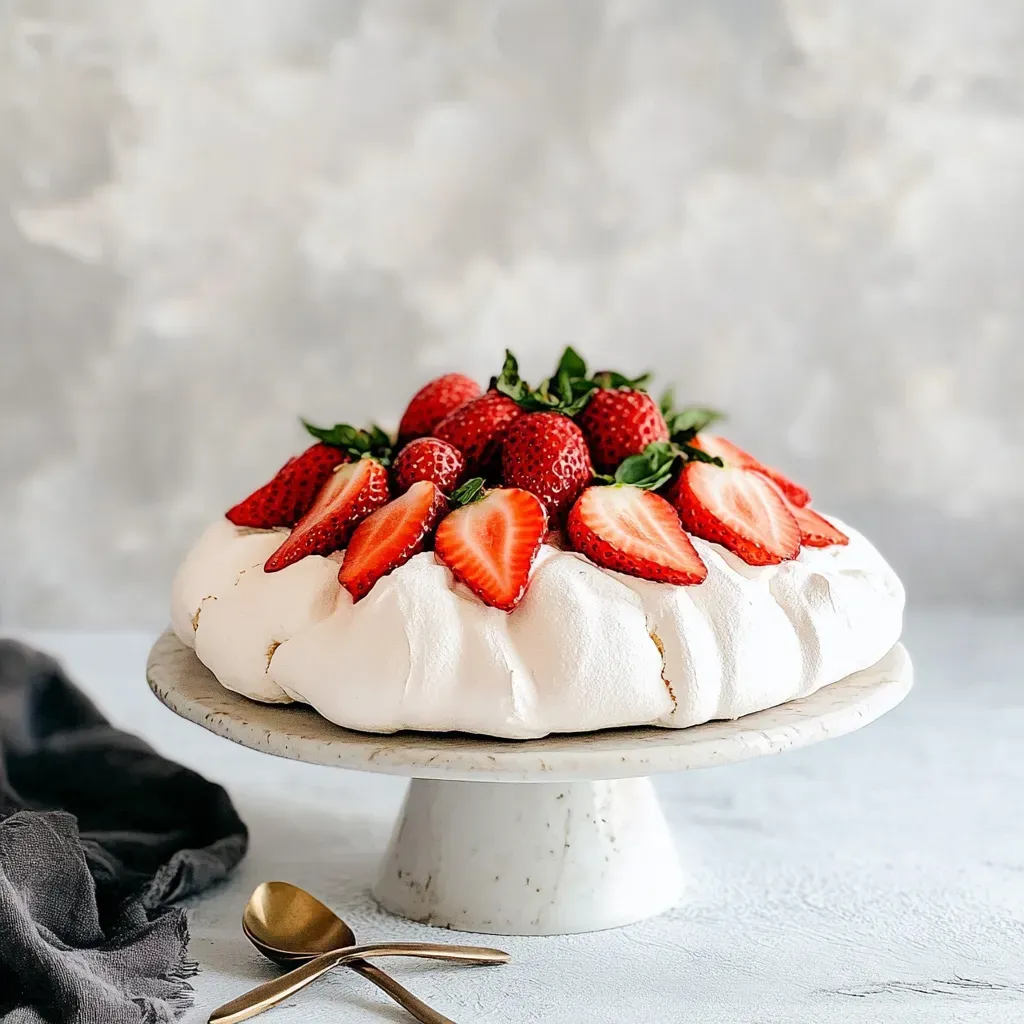
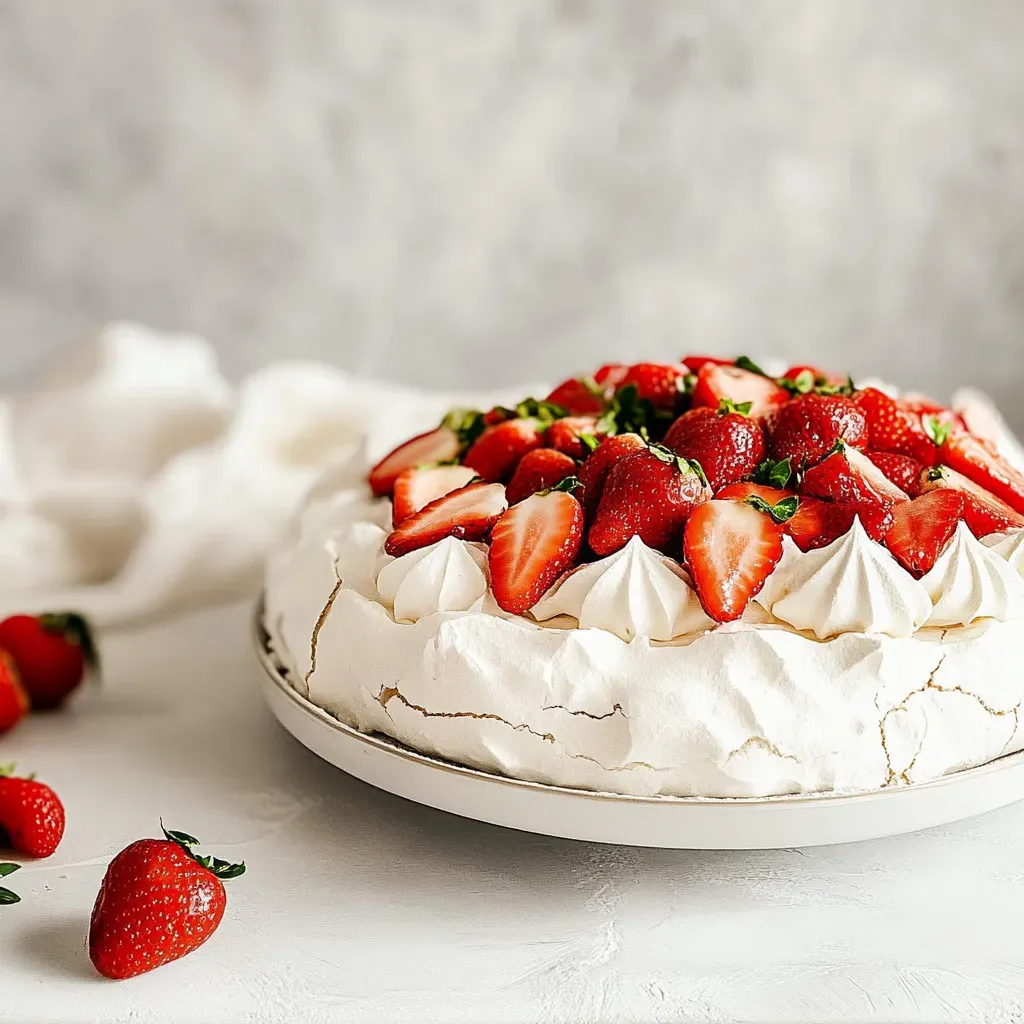
The Pavlova is truly a visual masterpiece. Its crisp exterior and soft, marshmallow-like interior create an inviting contrast. When topped with vibrant fruits and whipped cream, it becomes a stunning centerpiece that will wow your guests.
Gluten-Free Delight
This dessert is naturally gluten-free, making it an excellent option for those with dietary restrictions. Everyone can enjoy a slice without worry, ensuring that no one feels left out of the sweet festivities.
Simple Ingredients, Big Flavors
What I love about the Pavlova is how simple the ingredients are. Just a few key players—egg whites, sugar, and some fruit—come together to create something extraordinary. You’ll be amazed at how easy it is to achieve such a lovely dessert.
Perfect for Any Occasion
Whether it’s a birthday, holiday, or just a Sunday brunch, the Pavlova fits right in. Its lightness makes it an ideal dessert after a hearty meal, and its sweetness can brighten up any gathering.
Make it Your Own
This recipe is incredibly versatile. While I often use strawberries and mint, you can experiment with whatever fruits are in season or your personal favorites. Kiwi, passion fruit, or blueberries all work wonderfully!
A Labour of Love
Crafting a Pavlova requires a little patience, but the rewards are immeasurable. Watching the meringue rise and crisp in the oven is a joy, and the first bite is always worth the effort.
What Goes Into Pavlova
The ingredients for Pavlova are simple yet essential for achieving that perfect texture. The combination of egg whites, sugar, and a touch of cornstarch creates that light and airy meringue that is the hallmark of this dessert. Topped with freshly whipped cream and seasonal fruits, it’s a dessert that celebrates flavor and presentation.
- 6 egg whites at room temperature – Essential for creating stable meringue. Room temperature egg whites whip up to a greater volume and texture.
- pinch salt – Helps to stabilize the egg whites while whipping.
- pinch cream of tartar – Another stabilizer for achieving a glossy, voluminous meringue.
- 1 1/2 cups sugar – Sweetness is key for meringue, and sugar also helps create that crisp outer shell.
- 1 teaspoon lemon juice – Adds a subtle tartness that balances the sweetness of the Pavlova.
- 1/2 teaspoon vanilla – Gives a warm undertone to the meringue.
- 2 1/2 teaspoons cornstarch – This ingredient contributes to the soft, pillowy texture inside the meringue.
- 4 cups strawberries – Fresh and juicy, they offer a perfect topping and contrast to the sweet meringue.
- 2 tablespoons sugar – Used to macerate the strawberries, enhancing their flavor.
- 10 mint leaves – Adds a refreshing herbal note that complements the strawberries.
- 1 1/2 cups whipping cream – Whipped to soft peaks, it provides a rich and creamy layer inside the Pavlova.
- 1/2 cup crème fraîche or sour cream – Adds a tangy element to the whipped cream.
How to Cook Pavlova
Making a Pavlova is quite simple but requires attention to detail. You’ll enjoy the process as you watch the magic happen! Let’s dive into the steps that will guide you toward creating this classic dessert.
- Begin by allowing the egg whites to stand at room temperature for 30 minutes. This step is crucial because egg whites whip better when they’re warm. While the eggs are warming, prepare your baking sheet by lining it with parchment paper or foil. To ensure your Pavlova comes out perfectly shaped, draw a 9-inch circle on the paper or foil. Once done, flip the paper over, so the circle marks are on the underside.
- Preheat your oven to 250°F. It’s important to maintain a low temperature for a slow bake, which allows the meringue to dry out without browning. Next, in a large mixing bowl, start beating the egg whites using an electric mixer on medium speed. Continue beating until soft peaks form, indicated by curled tips.
- Gradually add the sugar, about 1 tablespoon at a time, while increasing the speed to high. This will create a stiff and glossy meringue. Keep beating until you see stiff peaks form, which means the tips will stand straight up when you lift the mixer.
- Incorporate the lemon juice and vanilla into your meringue. Mix gently to combine. Then, sift the cornstarch over the mixture, and using a rubber spatula, carefully fold it in. This folding technique should be gentle to maintain the meringue’s volume.
- Spread the meringue over the previously drawn circle on the parchment paper, building up the edges slightly to form a shell. This will create a perfect hollow center for your filling. It’s okay if it’s not perfectly smooth; a few swirls can add character.
- Place your baking sheet in the oven and bake for 1 1/2 hours. Resist the urge to open the oven door! Once the time is up, turn off the oven, and let the meringue cool in the oven with the door closed for 1 hour. This helps prevent cracks.
- While the meringue cools, you can prepare the filling. About 20 minutes before you’re ready to serve, clean, hull, and slice the strawberries. Place them in a large bowl and toss with 2 tablespoons sugar. This will draw out the sweetness and juices. Add the mint leaves, tearing them and gently stirring them into the strawberry mixture. Let it sit for 20 minutes to allow the flavors to meld.
- Next, in a separate large mixing bowl, whip the whipping cream and crème fraîche using an electric mixer on medium speed. Whip until soft peaks form, which should take a few minutes. You can also use a whisk if you prefer a workout!
- Once the meringue has cooled, gently place it on a large platter. Spread the whipped cream mixture into the center of the Pavlova shell, creating a lovely layer.
- Finally, spoon the marinated strawberries over the whipped cream. This is the moment where your Pavlova truly shines! Serve immediately and enjoy the delighted faces of your guests!
Things Worth Knowing
- Perfect Peaks: Ensure your mixing bowl and beaters are completely clean and grease-free. Any fat will prevent the egg whites from whipping up properly.
- Humidity Alert: Avoid making Pavlova on a humid day, as moisture can affect the meringue’s texture. Choose a clear, dry day instead.
- Cooling Time: Letting the meringue cool in the oven is essential for preventing cracks. Be patient—it’s worth it!
- Fruit Variations: Feel free to get creative with the toppings! Other fruits like passion fruit, kiwi, or mixed berries can be delightful additions.
Tips and Tricks about Pavlova
Creating the perfect Pavlova comes with its set of tips to ensure success every time. Here are some insights to help you master this exquisite dessert.
- Storage: If you have leftovers, store the Pavlova in an airtight container at room temperature. It’s best enjoyed fresh, but it can last for a day or two.
- Freezing: I wouldn’t recommend freezing the entire Pavlova, as the meringue can become soggy. However, you can freeze the meringue shell separately and assemble it with fresh toppings later.
- Pairing: This elegant dessert pairs beautifully with a cup of tea or coffee. It can also be served as a light dessert after a rich meal.
- Variations: Play around with different fruits and creams. You can try using flavored whipped creams or even a chocolate sauce!
- Layers of Flavors: Consider adding a layer of lemon curd or chocolate ganache underneath the whipped cream for more depth in flavor.
Side Dish Ideas for Pavlova
When it comes to serving your Pavlova, consider the following ideas:
- Light Salads: Pair your Pavlova with a fresh garden salad or a fruit salad to keep the meal light and refreshing.
- Tea Parties: This dessert is a wonderful addition to any afternoon tea, offering a sweet contrast to savory sandwiches and scones.
- Picnics: The Pavlova makes for a perfect picnic treat. Just be sure to keep it cool until serving!
- Holiday Celebrations: During festive occasions, the Pavlova shines with seasonal fruits, making it a delightful centerpiece for your dessert table.
- Warm Evenings: Serve Pavlova during warm summer evenings to complement a backyard barbecue or family gathering.
- Charcuterie Boards: Add slices of Pavlova to your charcuterie board for a sweet contrast against savory cheeses and meats.
FAQ
Conclusion
The Pavlova stands out as an exquisite dessert that combines elegance and simplicity. Its light and airy texture, paired with whipped cream and fresh fruits, creates a delightful experience that’s hard to resist. I encourage you to bring a little joy into your kitchen by trying this recipe. Not only will you impress your guests, but you’ll also create sweet memories with every bite!

Pavlova
Ingredients
Equipment
Method
- Allow egg whites to stand at room temperature for 30 minutes. Meanwhile, line a baking sheet with parchment paper or foil. Draw a 9-inch circle on the paper or foil. Invert paper or foil so the circle is on the reverse side.
- Preheat oven to 250°F. For meringue, in a large mixing bowl beat egg whites, salt, and cream of tartar with an electric mixer on medium speed until soft peaks form (tips curl). Add the 1 1/2 cups sugar, 1 tablespoon at a time, beating at high speed until stiff peaks form (tips stand straight). Beat in lemon juice and vanilla.
- Sift cornstarch over egg white mixture; using a rubber spatula, gently fold cornstarch into egg white mixture.
- Spread meringue over the circle on paper or foil, building up edges slightly to form a shell. Bake for 1 1/2 hours (do not open the door). Turn off oven; let meringue dry in oven with the door closed for 1 hour.
- For the filling, 20 minutes before serving, clean, hull, and slice the strawberries. Place strawberries in a large bowl. Toss berries with 2 tablespoons of sugar. Tear mint leaves; gently stir mint into strawberry mixture. Let stand for 20 minutes.
- Meanwhile, in a large mixing bowl beat the whipping cream and crème fraîche with an electric mixer on medium speed (or beat with a whisk or rotary beater) until soft peaks form (tips curl).
- Place meringue shell on a large platter. Spread the cream mixture into the meringue shell. Spoon the strawberry mixture over the cream mixture. Serve immediately.
Notes
- Storage: If you have leftovers, store the Pavlova in an airtight container at room temperature. It’s best enjoyed fresh, but it can last for a day or two.
- Freezing: I wouldn’t recommend freezing the entire Pavlova, as the meringue can become soggy. However, you can freeze the meringue shell separately and assemble it with fresh toppings later.
- Pairing: This elegant dessert pairs beautifully with a cup of tea or coffee. It can also be served as a light dessert after a rich meal.
- Variations: Play around with different fruits and creams. You can try using flavored whipped creams or even a chocolate sauce!
- Layers of Flavors: Consider adding a layer of lemon curd or chocolate ganache underneath the whipped cream for more depth in flavor.