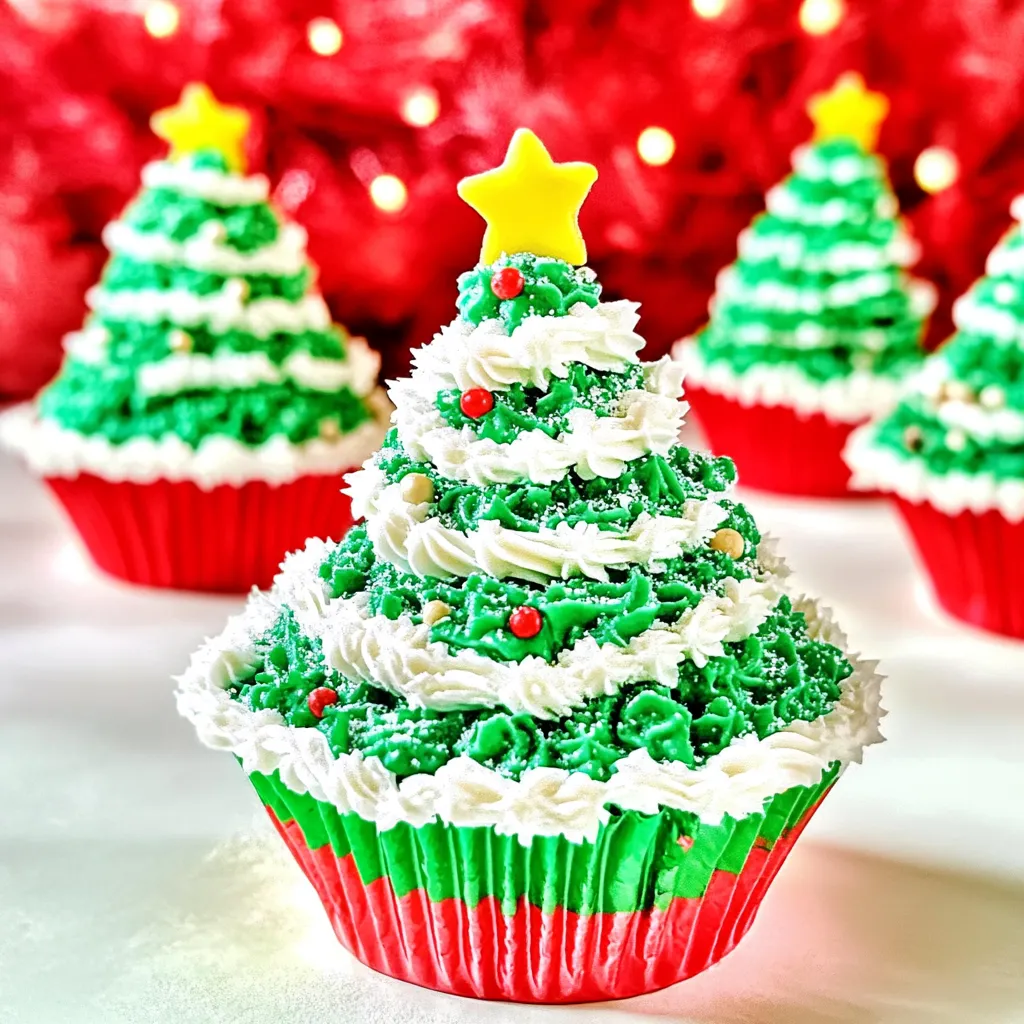
Every year, as the holidays approach, I find myself drawn to the kitchen, eager to create something fun and festive. This year, I decided to make Christmas Tree Cupcakes to share with family and friends. The moment I pulled these adorable little treats from the oven, I felt a rush of joy. Each cupcake is not just a dessert; it’s a celebration. Topped with fluffy whipped cream and nestled under a perfectly inverted ice cream cone, these cupcakes resemble a delightful Christmas tree! It’s the perfect way to bring holiday cheer right to your table.
Growing up, my family always had a tradition of baking during the holidays, and I’m thrilled to carry that on with my own twist. As I decorated these Christmas Tree Cupcakes, I couldn’t help but smile at the thought of sharing them during our festive gatherings. The laughter and excitement that come with baking together are just as important as the final product. Each cupcake is a canvas for creativity, and I love seeing how everyone personalizes their trees with sprinkles and colored frosting. It’s these little moments that make the holiday season so special.
Recipe Snapshot
35 mins
15 mins
20 mins
Medium
210 kcal
2 g
Gluten-Free, Low FODMAP
10 g
Cutting Board, Food Processor, Frying Pan, Wooden Spoon, Oven, Whisk, Mixing Bowl, Baking Sheet
Why This Christmas Tree Cupcakes Stands Out
Festive Presentation
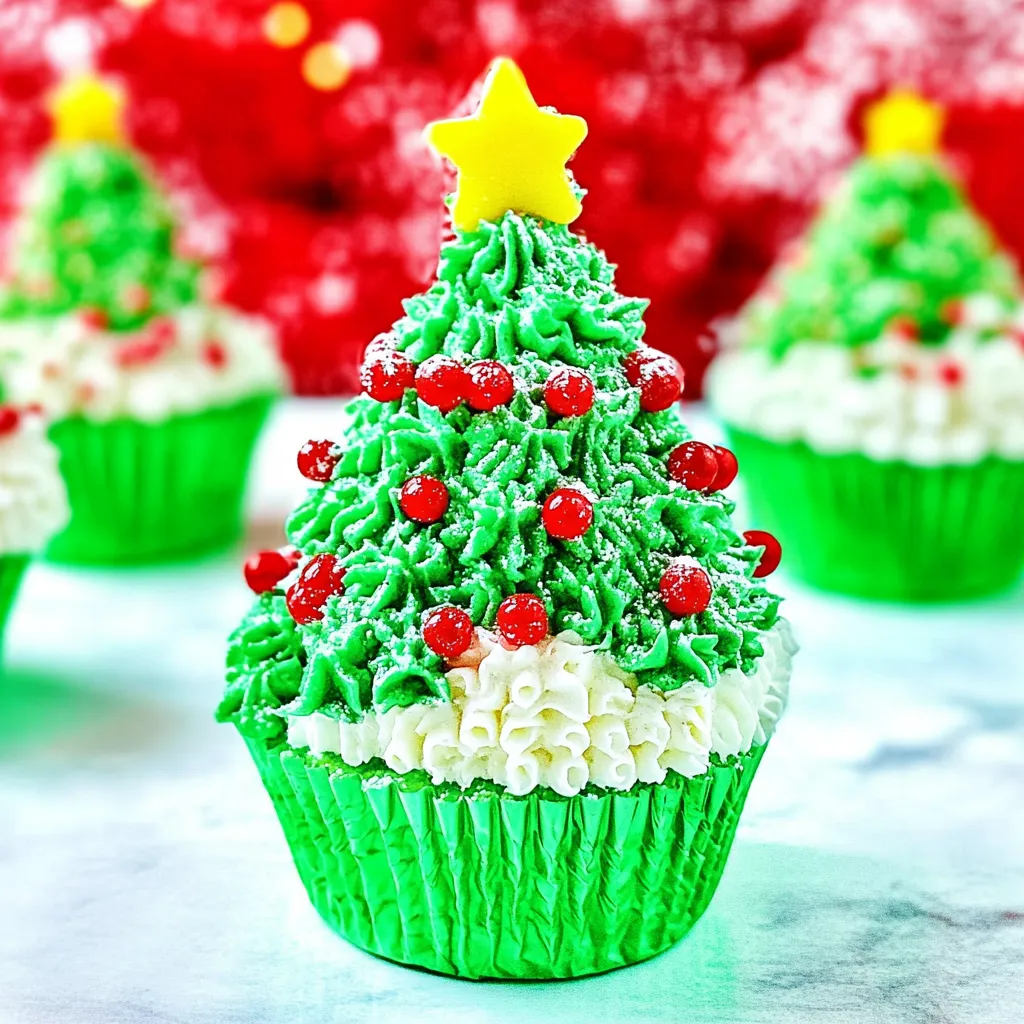
What I love most about these Christmas Tree Cupcakes is their presentation. They are not just delicious; they are a visual treat! The vibrant green whipped cream mimics tree foliage, while the yellow star at the top adds the perfect finishing touch. Each cupcake becomes a mini masterpiece that brings joy to both kids and adults alike.
Easy to Make
Even if you’re not a seasoned baker, these cupcakes are incredibly easy to make. The batter comes together quickly, and the steps are straightforward. I promise you don’t need any special skills to create these beauties!
Customizable Decor
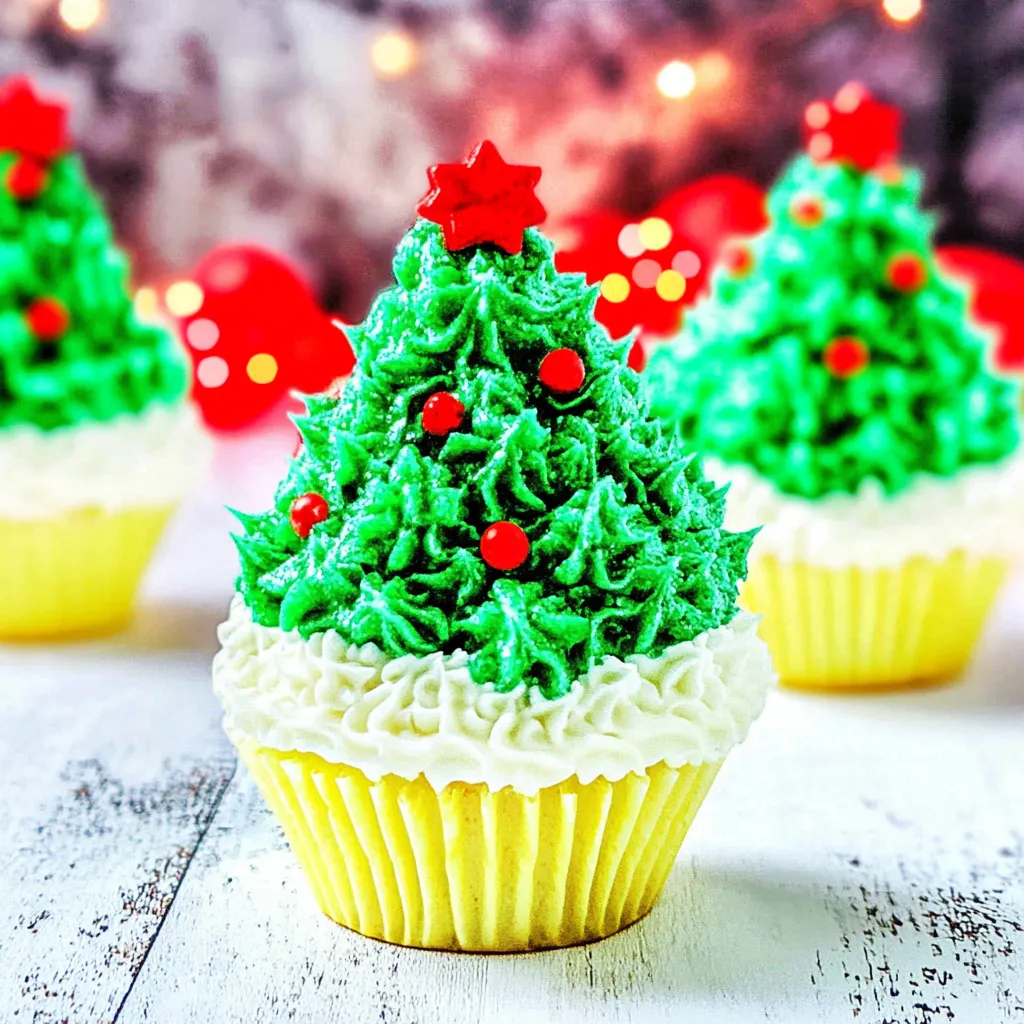
Another reason I adore this recipe is its versatility. You can customize your Christmas Tree Cupcakes to match your holiday décor or personal taste. Whether you prefer colorful sprinkles, edible glitter, or little candies, the options are endless to make each tree uniquely yours.
Family-Friendly Fun
Baking these cupcakes is a fantastic activity for families. Kids love to help, whether it’s mixing the batter or decorating the cupcakes. It creates a wonderful bonding experience while also encouraging creativity in the kitchen.
Perfect for Any Occasion
While these cupcakes are a holiday favorite, they are great for any festive occasion. Birthdays, school parties, or even just a cozy night in can be made better with these delightful treats. They never fail to bring smiles and spark joy!
Deliciously Sweet
Last but not least, let’s talk about flavor! The combination of the moist cupcake with the sweet, fluffy whipped cream creates a heavenly bite every time. With such a delightful flavor profile, it’s hard to eat just one!
Key Ingredients for Christmas Tree Cupcakes
The ingredients for these Christmas Tree Cupcakes are simple yet effective. Each one plays a crucial role in building the flavor and structure of the cupcakes. With fluffy whipped cream as the crown and sugar cookie ice cream cones as the trees, they bring together the magic of the season.
- 2 large eggs – These eggs add moisture and richness to the cupcakes.
- ½ cup vegetable or canola oil – This ingredient ensures the cupcakes remain soft and moist.
- ¾ cup granulated sugar – For sweetness, which balances the flavors of the other ingredients.
- 1 to 2 teaspoons pure vanilla extract – Adds a lovely depth of flavor.
- 1½ cups all-purpose flour – The backbone of any cupcake, providing structure.
- 1½ teaspoons baking powder – This helps the cupcakes rise and become fluffy.
- 1 teaspoon baking soda – It works with the baking powder for a perfect texture.
- 1 teaspoon salt – Enhances the overall flavor of the cupcakes.
- 1 cup heavy or whipping cream – For the whipped topping, adding lightness and sweetness.
- ¼ cup confectioners’ sugar – Sweetens the whipped cream perfectly.
- 12 pointed-tip sugar cookie ice cream cones – These cones create the tree shape for our cupcakes.
- Green food coloring – To achieve that beautiful Christmas tree green.
- Yellow stars – Optional for decorating, bringing a festive touch.
Directions for Christmas Tree Cupcakes
Making Christmas Tree Cupcakes is a fun and engaging process. You’ll see how each step leads to those cute, tree-like desserts. Let’s dive into the baking adventure!
- Preheat your oven to 350 degrees Fahrenheit. Line a standard 12-count cupcake pan with red or green foil cupcake liners. This adds a festive touch right from the start!
- In a large mixing bowl, add the eggs, vegetable oil, and granulated sugar. Use a whisk to combine them thoroughly, ensuring the mixture is smooth and uniform.
- Next, pour in the vanilla extract. Whisk it into your mixture, allowing that delightful aroma to fill your kitchen.
- Now it’s time to add the dry ingredients. Sprinkle in the flour, baking powder, baking soda, and salt. Gently stir this mixture until just combined. Be cautious not to overmix, as this can make your cupcakes dense.
- Evenly divide the batter into the prepared cupcake liners, filling each about two-thirds full. This will allow room for them to rise beautifully.
- Place the pan in your preheated oven and bake for 18 to 20 minutes. They are done when the centers are set, and a toothpick inserted into the center comes out clean or with just a few moist crumbs.
- Once baked, allow the cupcakes to cool in the pan for a few minutes before transferring them to a wire rack to cool completely.
- While the cupcakes cool, prepare the whipped cream. In a chilled bowl, add the heavy cream, confectioners’ sugar, and the remaining vanilla extract. Beat this mixture on high speed for about 90 to 120 seconds until stiff peaks form. Remember to stop and scrape down the sides of the bowl as needed!
- Once cooled, spread a thin layer of whipped cream over the top of each cupcake. This will act as the adhesive for your ice cream cones.
- Take your sugar cookie ice cream cones and gently invert them on top of each cupcake. The whipped cream should help secure them in place.
- For the remaining whipped cream, add green food coloring until you reach your desired shade of green. Mix well to ensure the color is evenly distributed.
- Using the green whipped cream, spread another thin layer over the ice cream cones, mimicking the look of a tree.
- Place the green whipped cream into a piping bag fitted with a star tip. Starting at the base of the cone, pipe star-shaped dollops of whipped cream, working your way up to create a tree-like appearance. Repeat this for all 12 cupcakes.
- Optionally, top each tree with a yellow star for a festive finishing touch. This step really brings your trees to life!
- Serve your Christmas Tree Cupcakes immediately or store them in an airtight container in the fridge. They will keep well for up to five days, but I doubt they’ll last that long!
Things Worth Knowing
- Chill your mixing equipment: For the best results when whipping the cream, make sure your mixing bowl and whisk are chilled. This helps achieve the desired stiff peaks.
- Even baking: To ensure uniform baking, rotate the cupcake pan halfway through the baking time. This will help prevent any uneven browning.
- Storage: If you have leftovers, keep them in an airtight container in the fridge. They should maintain their texture for a few days, but the whipped cream may soften over time.
- Coloring tips: When adding food coloring to your whipped cream, start with a small amount and gradually increase until you reach the desired color. This prevents over-saturation.
- Decorating fun: Feel free to get creative with decorations! Use chocolate shavings, edible glitter, or other candies to personalize your cupcakes.
Variations to Try
If you’re eager to explore different takes on these Christmas Tree Cupcakes, I’ve got some fun variations for you to consider! Each one adds a unique twist that I think you’re going to love.
- Storage: If you’re making these in advance, store them in an airtight container in the fridge. They will stay fresh for up to five days, but are best enjoyed within the first couple of days.
- Freezing: For longer storage, you can freeze the baked cupcakes without frosting. Just wrap them tightly in plastic wrap and place them in an airtight container. Thaw before decorating.
- Fillings: Consider adding fillings inside the cupcakes, like chocolate ganache or fruit preserves, to surprise your guests with added flavor.
- Different cones: Swap out the sugar cookie cones for chocolate ones for a richer flavor or try making your own cake cones!
- Cupcake flavor: Experiment with flavored cupcakes such as chocolate or red velvet to match your holiday theme.
- Decorating candies: Use different Christmas-themed candies such as M&Ms or sprinkles for added fun and festive flair on your trees.
- Whipped cream alternatives: If you’re looking for a lighter option, try using whipped coconut cream for a different flavor profile.
Serving Ideas for Christmas Tree Cupcakes
When it comes to serving these delightful Christmas Tree Cupcakes, there are so many creative options to consider. Here are some ideas that can enhance your holiday gatherings:
- Holiday parties: These cupcakes are perfect for any festive gathering. Their whimsical presentation makes them a favorite among children and adults alike!
- Gift giving: Package a few in a festive box or container and give them as sweet gifts to friends and family.
- Theme parties: Coordinate the colors with your party theme. You can use red, green, and gold decorations to match the cupcakes.
- After school treats: Surprise your kids with these whimsical cupcakes after school, making the perfect end-of-day treat.
- Seasonal swap: Adjust the toppings to suit other seasons or holidays—use pastel colors for Easter or spooky decorations for Halloween.
- Picnic idea: These cupcakes are also great for picnics! Just keep them cool in an insulated bag until you’re ready to enjoy.
- Ice cream pairing: Serve these cupcakes with a scoop of vanilla or chocolate ice cream for an indulgent dessert experience.
FAQ
Conclusion
These Christmas Tree Cupcakes truly capture the essence of the festive season! With their whimsical presentation and delicious flavor, they are bound to be a hit at any holiday gathering. I encourage you to give this recipe a try; it’s not just about baking, but creating memories that will last a lifetime. Let’s spread joy and sweetness this holiday season!

Christmas Tree Cupcakes
Ingredients
Equipment
Method
- Preheat your oven to 350 degrees Fahrenheit. Line a standard 12-count cupcake pan with red or green foil cupcake liners. This adds a festive touch right from the start!
- In a large mixing bowl, add the eggs, vegetable oil, and granulated sugar. Use a whisk to combine them thoroughly, ensuring the mixture is smooth and uniform.
- Next, pour in the vanilla extract. Whisk it into your mixture, allowing that delightful aroma to fill your kitchen.
- Now it’s time to add the dry ingredients. Sprinkle in the flour, baking powder, baking soda, and salt. Gently stir this mixture until just combined. Be cautious not to overmix, as this can make your cupcakes dense.
- Evenly divide the batter into the prepared cupcake liners, filling each about two-thirds full. This will allow room for them to rise beautifully.
- Place the pan in your preheated oven and bake for 18 to 20 minutes. They are done when the centers are set, and a toothpick inserted into the center comes out clean or with just a few moist crumbs.
- Once baked, allow the cupcakes to cool in the pan for a few minutes before transferring them to a wire rack to cool completely.
- While the cupcakes cool, prepare the whipped cream. In a chilled bowl, add the heavy cream, confectioners’ sugar, and the remaining vanilla extract. Beat this mixture on high speed for about 90 to 120 seconds until stiff peaks form. Remember to stop and scrape down the sides of the bowl as needed!
- Once cooled, spread a thin layer of whipped cream over the top of each cupcake. This will act as the adhesive for your ice cream cones.
- Take your sugar cookie ice cream cones and gently invert them on top of each cupcake. The whipped cream should help secure them in place.
- For the remaining whipped cream, add green food coloring until you reach your desired shade of green. Mix well to ensure the color is evenly distributed.
- Using the green whipped cream, spread another thin layer over the ice cream cones, mimicking the look of a tree.
- Place the green whipped cream into a piping bag fitted with a star tip. Starting at the base of the cone, pipe star-shaped dollops of whipped cream, working your way up to create a tree-like appearance. Repeat this for all 12 cupcakes.
- Optionally, top each tree with a yellow star for a festive finishing touch. This step really brings your trees to life!
- Serve your Christmas Tree Cupcakes immediately or store them in an airtight container in the fridge. They will keep well for up to five days, but I doubt they’ll last that long!
Notes
- Tip 1: The recipe for the whipped cream as written makes 2 cups which is enough to decorate with. However, if you're not experienced with a piping bag and decorating, I suggest doubling the recipe as written to ensure you will have enough whipped cream.
- Tip 2: Use heavy cream or whipping cream for the whipped cream. Do not use half-and-half or milk.
- Tip 3: Make sure the cream is very cold. Even better, chill your mixing bowl for 20 minutes in the fridge before you use it.
- Tip 4: You can fill the ice cream cones with M&Ms or chocolate chips for an added element of surprise when eating the holiday cupcakes.