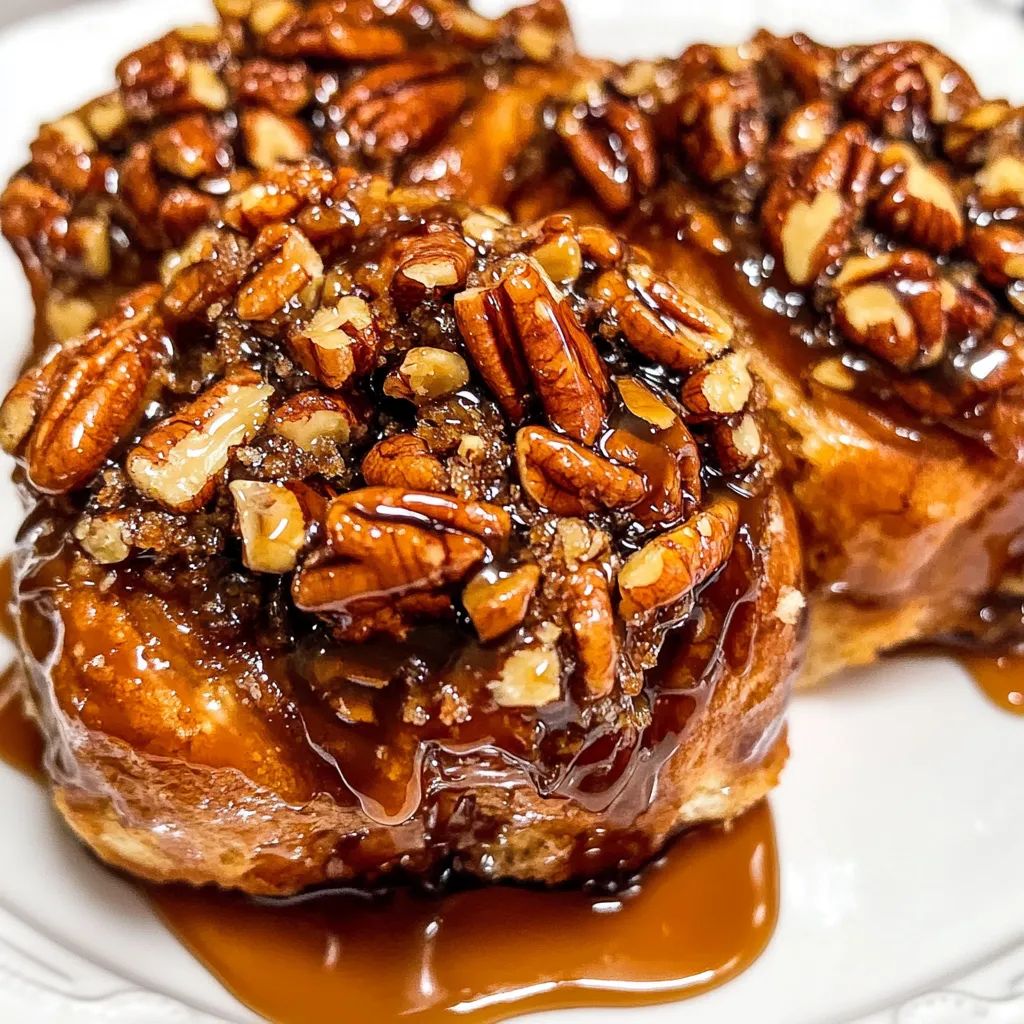
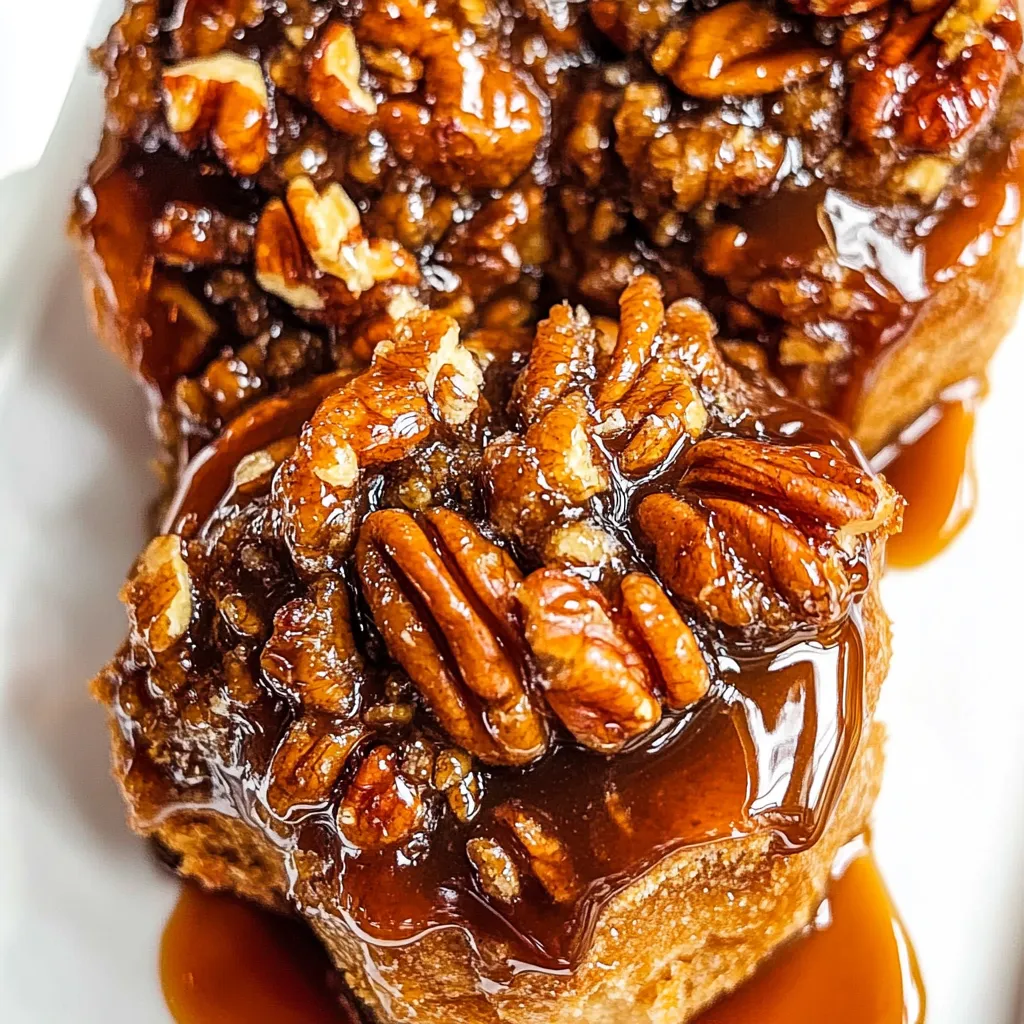
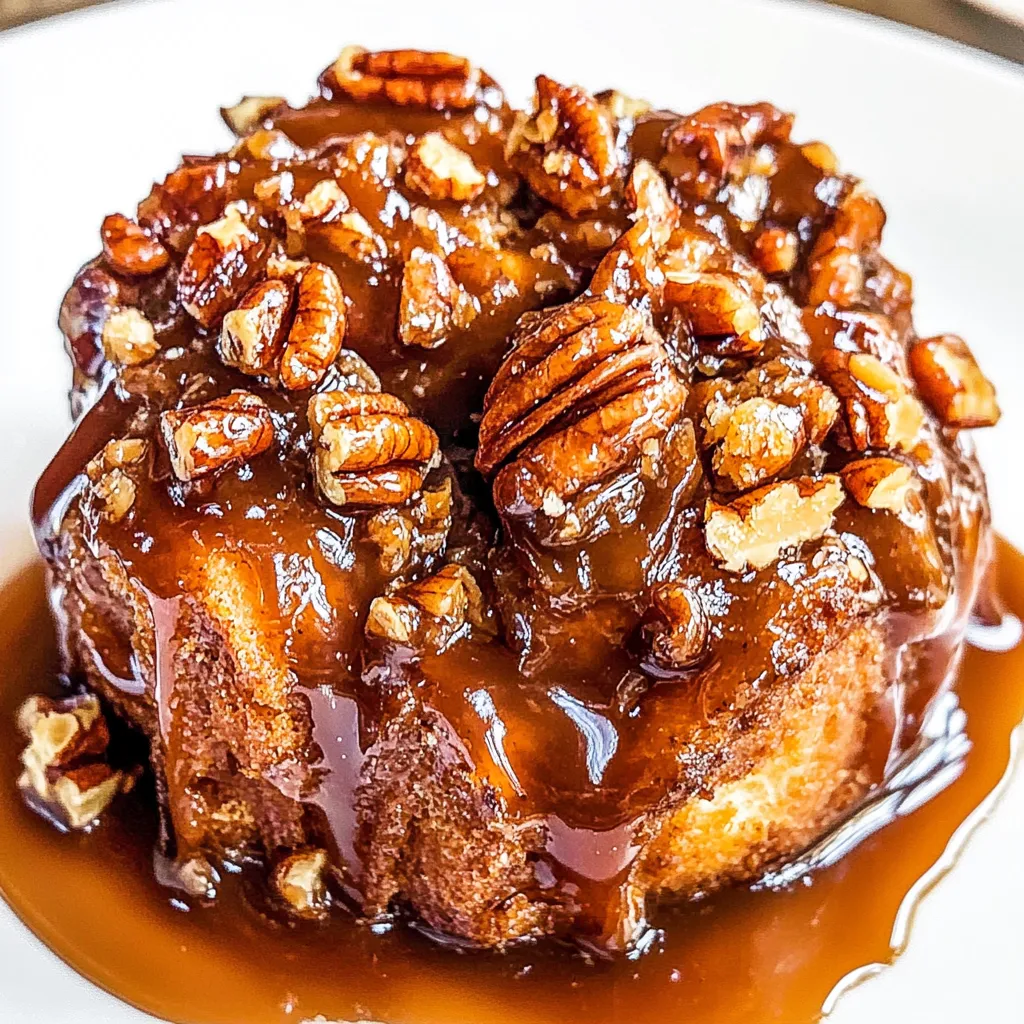
There’s something deeply comforting about the aroma of freshly baked Sticky Buns wafting through the house, isn’t there? I remember the first time I made these delightful treats; it was a chilly fall morning, and the warm spices filled the kitchen while I eagerly waited for them to rise. The anticipation was palpable as I watched the dough transform into fluffy rolls, glistening with a rich caramel and pecan topping. You see, Sticky Buns are not just a dessert; they’re a warm embrace on a plate, perfect for breakfast, brunch, or even as a sweet snack during the day. Each bite offers a delightful combination of textures and flavors that never fails to bring smiles and happy memories. So let’s dive into this recipe and create some magic together!
Recipe Snapshot
2 hr 35 mins
120 mins
35 mins
Hard
330 kcal
3 g
Vegan, Gluten-Free, Low FODMAP
16 g
Stand Mixer, Baking Sheet, Rolling Pin, 9-inch Round Cake Pan, Kitchen Scale
Why Try This Sticky Buns
1. Unforgettable Flavors
The magic of Sticky Buns lies in their incredible flavor profile. The combination of sweet, buttery dough with a sticky caramel sauce and crunchy pecans creates a symphony of tastes that’s simply irresistible. Each bite is a burst of sweetness that dances on your palate.
2. Perfect for Sharing
These buns are perfect for gatherings or lazy Sunday breakfasts. They serve a crowd, making them an ideal centerpiece for family brunches or holiday gatherings. Everyone loves a good Sticky Bun, and sharing them creates moments of joy and connection.
3. A Cozy Kitchen Experience
Making Sticky Buns is not just about the end product; it’s an experience. Kneading the dough, watching it rise, and finally assembling the buns is a joyful process. It fills your kitchen with warmth and aroma, creating a cozy atmosphere that enhances the whole cooking experience.
4. Simple Ingredients, Huge Impact
The beauty of this recipe is its simplicity. You’ll find that most of the ingredients are pantry staples. Yet, when combined, they create something extraordinary. The transformation of basic ingredients into something so delightful is truly magical.
5. Versatility
While the traditional Sticky Buns are classic, you can easily customize them. Feel free to experiment with different nuts, spices, or even add chocolate for a twist. This recipe is a blank canvas for your creativity!
6. A Sweet Tradition
For many, Sticky Buns evoke a sense of nostalgia. They remind us of family gatherings and cherished moments around the table. Making them can become a new tradition in your family, creating sweet memories that last a lifetime.
Ingredient List for Sticky Buns
The ingredients for Sticky Buns play a critical role in crafting their delightful texture and flavor. Each component adds its unique touch, creating a harmonious blend that results in heavenly rolls.
- 1 tablespoon active dry yeast – This is the key ingredient that makes the dough rise and gives the buns their fluffy texture.
- 1¼ cups warm water – Essential for activating the yeast, it should ideally be between 110°F-115°F.
- 4½-5 cups all-purpose flour – Provides the structure of the rolls, ensuring they are soft yet sturdy enough to hold the toppings.
- 3 large eggs – Adds richness and moisture to the dough, making it beautifully soft.
- ½ cup vegetable shortening – This keeps the dough tender and adds a nice flavor to the buns.
- ½ cup granulated sugar – Sweetens the dough, balancing the flavors beautifully.
- 1 teaspoon kosher salt – Enhances the overall flavor of the buns.
- 1½ cups unsalted butter – Used in various stages, it provides richness and a lovely buttery flavor.
- 1 cup dark brown sugar – Adds a deep caramel flavor to the pecan topping.
- 3 tablespoons ground cinnamon – Infuses the buns with warm spice, a signature flavor in this recipe.
- 2 tablespoons apple pie spice – Provides a delightful twist, complementing the cinnamon.
- 12 tablespoons unsalted butter – Additional butter for the topping, ensuring that every bite is indulgent.
- ¾ cup dark brown sugar – Sweetens the pecan topping, creating that sticky goodness.
- ¾ cup granulated sugar – Balances the flavors in the topping.
- ½ cup dark corn syrup – Contributes to the sticky texture of the topping.
- ¼ cup water – Helps to create the right consistency in the topping.
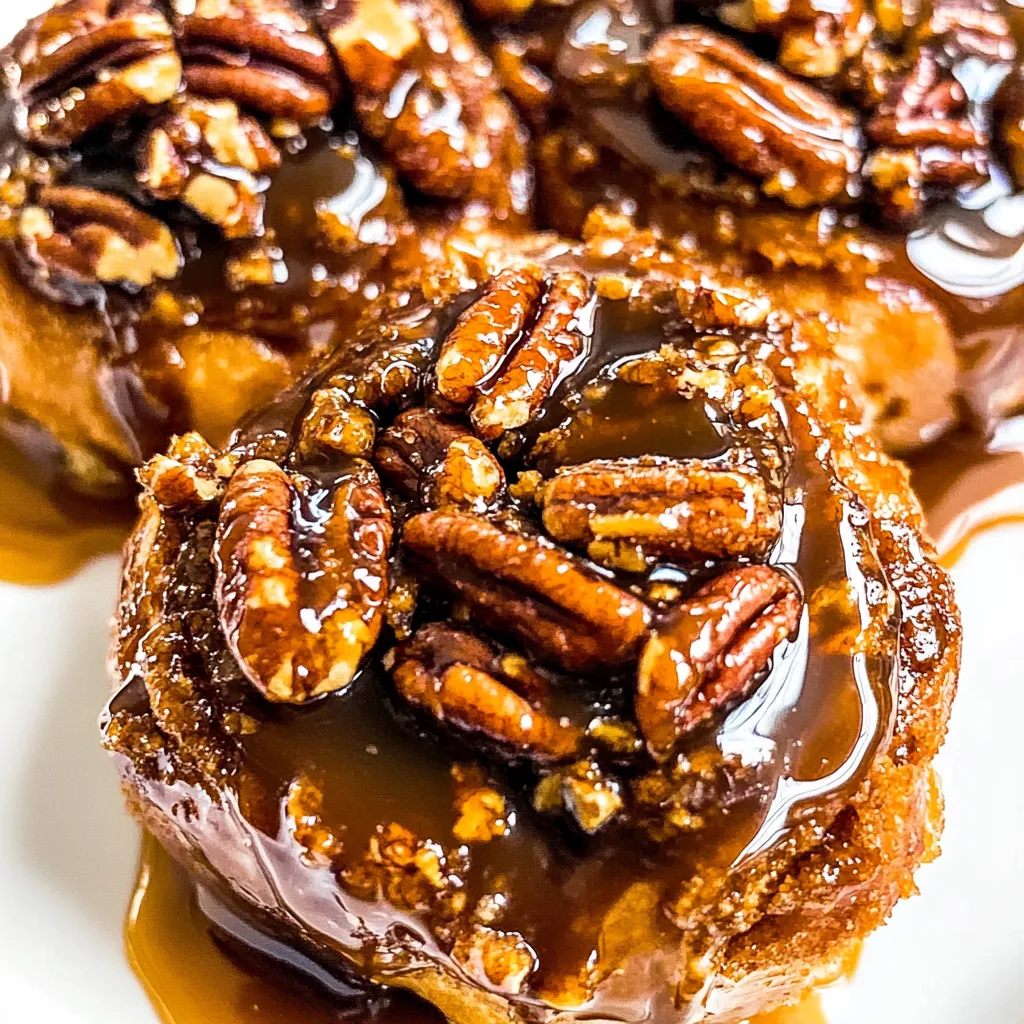
- 2 cups chopped pecans – Adds crunch and richness, making these buns even more delightful.
How to Cook Sticky Buns
Making Sticky Buns is a fun and fulfilling process that brings joy to your kitchen. Follow these steps for a delightful baking adventure!
- Start by lightly whisking 1 tablespoon active dry yeast with ¼ cup warm water in a liquid measuring cup. Let it stand for about 5 minutes until it’s frothy. This ensures that your yeast is active and ready to work its magic.
- In the bowl of a stand mixer fitted with the paddle attachment, combine the yeast mixture, the remaining 1 cup warm water, 2 cups of all-purpose flour, 3 large eggs, ½ cup vegetable shortening, ½ cup granulated sugar, and 1 teaspoon kosher salt. Beat this mixture for about 2 minutes, or until it starts to form a soft dough. You’ll want the dough to be smooth and slightly sticky.
- Gradually add in enough of the remaining flour (usually about 2½-3 cups more) and mix just until incorporated. The dough should hold together and not stick to your fingers too much.
- Next, spray (or butter) the inside of a glass bowl with nonstick spray. Place the dough inside, flipping it to coat. Cover the bowl and place it in a warm area to rise, allowing it to double in size for about 1-1½ hours.
- Once the dough has risen, punch it down gently to release the air, cover it, and refrigerate for at least 8 hours or overnight. This step develops the flavor and texture.
- When you’re ready to make the rolls, take the dough out of the refrigerator. Punch it down again and divide it in half. Cover the dough loosely with plastic wrap to keep it from drying out.
- Prepare your two 9-inch baking pans by spraying them generously with nonstick spray. This will help prevent sticking.
- Now it’s time to make the pecan topping! In a medium bowl, whisk together 12 tablespoons unsalted butter, ¾ cup dark brown sugar, ¾ cup granulated sugar, ½ cup dark corn syrup, 1 teaspoon kosher salt, and ¼ cup water until smooth. Pour an equal amount into each prepared pan and sprinkle half of the 2 cups chopped pecans into each pan.
- For the cinnamon-sugar filling, melt 1½ cups unsalted butter in a microwave-safe bowl. In a medium bowl, whisk together 1 cup granulated sugar, 1 cup dark brown sugar, 3 tablespoons ground cinnamon, and 2 tablespoons apple pie spice. This mix will add delightful flavor to the buns.
- Take one half of the dough and place it on a lightly floured surface. Knead it about 5 times until smooth. Roll it out into a large rectangle, about ⅓-inch thick, letting it rest if it pulls back. Make it approximately 18×15 inches, but the thickness is more critical than the exact size.
- Brush 12 tablespoons of melted butter evenly over the rolled-out dough. Sprinkle half of the cinnamon-sugar filling over it, leaving a ½ inch border along the edges.
- Starting from the long edge closest to you, roll the dough tightly into a cylinder. Pinch the seam to seal and place the cylinder with the seam side down. Trim the ends to neaten them.
- Use waxed dental floss to cut the dough into rolls, about 1½ inches thick. Slide the floss underneath the dough, cross the ends over each other, and pull to slice through. If you don’t have floss, a serrated knife works too!
- Transfer the rolls, cut-side down, to the prepared pans, ensuring there’s ½ inch space between each roll.
- Cover the rolls with plastic wrap and let them rise until they’re puffy, about 45-90 minutes.
- Preheat your oven to 350°F. Place a rimmed baking sheet lined with foil on the lowest rack to catch drips.
- Once the rolls have risen, remove the wrap and bake them for 30-35 minutes, or until they’re golden brown and the internal temperature hits 200°F. If they’re browning too quickly, cover them loosely with sprayed foil.
- After baking, let the rolls cool for about 5 minutes. Carefully invert them onto a large serving plate, being cautious of the hot glaze.
- Allow the rolls to cool for another 5-8 minutes before serving warm.
Things Worth Knowing
- Use the right yeast: It’s crucial to use active dry yeast, not instant yeast, for this recipe.
- Control the temperature: Ensure your water is at the right temperature to activate the yeast. Too hot or too cold can hinder the process.
- Don’t rush the rise: Allow the dough enough time to rise fully. This will result in light and airy buns.
- Cut dough properly: Using waxed dental floss for cutting ensures clean edges and prevents squishing the rolls.
Customization Ideas
There are so many ways to put your spin on Sticky Buns. Here are some ideas to get you started!
- Add dried fruit: Consider incorporating raisins or cranberries into the filling for an added burst of flavor.
- Experiment with nuts: Try using walnuts or almonds in place of pecans for a different texture and taste.
- Make it a chocolate treat: Add chocolate chips to the filling for a decadent twist.
- Use different spices: Swap out the apple pie spice for pumpkin pie spice for a seasonal flavor.
- Drizzle with icing: After baking, drizzle a simple icing made of powdered sugar and milk over the buns for extra sweetness.
- Make mini buns: Roll smaller pieces of dough into tiny buns for bite-sized treats perfect for sharing.
Serving Ideas for Sticky Buns
Serving Sticky Buns is as delightful as making them! Here are some suggestions to create the perfect experience:
- Brunch Delight: Serve these warm Sticky Buns fresh out of the oven at your next brunch get-together. Pair them with freshly brewed coffee or tea.
- Family Gatherings: They make a wonderful addition to family gatherings or holidays, creating a cozy atmosphere that everyone enjoys.
- Snack Time: Perfect for a midday snack, you can cut them into smaller pieces for easy sharing and enjoyment.
- Seasonal Treat: Highlight these buns during the fall season, as their warm spices align beautifully with autumn flavors.
- Storage Tips: Leftover buns can be stored in an airtight container at room temperature for a few days. Reheat in the microwave for a few seconds before serving.
- Freezing: These buns freeze well! Wrap them tightly before placing them in the freezer for later enjoyment.
FAQ
Conclusion
The beauty of Sticky Buns lies in their warm, gooey goodness and the memories they create. Baking them is not just about enjoying a sweet treat; it’s about the joy of bringing people together around the table. I encourage you to try making these delicious buns at home. You’ll be rewarded with a delightful dessert that can brighten anyone’s day!
Sticky Buns
Ingredients
Equipment
Method
- Lightly whisk the yeast and ¼ cup warm water in a liquid measuring cup. Let stand for 5 minutes.
- In the bowl of a stand mixer fitted with the paddle attachment, beat the yeast mixture, remaining 1 cup warm water, 2 cups of flour, eggs, melted shortening, sugar, and salt together. Beat for 2 minutes, or until the mixture starts to form a soft dough.
- Slowly add enough of the remaining flour (usually about 2½-3 cups more) and mix just until it is incorporated.
- Spray (or butter) the inside of a glass bowl with nonstick spray, then place the dough inside, flipping to coat the ball. Cover the bowl, place it in a proofing oven or warm place, and allow the dough to rise (it should double in size) for about 1-1½ hours.
- After the dough has risen, punch it down, cover, and refrigerate it for at least 8 hours or overnight.
- When ready to make the rolls, remove the dough from the refrigerator, punch it down again, and divide it in half. Cover the dough loosely with plastic wrap to keep it from drying out.
- Spray two 9-inch baking pans or cake pans with nonstick spray.
- Make the pecan topping while the dough rests on the countertop. In a small medium bowl, whisk the melted butter, granulated sugar, brown sugar, corn syrup, salt, and water together until the mixture is smooth.
- Pour an equal amount of the pecan topping into the prepared pans (about 348 grams per pan). Sprinkle half of the chopped pecans onto the pecan topping.
- Make the cinnamon sugar filling before rolling out the dough. Melt 1½ cups (3 sticks) of butter in a microwave safe bowl. Set aside. In a medium bowl, whisk the sugars, cinnamon, and pie spice together. Set aside.
- Place half of the dough on a lightly floured work surface and knead it about 5 times to smooth it out. Roll the dough into a large rectangle, ⅓-inch thick, allowing it to rest periodically until it stops pulling back.
- Brush 12 tablespoons of melted butter evenly over the dough. Sprinkle with half of the cinnamon-sugar filling, leaving a ½ inch border around the dough without cinnamon sugar.
- Beginning at the long edge nearest you, roll the dough (not too tightly) into a cylinder. Pinch the long seam to seal it and position the cylinder so the pinched seam is down. Trim off about ½ inch of dough on each end of the dough cylinder.
- Use waxed dental floss to cut the dough into rolls, about 1½ inches thick.
- Transfer the rolls, cut-side down, to the prepared pan with ½ inch between each roll.
- Cover the rolls with plastic wrap and let rise until rolls are puffy, about doubled in size, and touching each other, 45-90 minutes.
- Preheat oven to 350°F. Cover a large, rimmed baking sheet with foil and place it on the lowest rack in the oven to catch any drippings.
- Once the rolls have risen, remove the plastic wrap and place the rolls in the oven. Bake for 30-35 minutes, or until the internal temperature registers 200°F on an instant-read thermometer.
- Remove from the oven and let the rolls cool for 5 minutes.
- Very carefully invert the rolls onto a large serving plate (a plate larger than the baking pans). Be very careful when inverting the rolls – the glaze (at the bottom of each pan) is extremely hot and gooey at this point.
- Allow the rolls to cool for about 5-8 minutes before serving.
Notes
- Use two, round 9-inch baking pans: This ensures the best results.
- Generously spray the pans: This prevents sticking!
- Active dry yeast: Make sure to use it, not instant, for proper activation.
- Thickness of dough: Roll out to ⅓-inch thick for optimal results.
- Cut dough neatly: Waxed dental floss is the best method for cutting through the dough.