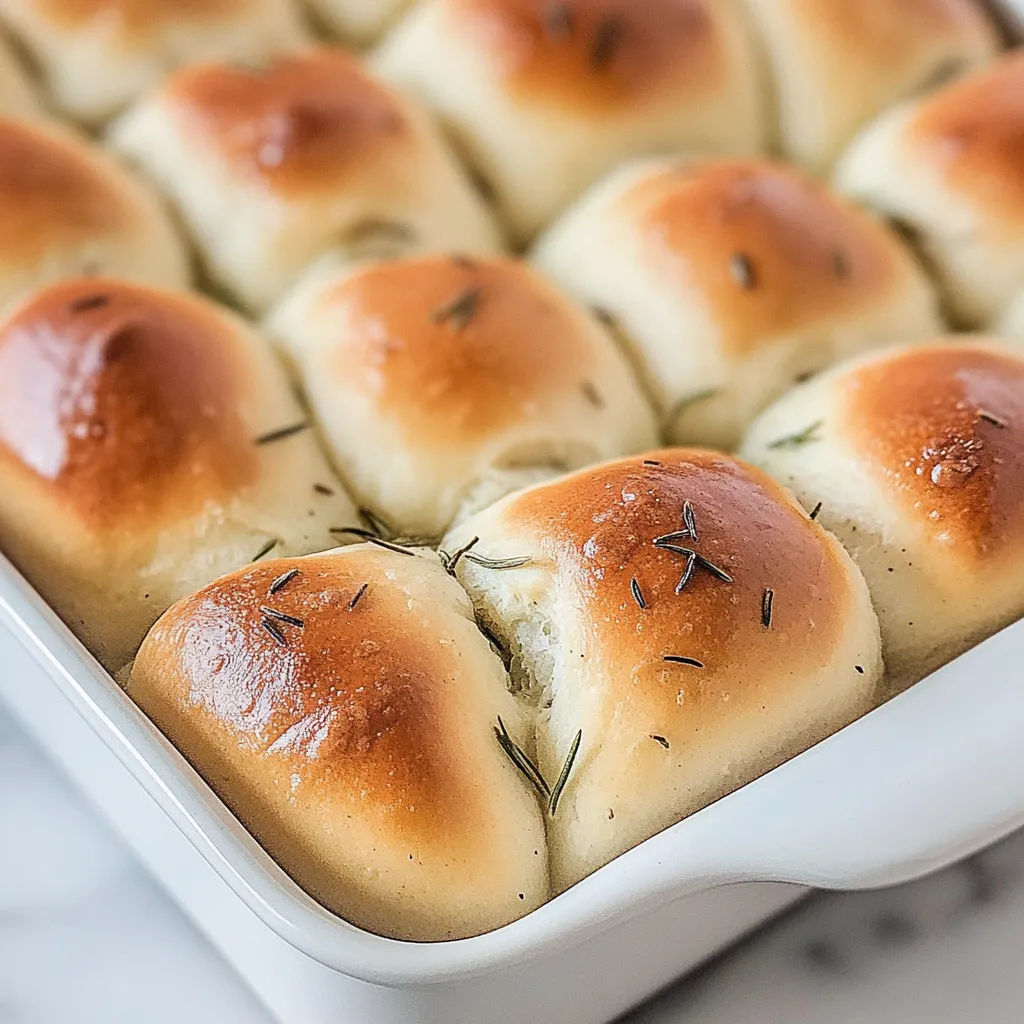
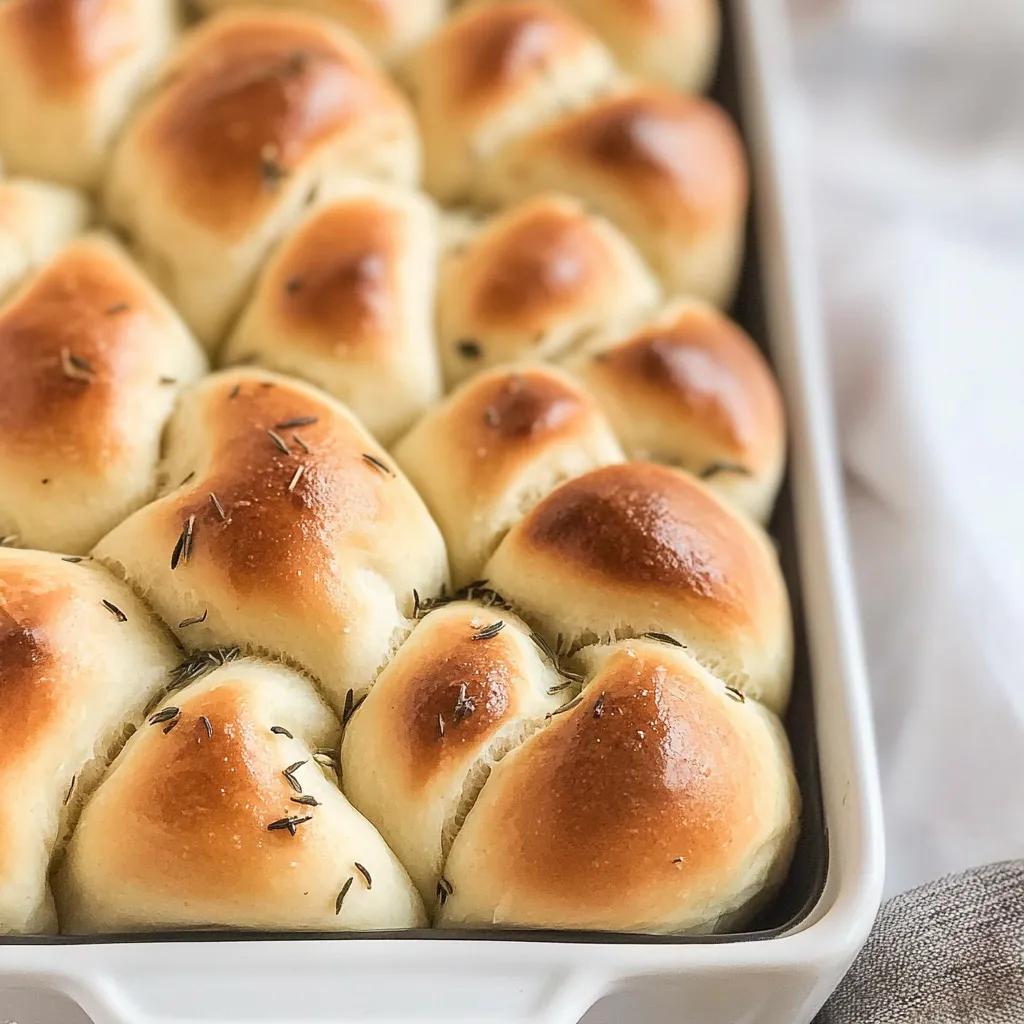
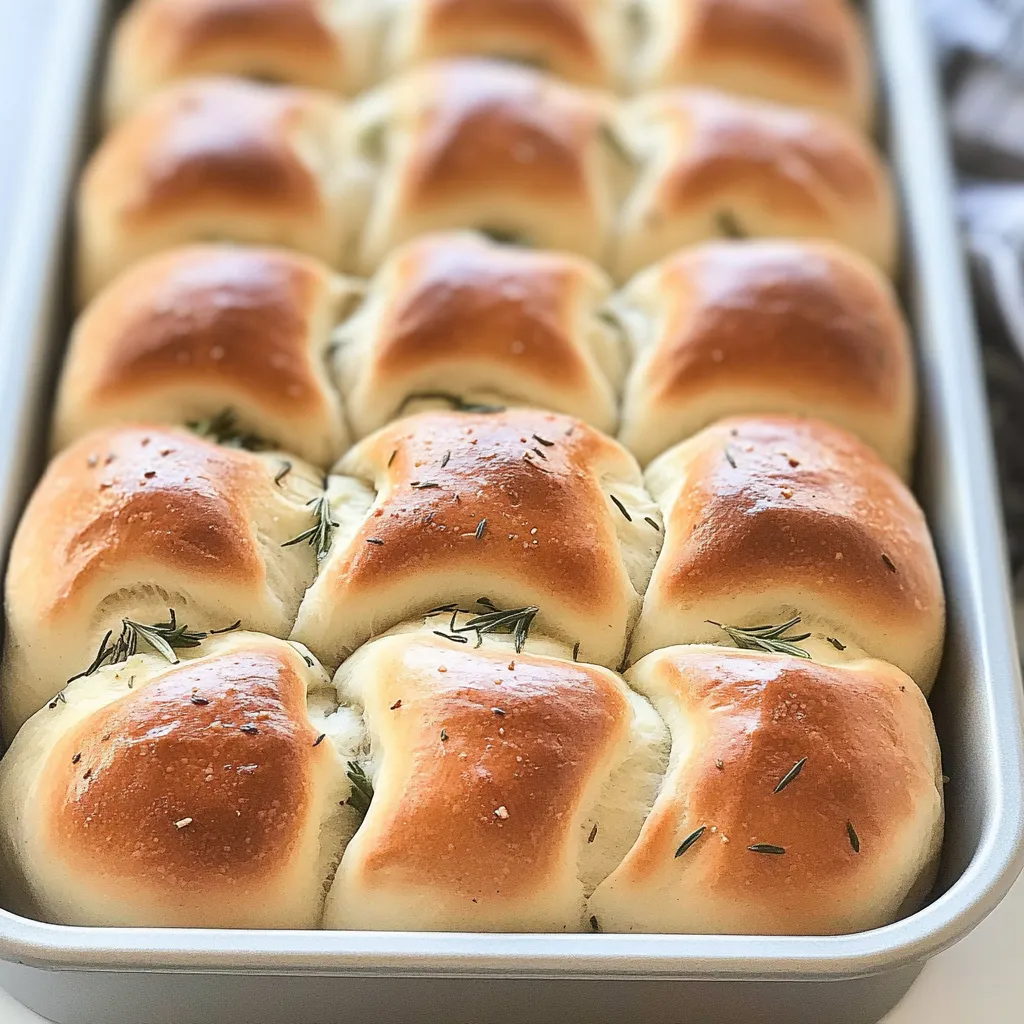
There’s something truly special about the aroma of freshly baked bread. The moment I take a batch of Roasted Garlic and Rosemary Cloverleaf Rolls out of the oven, my heart swells with warmth and nostalgia. These rolls are a staple in my kitchen, bringing together the rich, savory notes of roasted garlic and the earthy fragrance of rosemary. I remember the first time I baked them; I was hosting a dinner for friends, and the anticipation was palpable as I prepared this delicious addition to our meal. The golden crust and soft, fluffy interior set the perfect scene for laughter and shared stories. Every bite reminded me of family gatherings and the joy of homemade comfort food.
Recipe Snapshot
1 hr 57 mins
45 mins
72 mins
Medium
180 kcal
4 g
Gluten-Free, Low FODMAP
4 g
Frying Pan, Oven, Chef’s Knife, Mixing Bowl, Peeler, Baking Sheet
Why This Roasted Garlic and Rosemary Cloverleaf Rolls Stands Out
They Elevate Any Meal
The versatility of Roasted Garlic and Rosemary Cloverleaf Rolls is what truly makes them shine. Whether served alongside a warm bowl of soup or as a delightful companion to a roasted chicken, these rolls can elevate any meal into something memorable. Every gathering feels more special with fresh bread on the table. It’s like a warm hug for your guests, inviting everyone to relax and indulge.
Flavors that Dance Together
Roasting the garlic brings out its sweetness, mellowing the harsh edge typically associated with raw garlic. Coupled with the fragrant rosemary, it creates a harmonious blend that dances on your palate. The flavor combination is not just tasty; it’s transformational. You’ll find that every roll bursts with this delightful essence, making it impossible to eat just one.
Perfect for Sharing
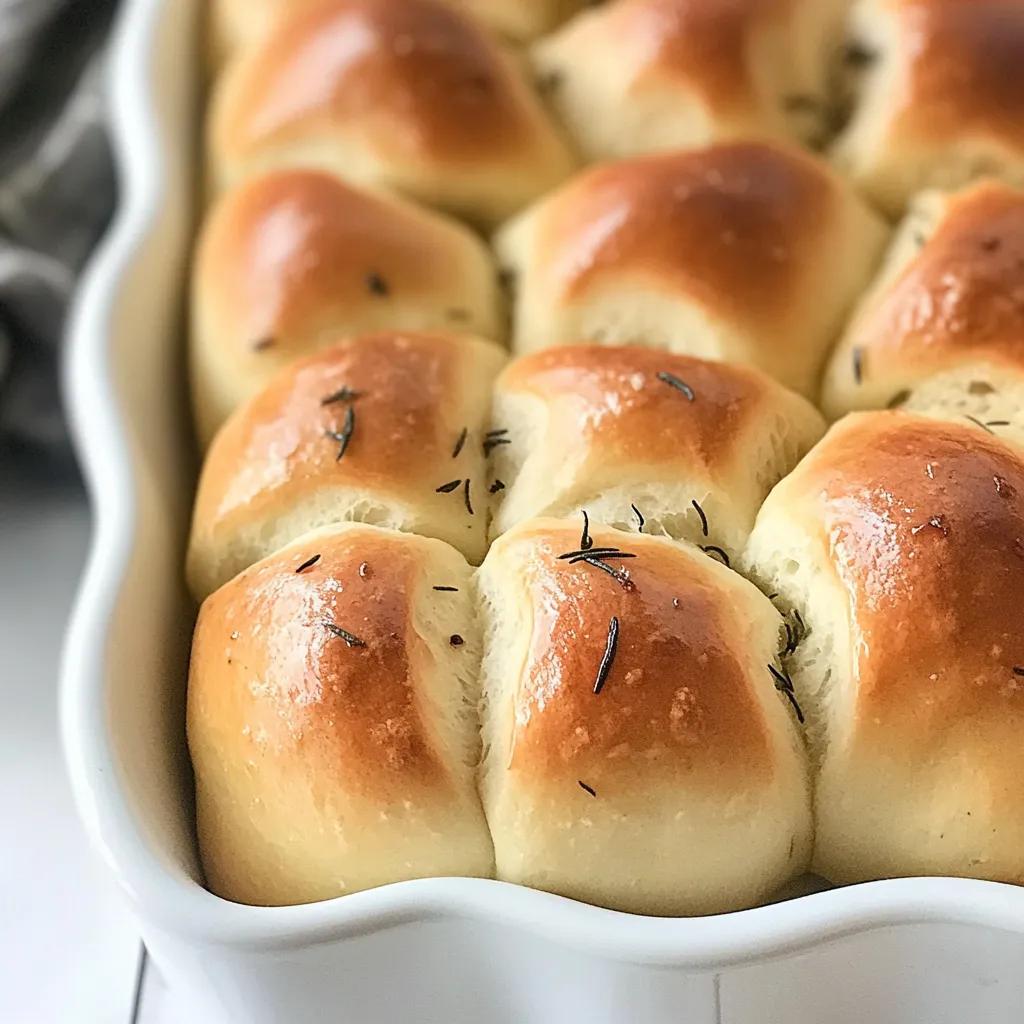
These rolls are crafted for sharing. Their cloverleaf shape adds a charming touch, making them not only delicious but visually appealing as well. They spark joy when pulled apart, and their soft texture makes them a delight to eat. I often find my family gathered around the table, each person tearing off a piece and sharing stories, creating a sense of community that is so essential in today’s busy world.
Easier Than You Think
Many shy away from baking bread, thinking it’s a long and complicated process. However, making Roasted Garlic and Rosemary Cloverleaf Rolls is surprisingly simple. With just a handful of ingredients and a little patience, you can create rolls that look and taste like they came from a bakery. It’s a wonderful way to impress your friends and family without spending all day in the kitchen.
Great for Meal Prep
These rolls freeze beautifully, making them an excellent option for meal prepping. You can bake a large batch and freeze them to enjoy later. When you’re ready for a comforting side dish, simply reheat them, and they’ll taste as good as fresh. This makes them not only a delightful treat but also a practical addition to your culinary repertoire.
Ingredient List for Roasted Garlic and Rosemary Cloverleaf Rolls
When it comes to making Roasted Garlic and Rosemary Cloverleaf Rolls, the combination of ingredients is what makes them stand out. Each component plays a crucial role, creating a perfectly balanced flavor and texture. The star players are the roasted garlic, which brings a sweet, mellow taste, and fresh rosemary, adding an aromatic touch. Together, they create a harmonious blend that elevates these rolls beyond the ordinary.
- 1 whole garlic head: This is the heart of the flavor. Roasting the garlic transforms it into a sweet, creamy delight that’s easy to blend into the dough.
- 1.25-ounce envelope yeast (or 2¼ teaspoons): Essential for leavening, yeast helps the rolls rise beautifully, creating that fluffy texture we all crave.
- 1 cup warm 2% milk (100 to 110 degrees F): The warmth of the milk activates the yeast, making it ready to work its magic.
- 3⅓ cups all-purpose flour, divided: This provides the structure of the rolls. Dividing the flour allows for adjustments while kneading.
- 2 tablespoons butter, softened: Adds richness and a slight sweetness to the dough, enhancing the overall flavor.
- 2 tablespoons granulated white sugar: A bit of sugar helps activate the yeast and adds a touch of sweetness to balance the flavors.
- 1 teaspoon salt: Salt enhances the flavor and controls the fermentation process of the yeast.
- 1 large egg: The egg contributes to the richness and helps bind the ingredients together.
- 1 tablespoon finely chopped fresh rosemary: Fresh rosemary adds a fragrant aroma and a burst of flavor that pairs perfectly with garlic.
- 1 tablespoon melted butter, for brushing the top: Brushing the rolls with melted butter before baking gives them a beautiful, golden finish.
How to Prepare Roasted Garlic and Rosemary Cloverleaf Rolls
Making Roasted Garlic and Rosemary Cloverleaf Rolls is a rewarding journey that ends with the most delightful aroma wafting through your kitchen. Follow these steps to create rolls that will impress everyone at your table.
- Preheat your oven to 350°F. This is the ideal temperature for roasting the garlic, allowing it to become soft and flavorful.
- Remove the white papery skin from the garlic head, making sure not to peel or separate the cloves. Wrap the whole head in foil, sealing it tightly. Bake for about 1 hour, then let it cool slightly.
- Once cooled, separate the roasted garlic cloves and squeeze to extract the creamy pulp. Discard the skins and set the garlic pulp aside.
- In a large mixing bowl, dissolve the yeast in the warm milk. Let it stand for about 5 minutes until it becomes frothy. This means the yeast is active and ready to help your rolls rise.
- Add the roasted garlic pulp to the yeast mixture, mixing well. Next, lightly spoon the flour into measuring cups and level it off. Add 1 cup of the flour, butter, sugar, salt, egg, and rosemary to the bowl. Beat the mixture with a mixer at medium speed until it’s combined.
- Gradually add in the remaining 2 cups of flour, mixing until the dough is smooth. Turn the dough out onto a floured surface and knead it until it feels smooth and elastic, which should take about 8 minutes. If the dough is sticking to your hands, add enough of the remaining flour, one tablespoon at a time, until it no longer sticks.
- Place the dough in a large bowl coated with cooking spray, turning it to coat the top. Cover it loosely with a clean dish towel and let it rise in a warm place, free from drafts, for about 1 hour, or until it has doubled in size. To test if it has risen enough, gently press two fingers into the dough; if an indentation remains, it’s ready.
- After the dough has risen, punch it down to release the air. Divide the dough into 12 equal portions. Then, divide each portion into 3 smaller pieces and shape each piece into a ball.
- Coat 12 muffin cups with cooking spray. Place 3 dough balls in each muffin cup, ensuring they are snug but not overly crowded. Cover the pans with a towel and let them rise again in a warm place for about 30 minutes, or until they have doubled in size.
- Preheat your oven to 400°F. Uncover the pans of dough and brush the tops with melted butter. Bake for approximately 12 minutes, or until the tops are golden brown. When they’re done, remove the rolls from the pans and serve them warm to your eager guests.
Things Worth Knowing
- Rising Temperature: The ideal temperature for the dough to rise is around 85°F. If your kitchen is cold, consider using the oven light to create a warm environment. This will help the yeast to work effectively.
- Texture Check: When kneading, the dough should feel smooth and elastic. If it’s sticky, it may need more flour; however, be careful not to add too much, as this can make the rolls dense.
- Roasting Garlic: To ensure even roasting, wrap the garlic tightly in foil. This traps steam and helps soften the garlic cloves, resulting in a sweeter flavor.
- Cooling: Allow the rolls to cool slightly after baking. This helps them set up better, making them easier to remove from the pan and ensuring they don’t become gummy.
Ways to Adapt This Recipe
If you’re looking to put your personal twist on Roasted Garlic and Rosemary Cloverleaf Rolls, here are some creative ideas to try out.
- Storage: To store leftovers, place them in an airtight container at room temperature for up to 2 days. For longer storage, refrigerate them for up to a week.
- Freezing: These rolls freeze well. After baking and cooling completely, wrap them tightly in foil and freeze for up to a month. To reheat, thaw them completely and warm in the oven.
- Variations: Experiment with herbs by adding thyme or oregano along with the rosemary for a different flavor profile.
- Cheesy Delight: Consider adding shredded cheese, such as mozzarella or cheddar, into the dough for a richer taste.
- Flavored Butters: Serve the rolls with flavored butters, like garlic herb butter or honey butter, for an extra special touch.
- Smaller Bites: For bite-sized versions, divide the dough into smaller portions to make mini cloverleaf rolls, perfect for parties.
Perfect Pairings for Roasted Garlic and Rosemary Cloverleaf Rolls
When it comes to serving Roasted Garlic and Rosemary Cloverleaf Rolls, the options are endless. Here are some great ideas to make your meal complete:
- Soups: These rolls pair perfectly with hearty soups like chicken noodle, minestrone, or creamy tomato basil. Their fluffy texture is perfect for dipping.
- Salads: Serve them alongside a fresh garden salad or Caesar salad. The contrast of warm rolls with a cool salad creates a wonderful dining experience.
- Main Dishes: They complement roasted meats, particularly chicken and turkey. The flavors of garlic and rosemary enhance the savory notes of the meat.
- Holiday Meals: They are an excellent addition to festive meals, adding a homemade touch to your Thanksgiving or Christmas dinner.
- Picnics: These rolls are great for picnics or potlucks, providing a satisfying side dish that everyone will enjoy.
- Snack Time: Enjoy them as a snack with a little butter or a drizzle of honey for a sweet treat any time of day.
FAQ
Conclusion
The Roasted Garlic and Rosemary Cloverleaf Rolls are truly a delightful addition to any table. They offer a blend of flavors that is both comforting and memorable. I encourage you to try this recipe; it’s perfect for gatherings, weeknight dinners, or even just to enjoy with a cozy bowl of soup. You’ll find that baking them brings warmth not just to your kitchen but also to your heart. So roll up your sleeves, embrace the process, and enjoy these delicious rolls with your loved ones!
Roasted Garlic and Rosemary Cloverleaf Rolls
Ingredients
Equipment
Method
- Preheat the oven to 350°F.
- Remove the white papery skin from the garlic head (do not peel or separate the cloves). Wrap the head in foil. Bake for 1 hour; cool slightly. Separate the garlic cloves; squeeze to extract the garlic pulp. Discard the skins.
- In a large bowl, dissolve the yeast in milk; let stand 5 minutes. Add the garlic pulp. Lightly spoon the flour into dry measuring cups; level with a knife. Add 1 cup of flour, 2 tablespoons of butter, the sugar, salt, egg and rosemary; beat with a mixer at medium speed until combined. Add 2 cups flour, and beat until smooth.
- Turn the dough out onto a floured surface. Knead until smooth and elastic (about 8 minutes); add enough of the remaining flour, 1 tablespoon at a time, to prevent the dough from sticking to your hands (the dough will feel tacky). If you have a large mixer with a dough hook, you may use that to do your kneading for you.
- Place the dough in a large bowl coated with cooking spray, turning to coat the top of the dough. Cover loosely with a clean dish towel and let rise in a warm place (85°F.), free from drafts, 1 hour or so until doubled in size. (Gently press two fingers into the dough. If an indentation remains, the dough has risen enough.)
- Punch the dough down. Divide the dough into 12 equal portions. Divide each portion into 3 pieces, and shape each piece into a ball. Coat 12 muffin cups with cooking spray; place 3 dough balls in each muffin cup. Cover and let rise in a warm place (85°F), free from drafts, 30 minutes or until doubled in size.
- Preheat the oven to 400°F.
- Uncover the pan of dough rolls, and brush the tops with 1 tablespoon melted butter. Bake for 12 minutes or until browned. Remove the rolls from the pans; serve warm.
Notes
- Freezing Instructions: These rolls freeze well. Bake, cool completely, wrap in heavy-duty foil, and freeze for up to a month. Thaw completely, and reheat in foil at 375°F. for 15 minutes or until warm.
- Tip for Rising: If you're in need of a warm place for rising, turn your oven on to 400°F. for 1 minute. Turn the oven light on too. Then turn off the oven (leave the light on) and place your rolls inside the warmed oven for rising. The light keeps it just warm enough for a good rise.